Payday Filing
Payday Filing Overview
Payday Filing is a New Zealand Government initiative to streamline business reporting obligations. Employers are able to report salary or wages, employment and KiwiSaver information to Inland Revenue (IRD) using the Inzenius Payday Filing Utility.
Each time an employer processes a Pay Run (Regular or Final), Users are required to submit an Employee Details and Employment Information Submission from the Inzenius Payday Filing Utility. This removes business obligations to manually submit the IR347 and IR349 Forms which were typically submitted once or twice per month.
Employees will be able to view their payment information in IRD online services, which they will access through their myIR account.
This guide will walk you through the steps to initialise the tool, clarify the submission types, navigate the Payday Filing process, and provide troubleshooting assistance. Note that there are requirements that must be completed prior to being able to utilise the Inzenius Payday Filing Utility. These will be outlined in the first section.
Note: The Payday Filing Payroll process is subject to change over time based on feedback from clients and updates to IRD requirements. If and when changes occur, all New Zealand clients will be provided with an updated copy of this manual and should adapt their internal processes accordingly.
Basic Payday Filing Requirements
The following section outlines the prerequisites that will enable utilisation of the Inzenius Payday Filing Utility.
Client Server Preparation
For clients to utilise the Inzenius Payday Filing Utility, there are two server requirements (outside of Utility installation):
- IP Address(es) of the Server(s) to be whitelisted by IRD – this is to be provided to Inzenius Support by your IT Department. Inzenius Support will then provide these details to IRD.
- Access to an Internet Browser* from the Server(s) Payday Filing will be submitted from.
Without these Server prerequisites, IRD will be unable to receive Payday Filing Submissions.
Note *: Internet Explorer is no longer supported. IRD’s Portal will not validate and/or function as expected when opened in Internet Explorer.
myIR Logon Detail
You will also need to know:
- Your business’ IRD Number(s)
- Your login details for myIR
Note: Please contact IRD if these credentials are unknown.
The IRD Number shown in the Inzenius Payday Filing Utility references the “Taxation Reference” of the Pay Run Schedule, or if this field is blank, will reference the “IRD Number” entered in the Business Unit Details. This number must match what is linked in your business myIR so it is a good idea to triple check this number is correct. Remember, this is the business’ IRD number, not your personal IRD number.
Once you have confirmed your business’ IRD number, you will need to give Inzenius permission to send your employment information to Inland Revenue.
To do this:
- Use your Business myIR account User ID and Password to log into the myIR Portal
- On the “Consent Management” page, click “Authorise” to authorise ‘Inzenius Payday Filing’
This is a one-off process per Business IR number to establish a link between Inzenius and Inland Revenue.
Note: Without having first established a link between Inzenius and Inland Revenue, you will be unable to submit any Payday Filing Forms through the Inzenius Payday Filing Utility. If you have not established a link between Inzenius and IRD, and you attempt to submit a Payday Filing Form, you will receive an error (“Error Code: 4”).
Business Unit
The following fields are required to be entered in the Inzenius Business Unit:
| Field | Notes |
|---|---|
| Name | Name should match Registered Business Name |
| IRD Number | A valid Employer IRD Number should be entered |
| Contact Person | Displayed in the Employment Information Form and will be used for IRD records. Please ensure this person is authorised to speak to IRD on behalf of the business regarding Payday Filing matters. |
| Email Address | Displayed in Employment Information Form and will be used for IRD records. Please ensure this is the email address of the Contact Person (above). |
| Telephone | Telephone Number entered as “Business” will be used. Please ensure this number is correct. |
| Address | Address entered as “Postal” will be used, if no Postal Address is entered, “Business” Address will be used. Please ensure this address is correct. |
Table #1: Business Unit – Required Details
Employee File
The following fields are required to be entered in Employee Files:
| Field | Notes |
|---|---|
| Employee Name | First Name and Last Name required; no special characters |
| Employee IRD Number | A valid IRD Number must be supplied; if the employee does not have an IRD number, enter all zeroes (i.e., ‘000000000’). |
| Tax Code | A Tax Code must be assigned to the Employee File. If no tax is to be paid by the employee, select “No Tax”. |
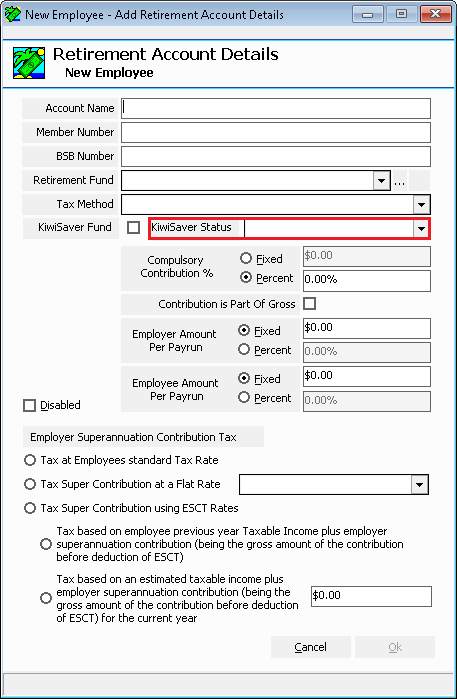
| KiwiSaver Status | A valid KiwiSaver Status is required to be assigned to the employee’s Retirement Fund Account. * |
Table #2: Employee File – Required Details
Note *: If no Retirement Account is setup in the Employee File, the employee will be submitted with a “NK” KiwiSaver Status indicating that they are not eligible for KiwiSaver.
Optional
For the purposes of Payday Filing, the following Employee File fields are considered optional:
| Field | Notes |
|---|---|
| Middle Name | Middle Name optional |
| Date of Birth | Date of Birth optional |
| Address | Address optional |
| Telephone Number | Day Phone Number/Mobile Number optional |
Table #3: Employee File – Optional Details
Child Support Deduction
Any Child Support Deductions will be reported to Inland Revenue through the Employment Information submission. Only Deductions with “Is Child Support” flagged will be considered as Child Support Deductions.
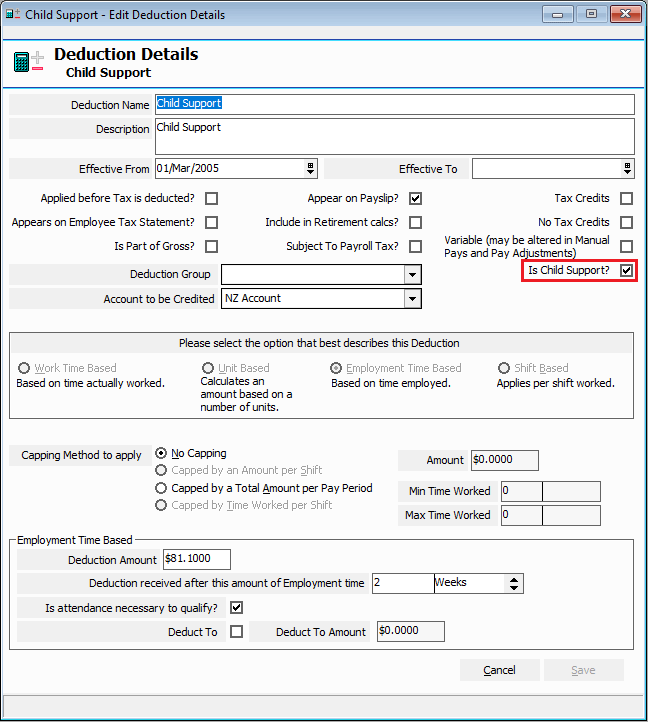
Figure #1: Inzenius ‘Deduction Details’ – “Is Child Support?” checkbox
Security
Only Users with access to the “Payday Filing” Function in their assigned Role will have access to launch and use the Inzenius Payday Filing Utility.
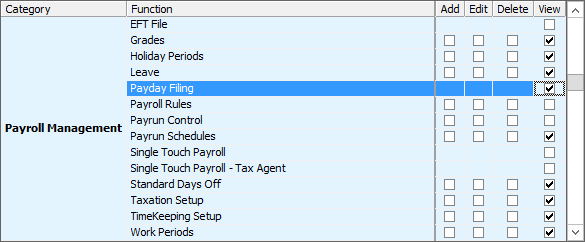
Figure #2: Inzenius Role – Payday Filing
Note: If the “Payday Filing” checkbox is flagged within the Role, all Users associated with that Role will be able to access the Inzenius Payday Filing Utility.
Checklist
The below checklist should be used to ensure all steps have been taken to ready your Inzenius Database for Payday Filing:
| No. | Step | Notes | Hint |
|---|---|---|---|
| 1 | Provide Inzenius Support with the required Server Details | Contact your IT Team/Department to assist with providing this information | |
| 2 | Download/be provided with Client Credentials from IRD | Ensure you have a Client Credential for each Employer IRD processed within Inzenius | Check each Pay Run Schedule “Taxation” field for IRD’s if you are unsure of which are being used for payroll purposes |
| 3 | Check required Business Unit details | ||
| 4 | Check required Employee File details | ||
| 5 | Check KiwiSaver Status assignment | Ensure that all employees with a KiwiSaver and/or Retirement Account have a valid KiwiSaver Status assigned | |
| 6 | Check optional Employee File details | ||
| 7 | Assign Child Support Deductions to applicable employee(s) | ||
| 8 | Check Role Security for “Payday Filing” Function | Ensure this is only applicable to Administrator Roles and/or Roles of Users who will submit Payday Filing forms |
Table #4: Payday Filing Preparation Checklist
IR Forms Submitted through Payday Filing
Employee Details
The Employee Details submission through the Inzenius Payday Filing Utility replaces the IR346 Form (for new employees) and IR348 Form (for departing employees) which notifies Inland Revenue (IRD) of your business’ new and/or departing employee(s).
- For new employees, an Employee Details submission must be made on or before the new employee’s first payday, per IRD’s reporting obligations timeframe.
- For departing employees, an Employee Details submission must be made on or before the departing employee’s last day, per IRD’s reporting obligations timeframe.
The Employee Details submission includes the following:
| Field | Required | Inzenius Data Output |
|---|---|---|
| Employee IRD | Required | The employee’s IRD Number entered in their Employee File. If the employee doesn’t have an IRD number, all zeros should be output (i.e., ‘000000000’). |
| Employee Name | Required | Full employee name Title (optional), First Name (mandatory), Middle Name (optional), Surname (mandatory for individuals). |
| Employee Name on EI Line | Required | This is the name (up to 20 characters) provided on the EI return. |
| Tax Code | Required | The Tax Code assigned to the Employee File. |
| Employment Start Date | Required | The latest Active Date configured in the Employee File. |
| Employment Finish Date | Optional | The latest Termination Date configured in the Employee File. |
| Employee Date of Birth | Optional | The Date of Birth configured in the Employee File. |
| Employee Address | Optional | Employee File “Default” Address |
| Employee Email Address | Optional | Employee File external email address. If no external email address, this will output the employee’s internal email address. |
| Employee Mobile Phone Number | Optional | Employee File Telephone Number marked as “Mobile” |
| KiwiSaver Status | Required | Either “AK”, “CT”, “NK” or “OK”. Please see Appendix C for further details |
| Employee KiwiSaver Eligibility* | Optional | Either “NE” for New Employee or “EE” for Existing Employee. Note that including this field is the equivalent of submitting a KS1 form. |
Table #5: Employee Details – Submission Data
Note *: Inzenius does not include the Employee KiwiSaver Eligibility Indicator as this is an optional field. If at any stage Clients are required to submit this information, please contact Inzenius Support for assistance.
Employment Information
Employment Information reporting is required to be submitted within 48-hours of each payday, per IRD’s reporting obligation timeframe. This is based on the day you pay your employees and may be weekly, fortnightly, monthly or more frequently if you have multiple paydays, or if you process ad hoc payments within Inzenius.
The Employment Information submission will ensure that the employee’s myIR is updated each Pay Period with their gross earnings paid within the period, PAYE, and KiwiSaver information (if eligible).
The Employment Information submission includes the following:
- Company Data: These are details about the company, most of which are derived from the Business Unit, however also includes Pay Run Schedule data and summary Pay Data also.
- Employee Details: These are details about the employee, all of which are derived from the Employee File (summarised version of the data included in the Employee Details submission).
- Pay Data: These are details about the payments made to each employee for the period submitted and are derived from the Pay Run(s) included in the Employment Information submission.
| Field Name | Inzenius Data Output |
|---|---|
| Company Data | |
| Period End Date | Outputs the last day of the pay date month (e.g., for all Pay Runs committed within the month of September, this will be 30/09/2021) |
| Total Gross Earnings | Total Gross Earnings in Pay Period |
| Total Earnings (not Liable ACC) | Total earnings not liable for ACC Earner’s Levy in Pay Period |
| Total Child Support Deductions | Total Child Support Deductions in Pay Period |
| Total Student Loan Deductions | Total Student Loan Deductions in Pay Period |
| Total KiwiSaver Employer Contributions | Total KiwiSaver Employer Contributions in Pay Period |
| Total KiwiSaver Deductions | Total KiwiSaver Deductions in Pay Period |
| Total ESCT Deductions | Total ESCT deducted in Pay Period |
| Total SLCIR Deductions | Total SLCIR Deductions in Pay Period |
| Total SLBOR Deductions | Total SLBOR Deductions in Pay Period |
| Employee Data | |
| IRD Number | The employee’s IRD Number |
| Employee Name | The employee’s Name shown on the EI Line (i.e., ) |
| Tax Code | The Tax Code assigned to the Employee File |
| Employment Start Date | The employee’s Active Date (if within the Pay Period) |
| Employment Finish Date | The employee’s Termination Date (if within the Pay Period) |
| Pay Period Start Date | The Start Date of the Pay Period |
| Pay Period End Date | The End Date of the Pay Period |
| Employee Pay Frequency | The employee’s Pay Run Schedule Frequency (WK = Weekly, FT = Fortnightly, MN = Monthly) |
| Employee Pay Data | |
| Gross Earnings | The employee’s Gross Earnings for the Pay Period |
| Earnings Not Liable ACC | Earnings not liable for ACC’s Earners Levy in Pay Period (if any) |
| Child Support Deductions | Child Support Deductions (if any) |
| Student Loan Deductions | Student Loan Deductions (if any) |
| KiwiSaver Employer Contributions | Net KiwiSaver Contributions (if eligible) |
| KiwiSaver Deductions | KiwiSaver Employee Deductions (if eligible) |
| SLCIR Deductions | SLCIR Deductions in Pay Period (if any) |
| SLBOR Deductions | SLBOR Deductions in Pay Period (if any) |
| ESCT Deducted | Employer Superannuation Contribution Tax (if any/eligible) |
Table #6: Employment Information – Submission Data
Payday Filing Process & FAQ
Before continuing, it is important to note the Payday Filing processing methods and clarify some definitions.
Processes for Payday Filing Payroll Submissions
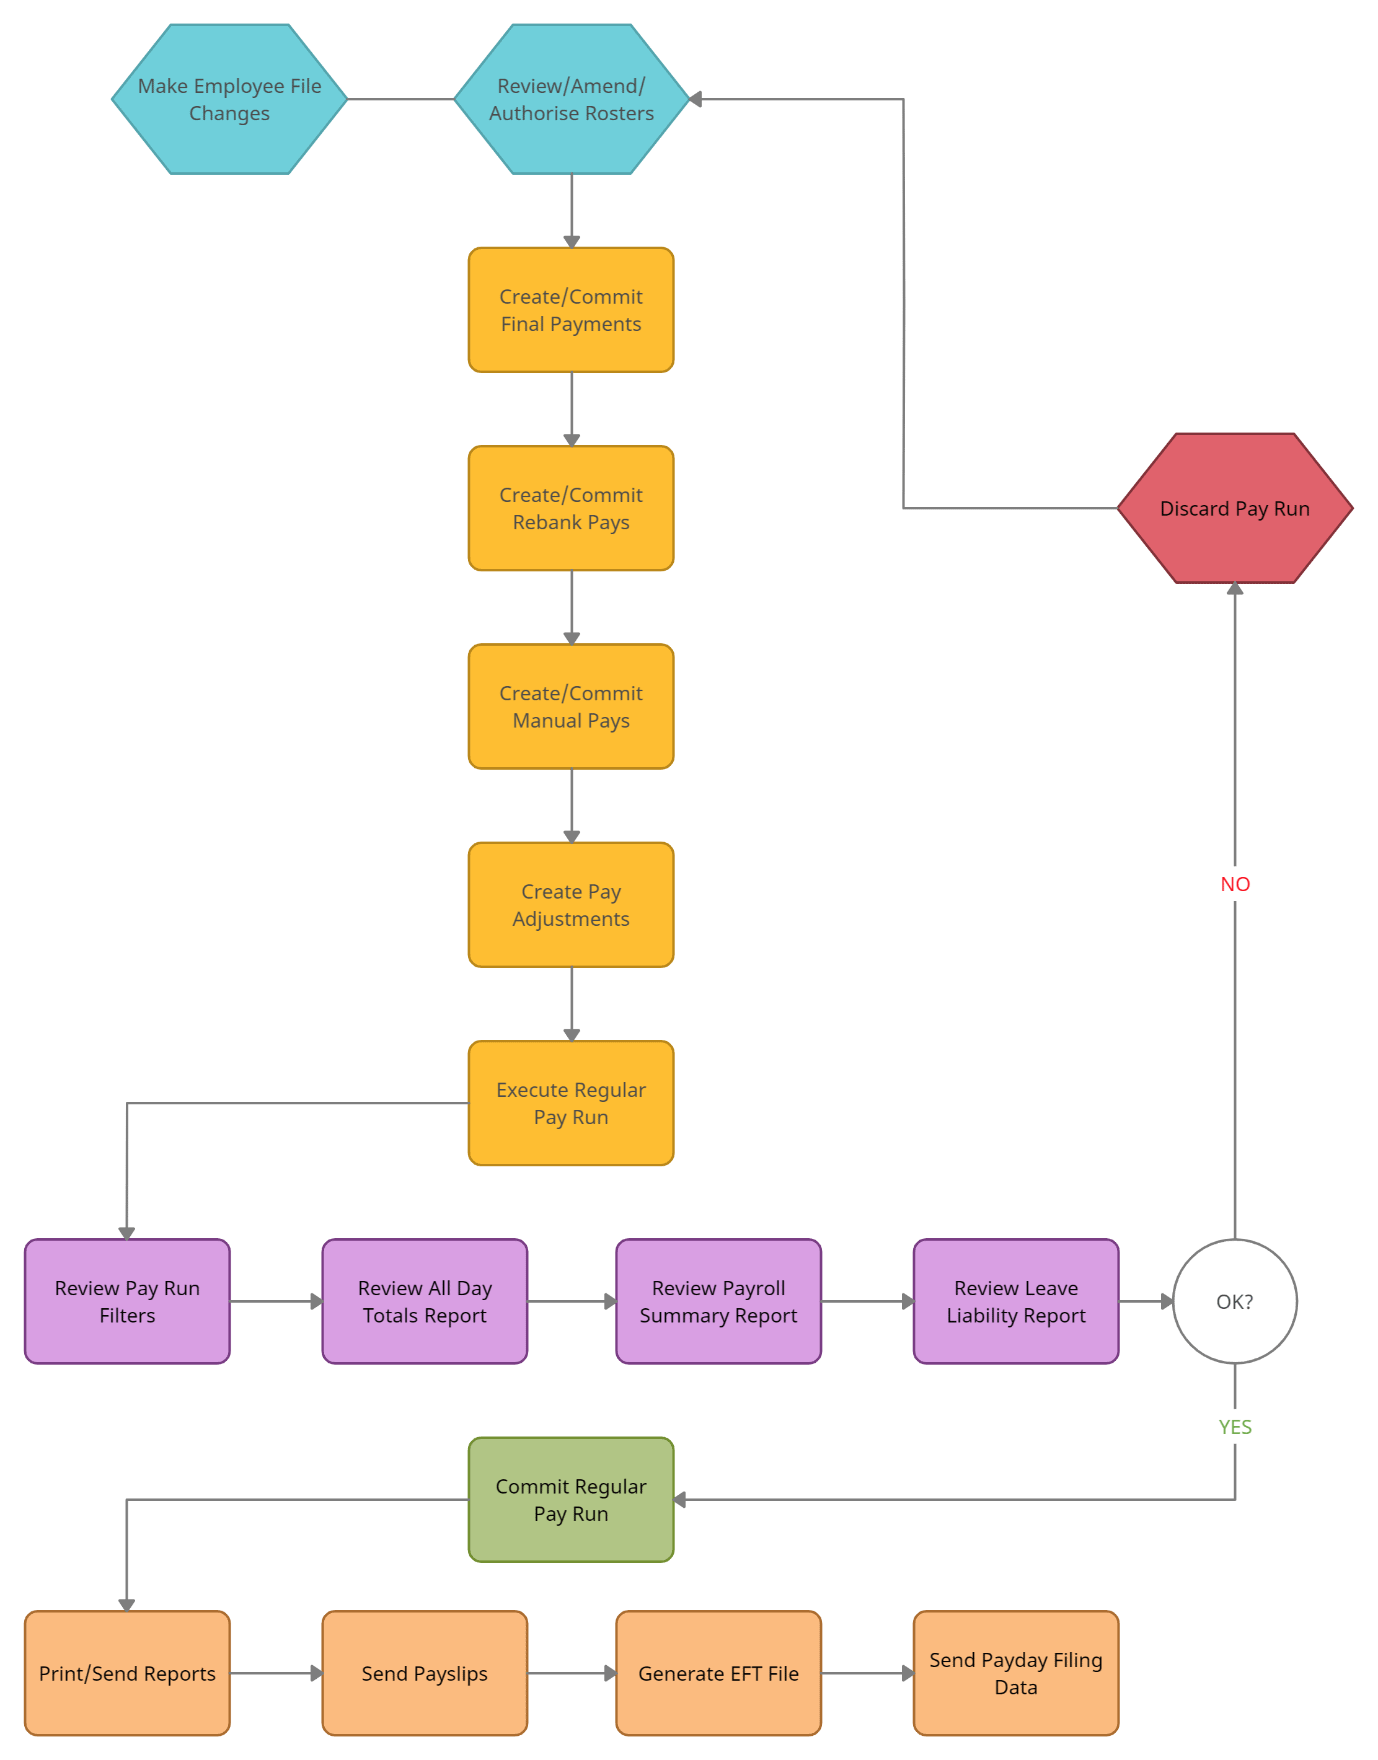
The below guide has been documented in a simplified flow chart attached to this document as Appendix A.
- Clients should be committed data for a single Pay Period following the flow chart within the ‘1.9.7 Inzenius Pay Run Controller Manual – New Zealand’. A copy of this flow chart is attached as ‘Appendix B’ in this document. Once the Regular Pay Run for a Pay Period has been processed, no Manual or Rebank Pays should be created for the same Pay Period.
- Payday Filing has been split into two categories:
- Regular Wages: includes Regular, Manual, and Rebank Pays
- An Employee Details Form should be submitted for the Regular Pay Run.
- An Employment Information Form should be submitted within 48-hours of committing/paying wages for the Pay Period.
- Termination Wages: includes Final Pays
- Final Pays are to be submitted separately, after the Regular Wages have been submitted.
- An Employee Details Form should be submitted for the Final Pay(s) to notify Inland Revenue that the employee has ceased employment.
- An Employment Information Form should be submitted within 48-hours of committing/paying Termination Wages.
- Regular Wages: includes Regular, Manual, and Rebank Pays
- The “Excel Report” button will generate an Excel Report for the Payday Filing Form “radio button” you have selected. Excel Reports can be generated at any time, but ideally should be generated before an Employment Information form is submitted so that data can be reviewed for inconsistencies prior to submitting events to Inland Revenue.

- The “Return File Amendment” option allows amendments to be made to a Pay Period you have already submitted an Employment Information submission for. For example, this option is utilised if you are wishing to amend an employee’s details, add a new employee and/or remove an employee from a previously submitted Pay Period.

- History of Payday Filing submissions can be viewed in “View History”. This is where Users will navigate to when reviewing IRD return messages for each submission. The IRD return messages will indicate the “Status” of the submission. Where the Status is “Error” or “Rejected”, error messages for each instance can be reviewed in detail.

Employee Details & Employment Information Submission Types
Employee Details and Employment Information include a large amount of data but can be broken down easily.
Employee Details Submission Types & Structure
There are three types of Employee Details submissions; (1) Create, (2) Update, and (3) Terminate; of which will be automatically determined by what is included in your submission:
- Create: The ‘Create’ Employee Details function is automatically triggered for employees who are being reported via the Inzenius Payday Filing for the first time.
- Update: The ‘Update’ Employee Details function is automatically triggered for employees who have had any modifications made to key fields in their Employee File since the last Employee Details submission they were included in.
- Terminate: The ‘Terminate’ Employee Details function is automatically triggered for employees that have been terminated since the last Employee Details submission they were included in.
The submission structure for each of these submission types differ slightly; the below Table outlines what is included in each of the Submission Types:
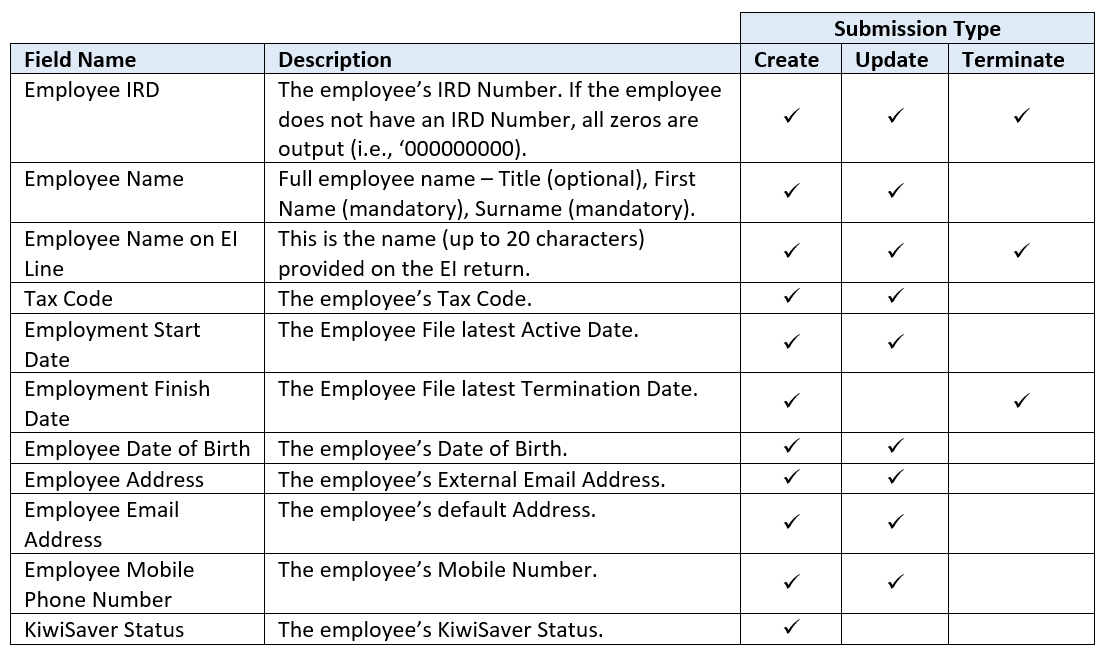
Table #7: Employee Details Submission Types & Structure
Employment Information Structure
There are two types of Employment Information submissions; (1) File, and (2) File Amendment:
- File: The ‘File’ submission type refers to the initial Employment Information submission made to IRD for the Pay Period.
- File Amendment: The ‘File Amendment’ submission type refers to any Employment Information Amendments submitted to IRD through the “Return File Amendment” window.
The submission structure for each of these submission types differ slightly. The key difference between the ‘File’ type and ‘File Amendment’ type is the inclusion of the following details:
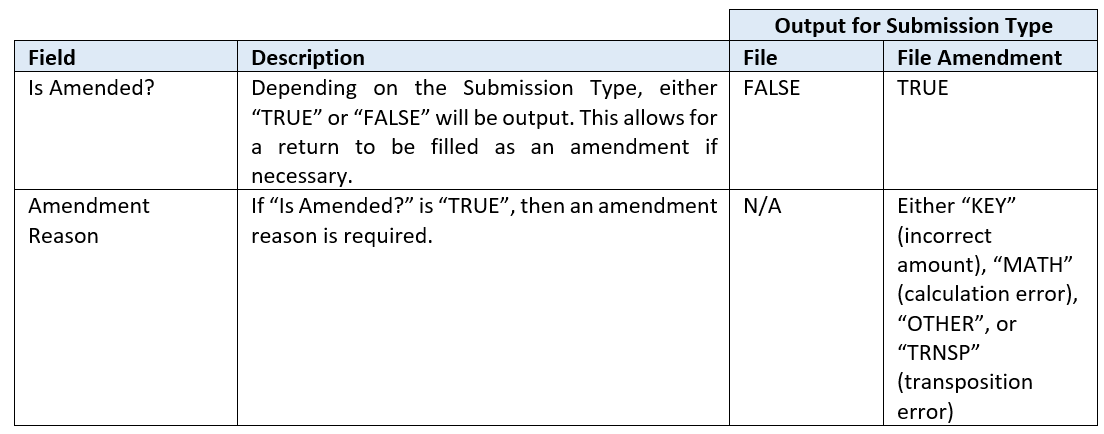
Table #8: Employment Information Submission Types & Structure
Logging in to the Payday Filing Utility
Launching Utility
The Inzenius Payday Filing Utility is typically located in the Inzenius Directory (‘C:\Program Files (x86)\Inzenius\Inzenius Payday Filing’ or ‘C:\Program Files\Inzenius\Inzenius Payday Filing’). However, Clients/Inzenius Support may have created Desktop Shortcuts.
When launching the Payday Filing Utility, the login screen will appear. This screen will display all current available databases, along with the name, location/server and Business Unit of each Database.
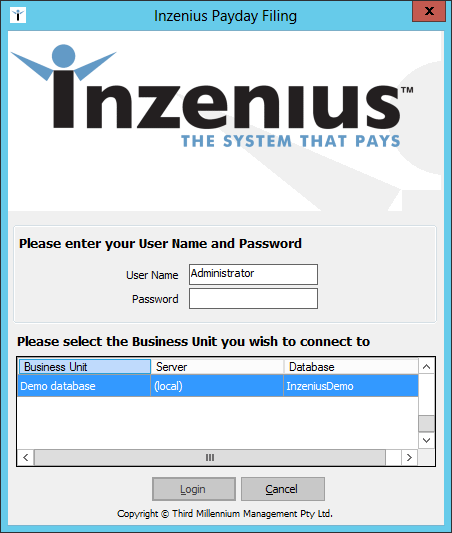
Figure #3: Inzenius Payday Filing Utility
Note: Your credentials will be the same as those utilised to log in to Inzenius Labour Logistics. The User’s assigned Role is required to have the “Payday Filing” function flagged in order to access this Utility.
Filtering & Loading Pay Runs
When first connecting to the Utility, the Payday Filing screen will be launched. Here, Pay Runs can be loaded for submission and Payday Filing Submission History can be reviewed.
Loading Pay Runs for selection is a two-part process where both the Pay Run Filter dates and Pay Run Schedule selection is required.

Figure #4: Inzenius Pay Run Filter
In the “Date From” and “Date To” calendar selection, choose the applicable parameter dates based on the Pay Run(s) Pay Period Start and End Dates.
Hint: You can type the date by clicking in the date (‘DD’) field and typing the date. To move to the month (‘Mon’) field, press the right-hand arrow (‘>’) on your keyboard. Type the month using the number pad (e.g., ‘April’ = ‘04’ or ‘4’). To move to the year (‘YYYY’) field, press the right-hand arrow (‘>’) again and type the year. To move to the next field, select ‘Tab’.
The second step of loading Pay Runs is the Pay Run Schedule selection. Here, each active Pay Run Schedule within the selected Database will be depicted, along its corresponding IRD Number.
Note: The IRD Number is derived from the “Taxation Reference” field within the Pay Run Schedule configuration. If this field is blank, the Business Unit “IRD Number” will be depicted.
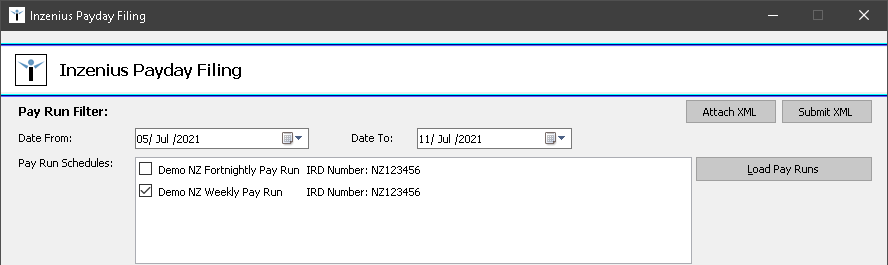
Figure #5: Completed Pay Run Filter
When the applicable Pay Run filter dates and Schedule have been selected, click the “Load Pay Runs” button. Once “Load Pay Runs” has been selected, the ‘Loaded Pay Runs’ section will display any Pay Runs that meet the applicable criteria.
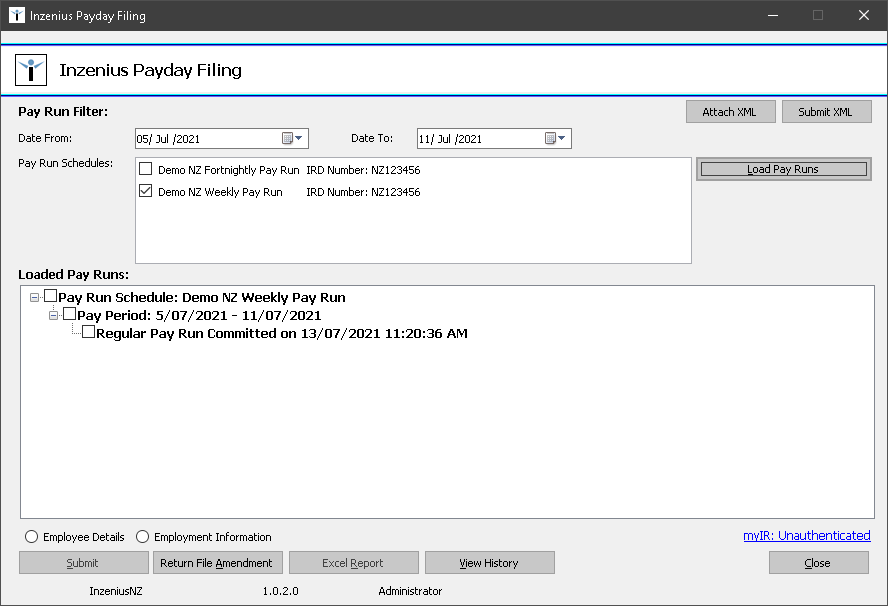
Figure #6: Loaded Pay Runs
Selecting Pay Runs for Submission
As previously noted, submission of Pay Runs falls under two categories: Regular Wages and Termination Wages.
Hint: Regular Wages encompasses all Regular, Manual, and Rebank Pay data which are grouped during submission. Termination Wages encompasses Final Pays, which can be selected individually for submission.
From the ‘Loaded Pay Runs’, select the applicable Pay Run(s) you wish to submit Payday Filing (Employee Details and/or Employment Information) for by flagging the checkbox next to either the Regular Pay Run or the Final Pay.
Note: If a Regular Pay Run is selected, all Manual and Rebank Pays for the same Pay Period will automatically be selected also. There is no option to unflag particular Manual or Rebank Pays
Note 2: Only one Pay Period should be submitted at a time. Under no circumstances should multiple Pay Periods be selected for submission

Figure #7: Selected Pay Run(s)
Selecting your Request Type
Once you have selected your Payday Filing parameters (see ‘Filtering and Loading Pay Runs’ and ‘Selecting Pay Runs for Submission’ for instructions), you will need to flag the type of Request you wish to submit first by clicking on the pertinent radio button.

Figure #8: Request Type selection – ‘Employee Details’ radio button selected
Verifying your Identity & Submitting Payday Filing
In order to submit your selected Request Type (Employee Details or Employment Information), you will first need to verify your identity through myIR.
To verify your identity, and that you are authorised to submit Payday Filing on behalf of the business, click on the “myIR” authentication link. This will open your default Web Browser and direct you to log into the myIR portal.
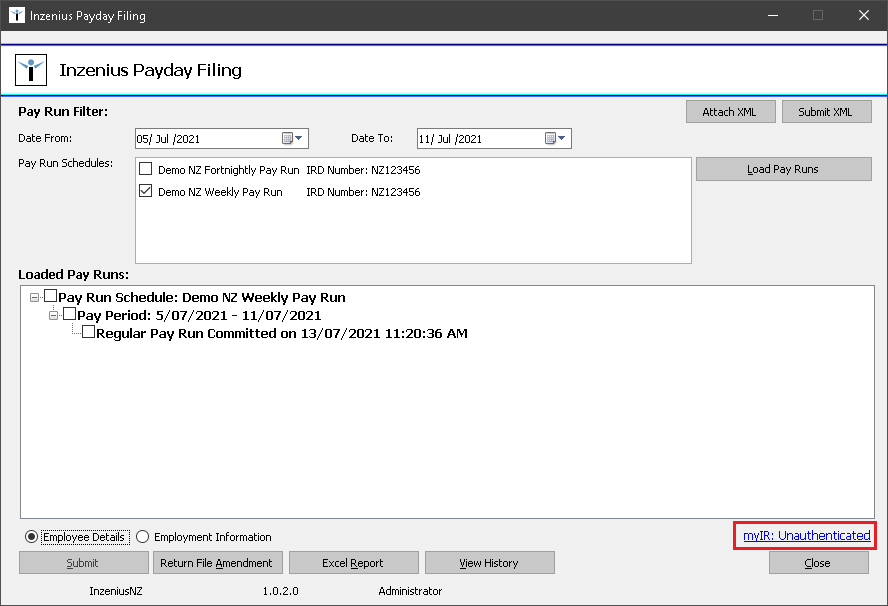
Figure #9: myIR Authentication Link – Unauthenticated
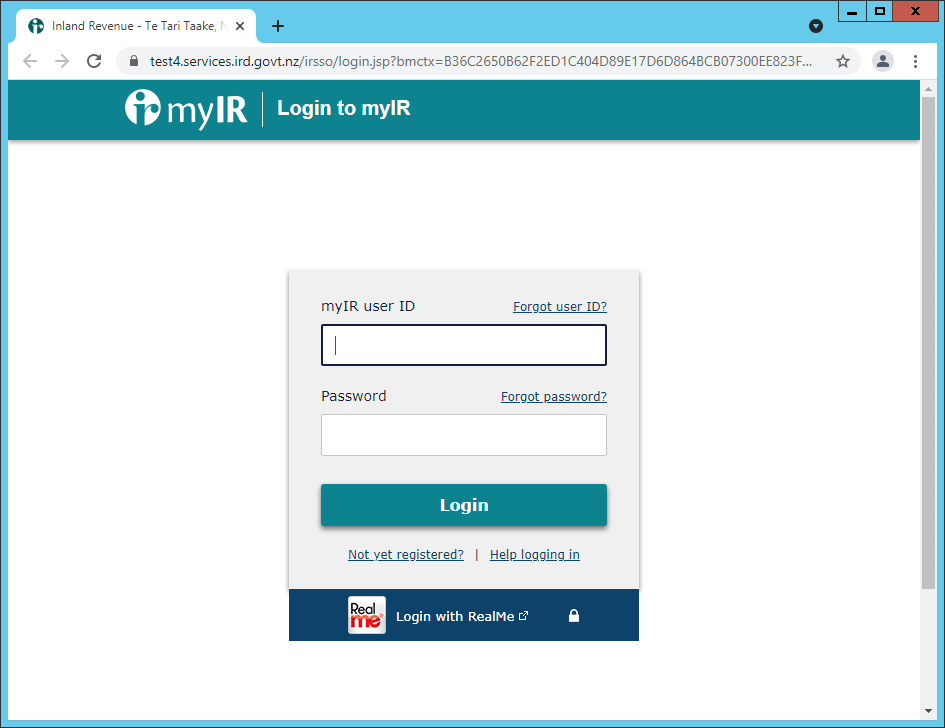
Figure #10: myIR Login Page
Enter your business myIR credentials to login. Once you have successfully logged in and authenticated your identity, you may close your web browser. The Inzenius Payday Filing Utility should now display “Authenticated”.

Figure #11: myIR Authentication Link – Authenticated
Once authenticated, you will then be able to select the “Submit” button. Click “Submit” to submit your selected Request Type to Inland Revenue. Repeat the submission process for the next Request Type to be submitted.
Note: Your session will remain Authenticated for ~5 minutes allowing you to submit Employee Details and Employment Information in succession. If ~5 minutes has elapsed, you will need to re-Authenticate your identity by selecting on the “myIR” Authentication Link.
Note: If your default web browser is set to ‘Internet Explorer’, myIR will not authenticate as Inland Revenue’s portal does not support this browser.
Return File Amendment
In the event you are required to amend an Employment Information submission, simply filter and load the Pay Run(s) you wish to amend, and select the applicable Pay Run Schedule (see ‘Filtering and Loading Pay Runs’ for instructions).
Once you have filtered and selected you Pay Runs to be amended, authenticate your identity through the “myIR” Authentication Link and select the “Return File Amendment” button.
![]()
The Return File Amendment window will retrieve the Employment Information Requests previously submitted that fall within your selected parameters. From here, you are able to select the Employment Information Submission relating to the Pay Period you wish to amend.
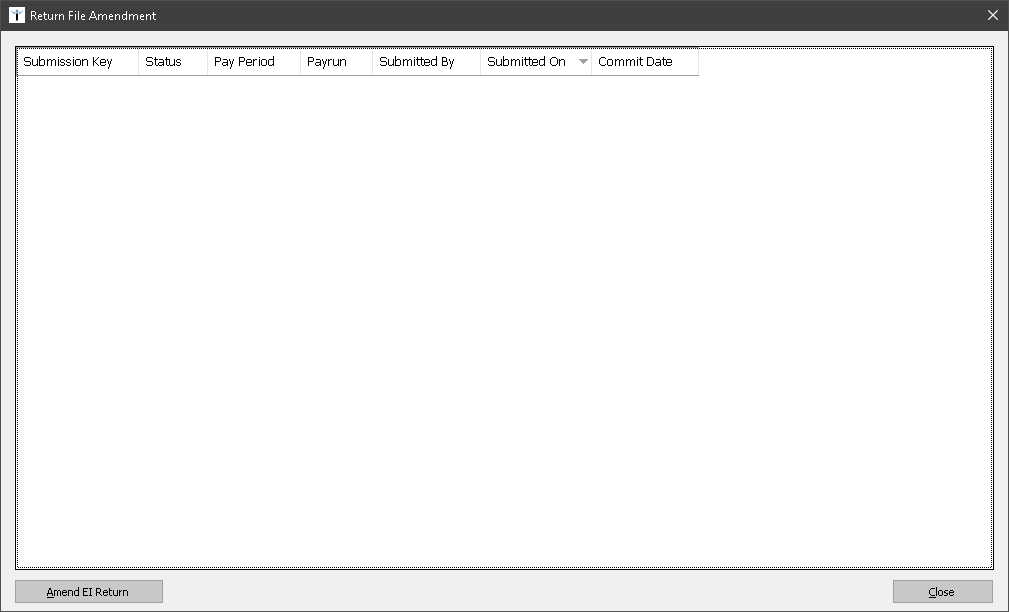
Figure #12: Return File Amendment Window
Upon highlighting/selecting the required Submission to be amended, select the “Amend EI Return” button.
![]()
Viewing History & Retrieving Submission Results
View History & Submission Details
The “View History” button will take you to the ‘Submission History’ screen, depicting all Pay Runs submitted through the Payday Filing utility. In this screen, “Employee Details” and “Employment Information” submissions are displayed within their respective tabs where you can view the statuses of each submission.
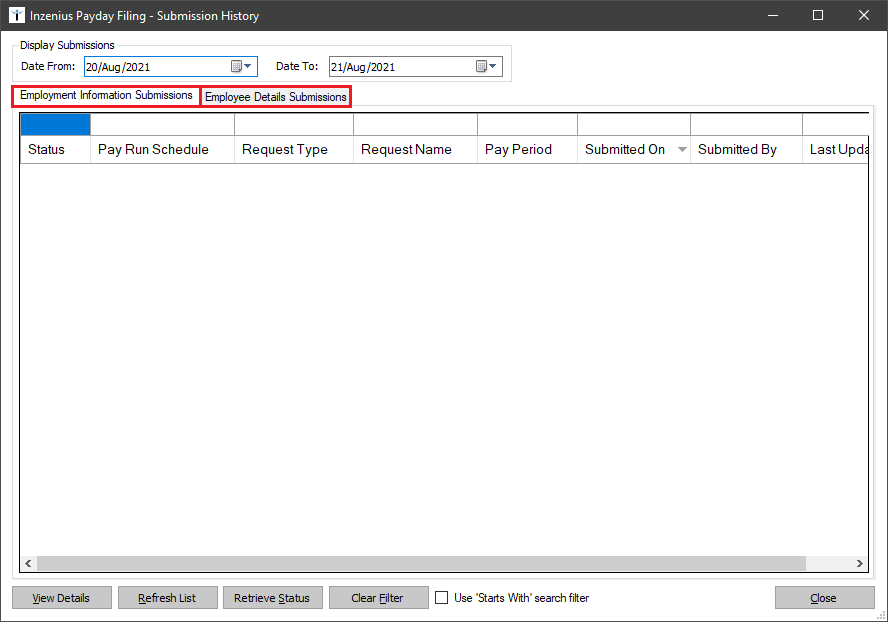
Figure #13: Submission History window – Submission Type tabs
In order to view your previous submissions, you will first need to change the “Display Submissions” date filter to the submission date. This filter will display Pay Runs submitted on/between your selected dates. If no submissions have been made between your selected date range, no history will be displayed.
By default, the “Date From” and “Date To” will display the current date and the next date, respectively. To change your Date Filters, you are able to manually type in each field (in “DD/MM/YYYY” format); alternatively, you are able to select the required dates within the pop-up calendar.

Figure #14: Submission History – Date Selection
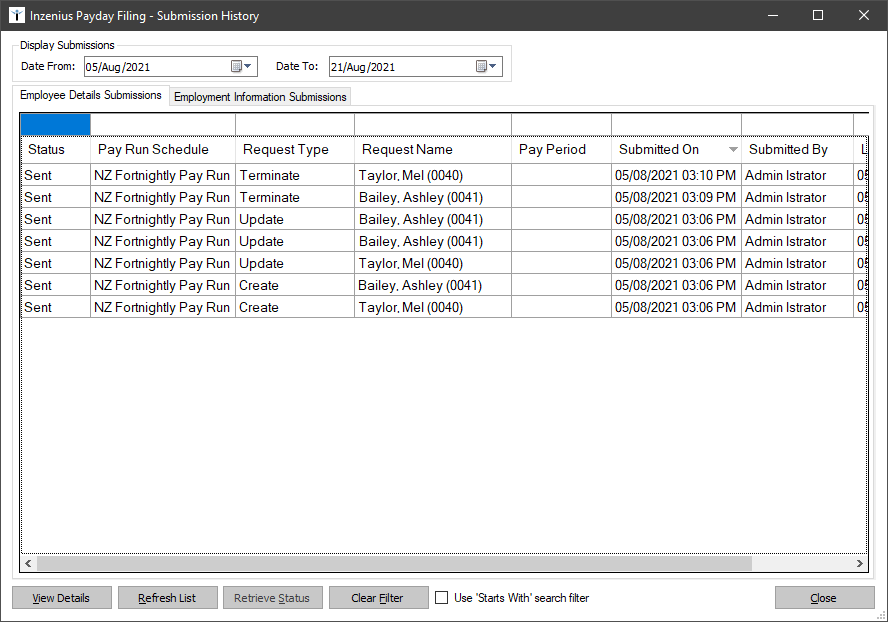
Figure #15: Submission History –Employee Details Submission History
| Column Name | Information Included |
|---|---|
| Status | The Status of the Submission |
| Pay Run Schedule | The name of the Pay Run Schedule Payday Filing was submitted for |
| Request Type | The Type of Request submitted |
| Request Name | The name of the Pay Run Payday Filing was submitted for; will depict ‘Regular’, ‘Manual – EmployeeName’, or ‘Final – EmployeeName’ |
| Pay Period | The Pay Period Payday Filing was submitted for (only output for Employment Information Submission Types) |
| Submitted On | The date and time Payday Filing was submitted |
| Submitted By | The First Name and Last Name of the User who submitted Payday Filing |
| Last Updated | The date and time Payday Filing was last updated; this updates upon submission and retrieval of any messages |
Table #9: View History – Column Details
Retrieve Submission Results & Status Codes
Employee Details Results & Status Codes
Users will not need to manually retrieve a Status for ‘Employee Details’ submissions; therefore the “Retrieve Status” button will be greyed out in the “Employee Details” tab of the ‘Submission History’ window.
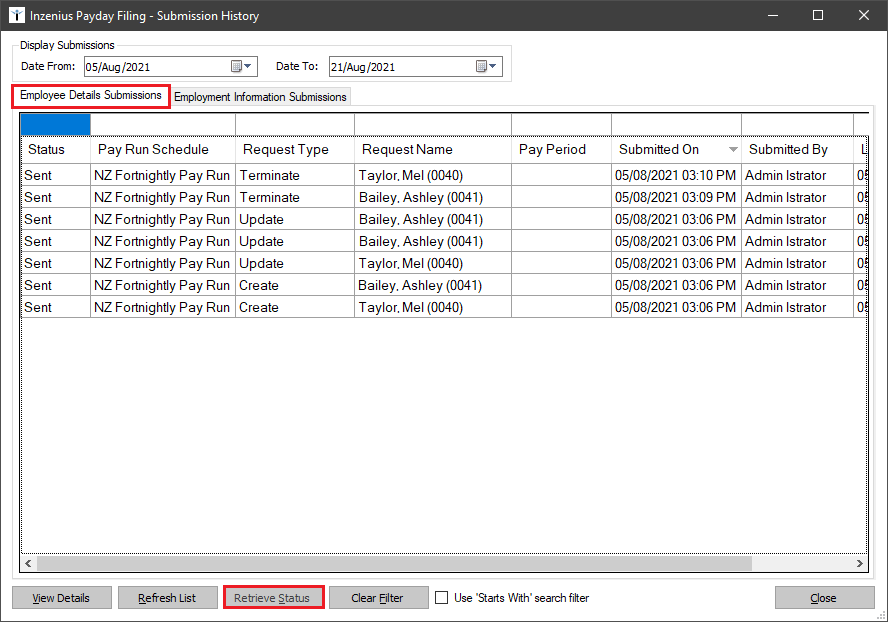
Figure #16: ‘Employee Details’ Submission History – “Retrieve Status” greyed out
If an Employee Details Submission has been successfully submitted to – and validated by – Inland Revenue, the Status in the ‘Event History’ screen will be depicted as “Sent”. To view and further details pertaining to a specific Payday Filing submission, Users are able to select the “View Details” button.
![]()
A pop-up window will then appear which will display the Status Message and/or Status Code related to the Submission, as well as any additional messages/information to assist with troubleshooting (where necessary).
Employment Information Results & Status Codes
Users will need to manually retrieve a Status for Employment Information submissions. The “Retrieve Status” button is only available to be selected for Employment Information submissions. In order to retrieve Submission Results, you must first ensure that your identity has been authenticated.
![]()
Note: Your session will remain Authenticated for 5 minutes allowing you to submit Employee Details and Employment Information in succession. If 5 minutes has elapsed, you will need to re-Authenticate your identity by selecting on the “myIR” Authentication Link.
Once you have authenticated your identity and a connection to IRD has been made, highlight the pending Submission you wish to retrieve Results for.
If an Employment Information Submission has been successfully submitted to and validated by Inland Revenue, the Status in the ‘Event History’ screen will be depicted as “Processed”. To view any further details pertaining to a specific Payday Filing submission, Users are able to select the “View Details” button. A pop-up window will then appear which will display the Status Code related to the Submission, as well as any additional messages/information to assist with troubleshooting (where necessary).
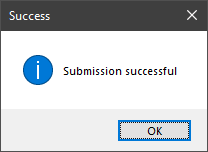
Figure #17: Submission History –View Details “Successful” Submission
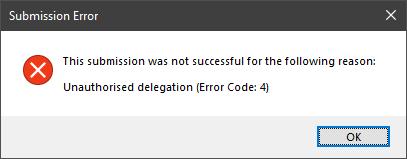
Figure #18: Submission History –View Details “Unsuccessful” Submission with Error Code
Inland Revenue (IRD) have provided a list of the potential Message/Response Codes that you may receive when submitting either an Employee Details Form, or an Employment Information Form.
Note: Please refer to ‘Payday Filing Status Codes’ for a detailed breakdown of the potential Status Codes provided by Inland Revenue.
Generic Gateway Status Codes
Generic Gateway Status Codes relate to the Utility’s ability to contact/connect to Inland Revenue’s Gateway/Servers. The following codes pertain to the validation of the Account/IR Identity attempting to submit Payday Filing to IRD.
As these codes are generic in nature, these may be displayed for either Employee Details or Employment Information Submissions.
| Code | Standard Message | Description | How to Correct |
|---|---|---|---|
| -1 | An unknown error has occurred | This error will be logged by IRD and evaluated the next business day | Contact IRD for assistance |
| 0 | Success | The submission was successful | No action required |
| 1 | Authentication failure | The link between Inland Revenue and Inzenius has been broken for the person who submitted the Employment Information | Check “Consent Management” in the IRD Portal and ensure that Inzenius has been authorised to submit employment information |
| 2 | Missing authentication token(s) | The link between Inland Revenue and Inzenius has been broken for the person who submitted the Employment Information | Check “Consent Management” in the IRD Portal and ensure that Inzenius has been authorised to submit employment information |
| 3 | Unauthorised access | The person making the call does not have access to make the request on behalf of the business. | Ensure that your myIR User ID has security access to submit employment information on behalf of the business |
| 4 | Unauthorised delegation | Access is not permitted for the requestor to perform this operation for the submitted Business IR Number | Contact Inzenius Support (support@inzenius.com) for assistance |
| 5 | Unauthorised vendor | The vendor provided is not authorised to use these suite of services (i.e., Inzenius has not been authorised by the Client). | Check “Consent Management” in the IRD Portal and ensure that Inzenius has been authorised to submit employment information. If the error persists, contact Inzenius Support (support@inzenius.com) for assistance |
| 20 | Unrecognised XML request | The XML submitted could not be recognised by IRD | Contact Inzenius Support (support@inzenius.com) for assistance |
| 21 | XML request failed validation | The XML structure did not meet IRD’s specifications | Contact Inzenius Support (support@inzenius.com) for assistance |
| (none) | Where no Status Code is output, this relates to an IRD/Gateway Service fault | Contact IRD for assistance | |
| Unauthorised | When maximum concurrency has been exceeded by the service provider this Status Code will be returned | Contact IRD for assistance | |
Table #10: Generic Gateway Responses
Generic Returns Status Codes
These Status Codes are specific to Employee Details Submissions only.
| Code | Standard Message | Description | How to Correct |
|---|---|---|---|
| 100 | Could not extract data from XML payload | The submission has reached IRD but contains invalid data | Contact Inzenius Support (support@inzenius.com) for assistance |
| 101 | The provided information was not specific enough to match with a single employment relationship | The employment relationship that is attempting to be updated does not exist | Contact Inzenius Support (support@inzenius.com) for assistance |
| 102 | The provided information was not specific enough to match with an employment relationship | This error can occur because the myIR account associated with the IRD number doesn’t have access to an ‘EMP’ account. | Ensure that your myIR User ID has security access to submit employment information on behalf of the business |
| 103 | The provided IRD Number was invalid | The provided IRD Number was invalid | Confirm and update the employee’s IRD Number in their Employee File |
| 106 | A relationship between this account and employee IRD already exists | A relationship between this account and employee IRD already exists | Contact IRD for assistance |
| 108 | A provided Tax Code was invalid | A provided Tax Code was invalid | Confirm and update the employee’s Tax Code assigned to their Employee File |
| 130 | The provided KiwiSaver Status is not valid | The provided KiwiSaver Status is not valid | Confirm and update the employee’s KiwiSaver Status in their Employee File |
| 138 | Employee must not have an ‘SL’ type Tax Code as they have no Student Loan, or they have a Student Loan exemption | Employee must not have an ‘SL’ type Tax Code as they have no Student Loan, or they have a Student Loan exemption | Confirm and update the employee’s Tax Code assigned to their Employee File. You may also wish to contact IRD to determine if the employee owes/is owed Tax |
| 139 | Employee must have an ‘SL’ type Tax Code as they have a Student Loan and do not have a Student Loan exemption | Employee must have an ‘SL’ type Tax Code as they have a Student Loan and do not have a Student Loan exemption | Confirm and update the employee’s Tax Code assigned to their Employee File. You may also wish to contact IRD to determine if the employee owes/is owed Tax |
| 140 | Employee Date of Birth cannot be in the future | Employee Date of Birth cannot be in the future | Check the employee’s Date of Birth in their Employee File and ensure that it is not a future date |
| 141 | Employee must have an ‘ND’ type tax code when using a zero IRD number | Employee must have an ‘ND’ type tax code when using a zero IRD number | Confirm and update the employee’s Tax Code assigned to their Employee File |
Table #11: Generic Status Codes
Appendix A
The Payday Filing Process (flowchart)

Appendix B
New Zealand Payroll Process (flowchart)
Appendix C
Your employee must be one of the four following KiwiSaver status types:
| >KiwiSaver Status | Applies to | |
|---|---|---|
| AK | Active KiwiSaver Member | Applies to employees who are not subject to automatic enrolment due to being a casual/temporary employee |
| CT | Casual/temporary employees | Applies to employees who are not subject to automatic enrolment due to being a casual/temporary employee |
| NK | Not eligible for KiwiSaver | When the employee is not eligible for KiwiSaver |
| OK | Opting into KiwiSaver | Where an existing employee is choosing to opt into KiwiSaver |
Appendix C: KiwiSaver Status Details
The “KiwiSaver Status” field is located in the Employee File ‘Retirement Account Details’ window. A KiwiSaver Status must be assigned to employee Retirement Accounts; if a User does not select a valid option from the drop-down menu, the Retirement Account cannot be saved.
Appendix C: KiwiSaver Status Status