The Employee Portal
Overview
This manual relates to version 2.0.2 of the Employee Portal. The version number can be viewed at the bottom of the Employee Portal web page.
The Inzenius Employee Portal allows employees to remotely view their Personal Information, Payslips, and PAYG Payment Summaries for previous Financial Years, as well as apply for Leave. Employees are also provided the opportunity to view and upcoming Shifts, and (if enabled) are able to accept or reject Shifts accordingly.
The Inzenius Employee Portal can be accessed through your computer/laptop, tablet and/or phone through Google Chrome, Microsoft Edge, and/or Mozilla Firefox.
Before gaining access to the Employee Portal, an Employer might ask an Employee to complete an Onboarding process which is covered in a separate Manual “Inzenius-Flare Employee Onboarding User Manual”
Note: While the Employee Portal may be accessed through different browsers, the aforementioned are the recommended Web Browsers to ensure full functionality within the Portal.
Logging In
To begin, open your preferred Internet Browser and type in the address provided to by your manager, Payroll or HR. Enter your Username and Password in the appropriate fields, and follow the prompts to verify your identity.
Note: Please contact you manager or Payroll to obtain your Username and Password if not already provided.

Figure #1: Employee Portal – User Credentials
Click the reCAPTCHA checkbox and follow the prompts to complete verification. Once confirmed you will then be able to login into the Employee Portal.
Figure #2: Employee Portal – reCAPTCHA successful
Employee Portal Overview
Below is a brief overview of the Menus and their submenus available in the Employee Portal.
| Menu | Sub Menu | Description |
|---|---|---|
| MY DETAILS | Personal Details | View and edit personal and emergency contact details |
| Leave Details | View leave balances | |
| Work Details | View various work details | |
| Upcoming Leave | View upcoming leave | |
| Bank Details | View and edit bank details | |
| Superannuation details | View and edit superannuation details | |
| Documents | Upload, view, and delete documents | |
| TIME & ATTENDANCE | Start and finish shifts and breaks | |
| SCHEDULE | View rosters on a monthly calendar | |
| LEAVE REQUEST | Apply for leave | |
| REPORTS | Payslips | View and download payslips |
| ETP Payment Summary | View and download ETP Payment Summaries | |
| PAYG Payment Summary | View and download PAYG Payment Summaries | |
| CONTACT | Contact managers or payroll | |
| USERNAME | Admin Dashboard | Only available to Admins used to access dashboard |
| Change Password | Change password for the Employee Portal | |
| Logout | Logout of Employee Portal |
Table #1: Employee Portal Overview
My Details
Personal Details and Next of Kin
Employees will be able to view their Personal Details, and Next of Kin Details (if any) which have been configured in their Inzenius Employee File.
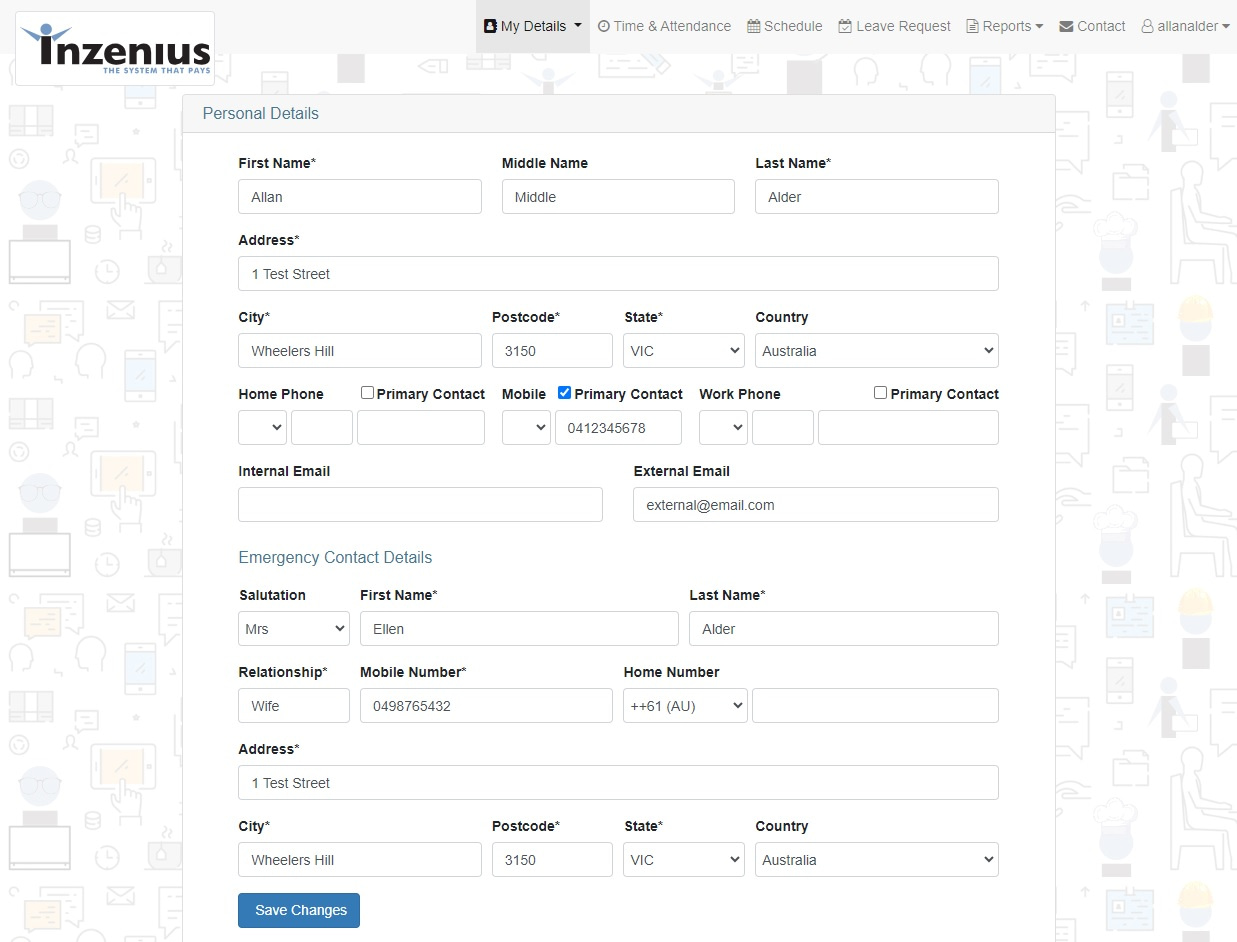
Figure #3: Personal Details and Next of Kin Details
If at any stage changes are made to the Personal Details Field, the “Save Changes” button will become active. Changes will flow through to Inzenius immediately upon saving changes.
![]()
Figure #4: “Save Changes” button
Where there are compulsory fields that have not been provided, Users will not be able to save changes until such time as details have been entered into the compulsory field. Any compulsory fields missing data will be marked indicated with a red box around the field.
![]()
![]()
Figure #5: Unable to save changes
Note: Employees will not be able to edit their Personal Details (unless security access has been flagged within the ‘Web Only’ User Role). Providing access to edit Personal Details fields are at the discretion of each Client.
Leave Details
The Leave Details page will display the Public Holidays associated with the employee’s Default Grade, as well as the employee’s available Leave Balance(s).
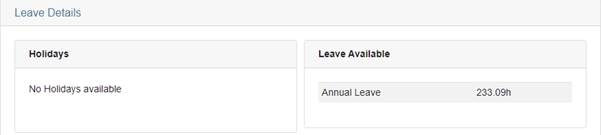
Figure #6: Leave Details screen
Note: Only Leaves that have been flagged to appear on employee Payslips will be shown in this screen.
Work Details
The Work Details page displays the employee’s Standard Work Times, Standard Days Off, Availability, Unavailability, and Qualifications. These fields are derived from the Employee File and/or their Default Grade.
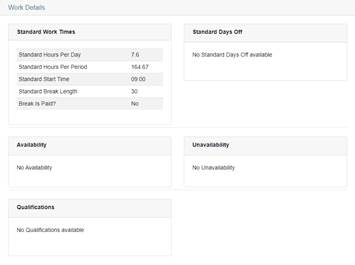
Figure #7: Work Details
Upcoming Leave
The Upcoming Leave page will display any upcoming Leave(s) that the employee has applied for/has been Rostered to.
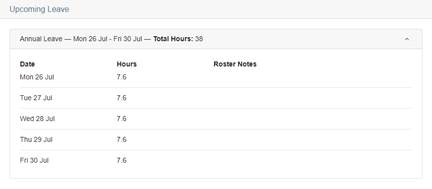
Figure #8: Upcoming Leave
Note: This page will only display Authorised Leave Rosters. No additional functions may be actioned in this page.
Bank Details
The Bank Details page will display the employee’s Bank Account(s) configured in their Inzenius Employee File. This will include their main/default Bank Account, and any secondary Bank Account(s).
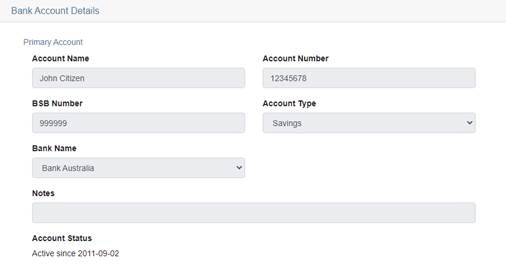
Figure #9: Bank Details
Note: Where a Secondary Bank Account has been configured in the Employee File, employees will be able to view the fixed amount or percentage of wages to be paid into their secondary account.
Note 2: Employees will not be able to edit any Bank Details within this page. Providing edit access to employee bank details are at the discretion of each Client.
Superannuation Details
The Superannuation Details page allows employees to view their Superannuation Account Details configured in their Inzenius Employee File. Here, they will see the Compulsory Super Contribution percentage configured (which is derived from the employee’s Default Grade), any Employer Additional Contribution configurations (percentage or fixed amount), and Employee Contributions/Salary Sacrifice (percentage or fixed amount).
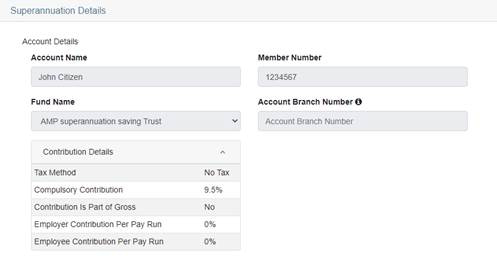
Figure #10: Superannuation Details
Documents
The Documents page allows employees to view any documents Payroll/HR may have uploaded into the employee’s Inzenius Employee File. Where no document has been uploaded “No documents available” will displayed.

Figure #11: Documents
Where employees have been provided security access to add Documents, they will be able to upload documents of any File Format up to 10MB in size (e.g., PDF, DOC, JPG, etc.).
To upload a file, simply select “Upload New Document”. Within the ‘New Document Upload’ window, choose the file from your computer/laptop to be uploaded. Here, Users will then need to enter the appropriate details in the additional Upload fields:
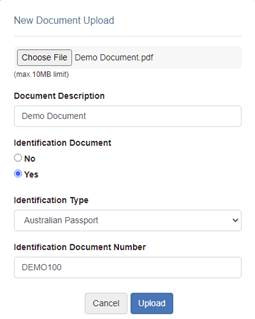
Figure #12: Documents – Upload Document
| Upload Field | Description | Required? |
| Document Description | Freeform text field where Users must provide a short description of the file being uploaded | Yes |
| Identification Document | Select “Yes” if the file being uploaded is utilised to verify the employee’s identity, otherwise select “No” | Yes |
| Identification Type | Select from the drop-down menu what type of Identification Document is being uploaded | Conditional* |
| Identification Document Number | A freeform text field where Users must provide the ID Number of the document. | Yes |
Table #2: Documents Field Information
* Conditional: If the User has selected “Yes” under the ‘Identification Document’ field, this field is required. Otherwise, this field will be greyed out.
Once uploaded the file will be shown on the documents screen. Files are sorted in descending order by upload time. Clicking on the down arrow next the file will show more details on the file as well as allowing the user to delete or download the file.
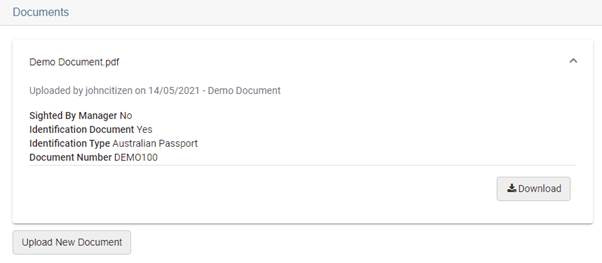
Figure #13: Documents – Uploaded File
Time & Attendance
In the Time & Attendance page, employees are able to Clock In and/or Clock Out for their Shift and their breaks. Additionally, any Planned Rosters for the day will be shown in this page indicating the Planned Start Time, Finish Time, the Break Length, the Location the employee will be working at and at what Position.
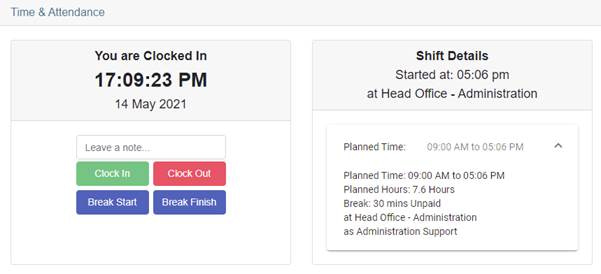
Figure #14: Time and Attendance screen
Note: The Time & Attendance tab may/may not be made available to your employees. It is at the discretion of each client if this feature is enabled. This feature is intended for the use of Staff who work remotely (i.e., work from home).
Schedule
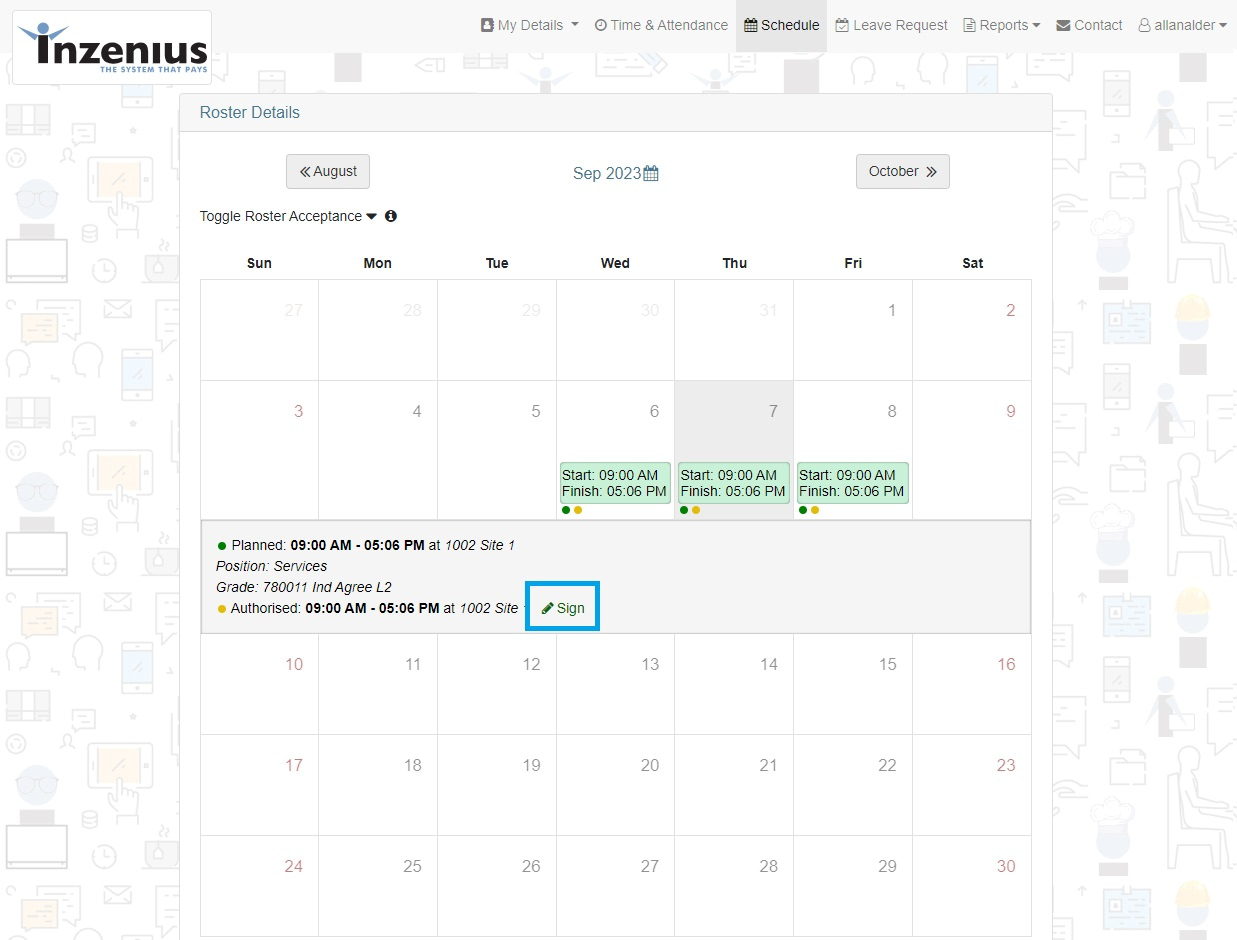
The Schedule page allows employees to view upcoming Shifts that have been Pre-Published and/or Published, as well as any Authorised Rosters.
When clicking on a Shift, the Shift Details will be displayed accordingly; indicating the Location at which the employee has been Rostered to. Here, employees are also able to accept or reject the selected Shift (if applicable to the Shift Type).
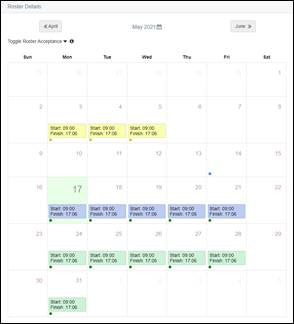
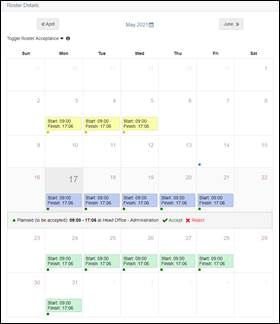
Figure #15: Schedule – Expanded Shift Details
The different Shifts Types can be identified by their corresponding colour in the Schedule Calendar:
| Shift Type | Description | |
| Authorised | Authorised Shifts are the hours that will be processed through Payroll and paid to the employee. | |
| Pre-Published | Where a Shift has been Pre-Published, employees will be able to accept or reject their Shift(s). | |
| Published | Published Shifts are predetermined Shifts allocated to employees which cannot be accepted or rejected; i.e., Published Shifts dictate to employees that they are required to attend work on the scheduled day. | |
Table #3: Schedule Shift Types
Accept/Reject Shifts
If the ‘Accept/Reject Shift’ function has been enabled and there are Pre-Published Shifts present within the Schedule Calendar, employees are able to expand the Roster Acceptance options by selecting the “Toggle Roster Acceptance” arrow button.
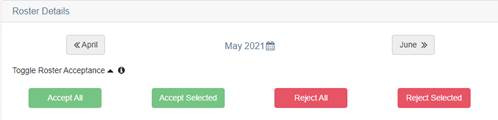
Figure #16: Roster Acceptance
| Roster Acceptance Function | Description |
| Accept All | The “Accept All” button will automatically accept all Pre-Published Shifts that are present in the Schedule Screen. |
| Accept Selected | The “Accept Selected” button will only accept the highlighted/selected Pre-Published Shift(s) within the Schedule Screen. |
| Reject All | The “Reject All” button will automatically reject all Pre-Published Shifts that are present in the Schedule Screen. |
| Reject Selected | The “Reject Selected” button will only reject the highlighted/selected Pre-Published Shift(s) within the Schedule Screen. |
Table #4: Schedule Accept/Reject Options
If there are no Shifts to be accepted or rejected for the month currently being viewed, the Roster Acceptance interface will not be displayed.
Signing Approved Shifts
Employees are able to digitally sign their Approved Timesheet / Shifts. To do this, employees click the “Sign” link for an Authorised Shift (as indicated by the yellow dot).
A small window will pop open, where employees can sign their roster, then click “Save”.
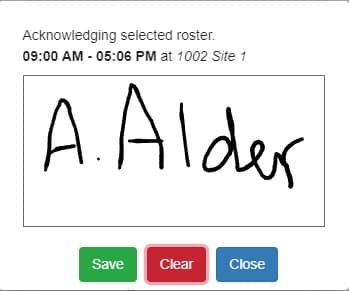
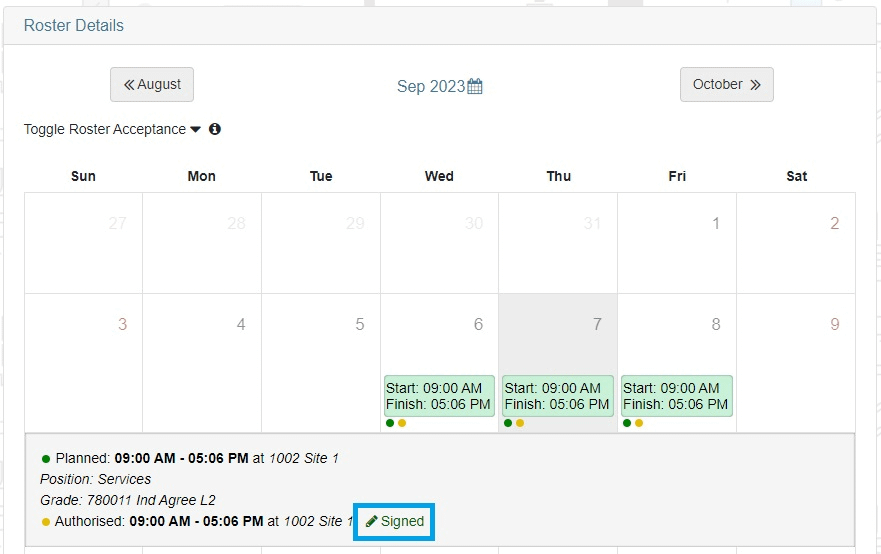
Once Saved, a signature cannot be edited. To View a saved signature, click the “Signed” link in the Schedule.
Leave Request
Employees are able to submit their leave requests within the Leave Request page. Here, employees are provided the option to select from a list of Leaves that have been made available for selection.
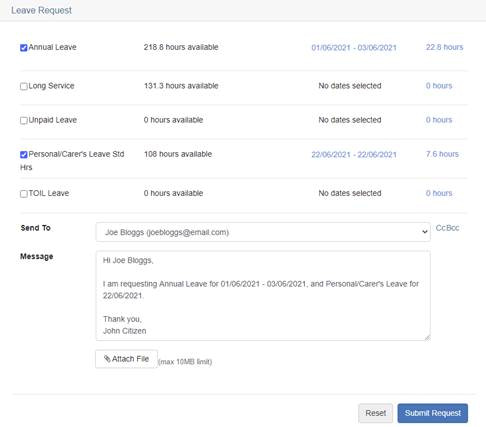
Figure #17: Leave Request – Submitting Leave
Note: Only Administrator Users will have access to determine a list of Leaves to be made available for selecting. Instructions on how this is actioned can be found under ‘Leave Request Settings’.
To submit Leave Requests:
- Select the Leave you wish to apply for by ticking the corresponding check-box
- Select the Date Range you wish to apply for within the Calendar, by clicking on “Please select dates”
- From the “Send To” drop down-menu, select the Manager you wish to send the Leave Request to
- If you wish to carbon-copy (‘CC’) or blind-carbon-copy (‘BCC’) another email address in the Leave Request Email, simply click on the “CC/BCC” link and enter the email address(es) you wish to include in the email
- In the “Message” text box, enter the accompanying message you wish to be included/sent to your selected Manager within the Leave Request
If needed, you are also able to upload supplementary documents (such as medical certificates) by selecting the “Attach File” button.
Note: In the calendar window, you are able to select 1 or more days. Where more than 1 day is selected, the Leave Request will be submitted for all days between the first date selected and the last date selected.
Note 2: The “Message” text-box allows a maximum of 100 characters to be entered.
Note 3: File attachments must be 10MB or under in size. Files exceeding this size will fail to upload.
If you do not have any Leave(s) available for selection, the Leave Request interface will be disabled and you will be prompted to contact your manager to advise that no Leaves are available for selection.
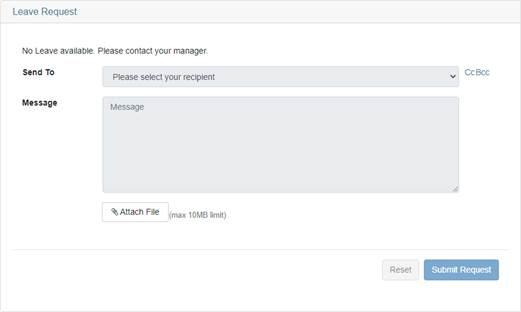
Figure #18: Leave Request – No Leave(s) available for selection
Reports
Payslips
Employees are able to retrieve Payslips for any previously committed Pay Period. By default, the past year of payslips will be retrieved within the ‘Payslips’ page. However, employees are able to retrieve payslips from any previous year by updating the “From” and “To” date range.

Figure #19: Payslips – “From” and “To” Date Selection
ETP Payment Summary
Employees who have been terminated and paid an Eligible Termination Payment (ETP C) will be able to view the ETP Payment Summary within this page.
Once Payroll has finalised the Financial Year and have rolled over the Database for the new Financial Year, an ETP Payment Summary will be made available within the Inzenius Employee Portal.
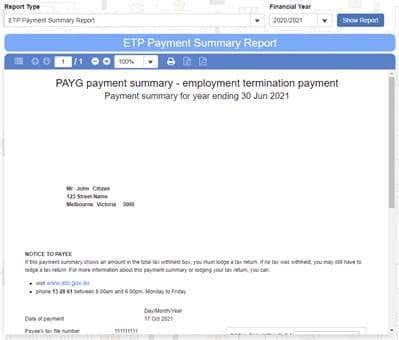
Figure #20: ETP Payment Summary
PAYG Payment Summary
While Single Touch Payroll has removed the need for businesses to provide employees with a PAYG Payment Summary, employees are still afforded the ability to view/generate their Payment Summary at the end of the Financial Year within the Inzenius Employee Portal.
Once Payroll has finalised the Financial Year and have rolled over the Database for the new Financial Year, a PAYG Payment Summary will be made available within the Inzenius Employee Portal.
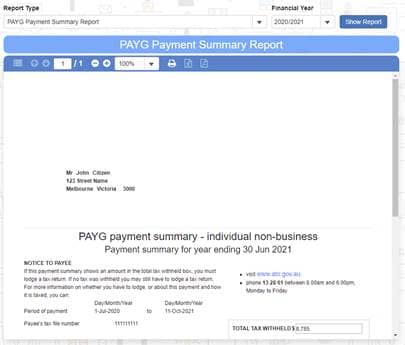
Figure #21: PAYG Payment Summary
PAYG Payment Summaries for any previous Financial Years will also be available for employees to view/generate if required.
Contact
Within the ‘Contact’ page, employees are able to contact their Manager and/or Payroll via email.
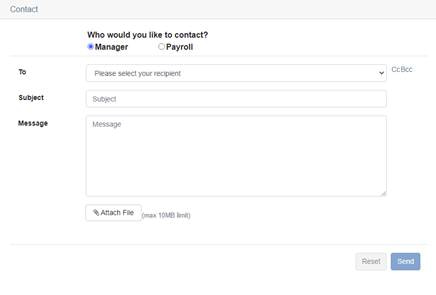
Figure #22: Contact – Email Form
When the “Manager” radio button is selected, a list of Managers and their associated email addresses will become available for selection in the “To” drop-down menu. When the “Payroll” radio button is selected, a list of Payroll Officers and their associated email addresses will become available for selection in the “To” drop-down menu.
Note: The Manager and Payroll list may/may not differ for each employee as this is dependent on Entity and Grade Association configured in the ‘Admin Dashboard’ (i.e., dependent on the Sites that the Manager/Payroll Officer are in charge of).
Note 2: The Subject line is limited to 255 characters, while the Message length is limited to 1000 characters.
Note 3: Any attachments must not exceed 10MB in size. Files over 10MB in size will fail to upload.
User Settings
The User Settings menu (denoted by the ‘User’ icon and the employee’s Username) is where Users are able to change their password and/or log out of the Employee Portal.

Figure #23: User Settings – Drop-down menu
Change Password
Users are able to change their own password within this screen.
To change your password, you must provide your current Password, enter a new Password and confirm your new Password accordingly.
For security, your new Password must meet the following requirements:
- Minimum 12 characters in length
- Must contain at least 1 lowercase letter
- Must contain at least 1 upper case letter
- Must contain at least 1 number
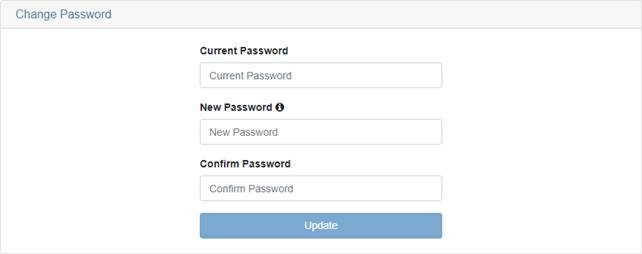
Figure #24: Change Password Screen
Logout
To log out of the Employee Portal, simply select the “Logout” button from the User Settings menu. If there are any unsaved changes on the page you are currently on, you will be prompted to confirm you wish to leave. If there are no changes to be saved, you will be logged out immediately.