Manager Portal
Overview
This manual relates to version 2.0.1 of the Inzenius Manager Portal
The Inzenius Manager Portal has been designed as an easy access to Rostering and certain Rostering Reports, without the need to connect to the core application. The Inzenius Manager Portal can be accessed from the internet anywhere.
Use of the Inzenius Manager Portal is ideal for clients who do not wish to give their Rostering Users access to the core application, or, would like for them to be able to Roster on-the-go in a conveniently accessible manner.
The Inzenius Manager Portal can be accessed through your computer/laptop, tablet and/or phone through Google Chrome, Microsoft Edge, and/or Mozilla Firefox.
Note: While the Manager Portal may be accessed through different browsers, the aforementioned are the recommended Web Browsers to ensure full functionality within the Portal.
Logging In
To begin, open your preferred Internet Browser and type in the address provided to by your manager, Payroll or HR. Enter your Username and Password in the appropriate fields, and follow the prompts to verify your identity.

Figure #1: Manager Portal – User Credentials
Click the reCAPTCHA checkbox and follow the prompts to complete verification. Once confirmed you will then be able to login into the Manager Portal.
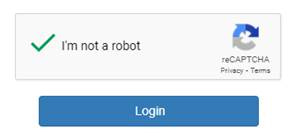
Figure #2: Manager Portal – reCAPTCHA successful
If you are unsure of any details, please contact your system administrator for assistance.
For security integrity, you will have 5 login attempts before your account is locked out. If you enter your password incorrectly on your 5th attempt, you will be unable to log in for 15 minutes.
Alert: The Web Kiosk/Employee Portal and Manager Portal are linked. If your Manager Portal User is locked out, you will be unable to log into the Web Kiosk/Employee Portal with this username for the allotted 15 minutes.
The database details and credentials (Connection Name and Connection URL) will be saved after first login, so that when re-opening the Manager Portal, it will automatically connect. You will only be required to enter your username and password if you have logged out of the page.
The Navigation Menu
Once logged into the Manager Portal, Users will be directed to the ‘Rostering’ screen. To navigate to other Manager Portal pages, use the top right-hand side navigation menu.

Figure #3: Navigation Menu
Note: Not all functions will be available to every client. Please contact your system Administrator and/or Inzenius Support to discuss enabling additional functions.
Dashboard
When logged into the Manager Portal, you will first see the Dashboard. It contains Widgets for Unaccepted Rosters, Unauthorised Rosters, Upcoming Leave and Unapproved Leave.
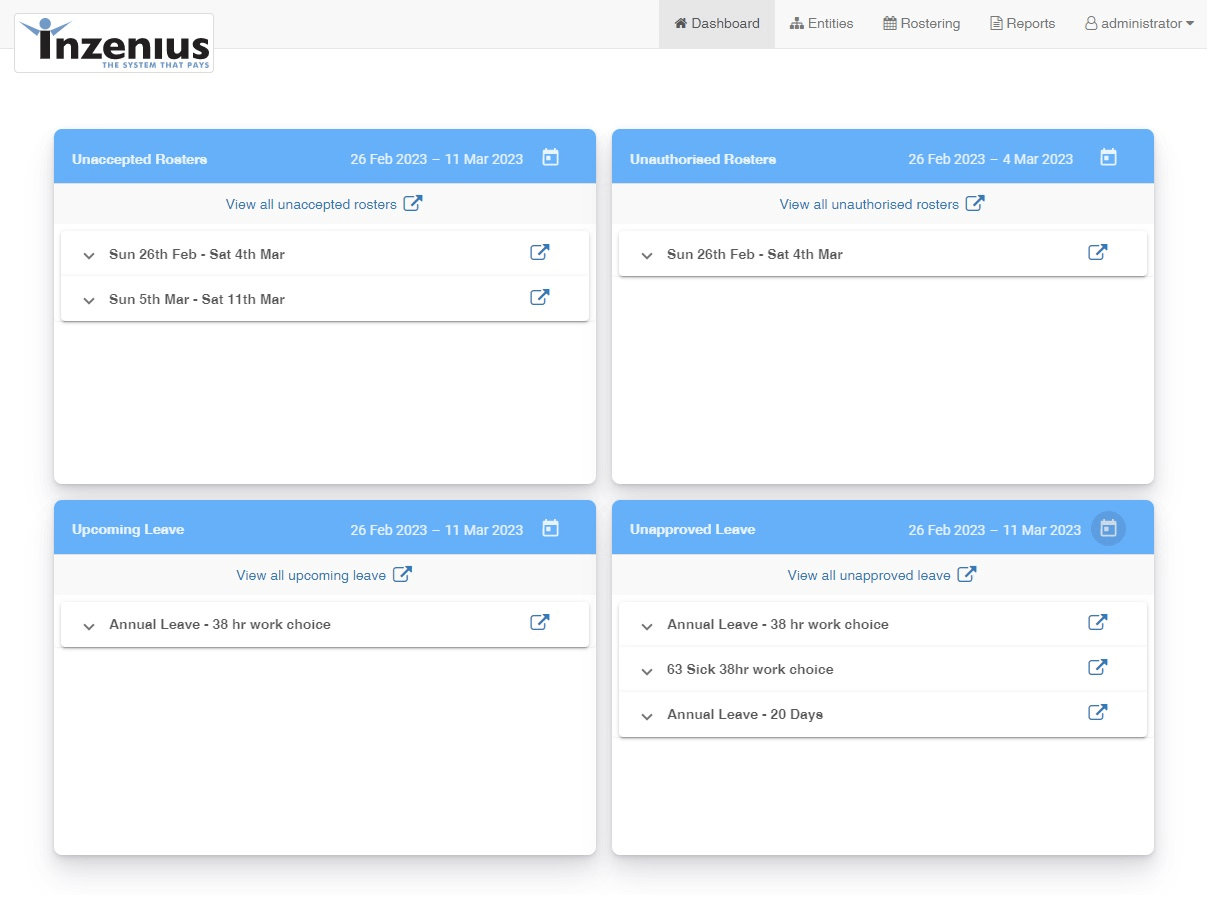
- Unaccepted Rosters: This widget will show all the Rosters which are in Pre-Published state and have not accepted by the Employees for a given period.
- Unauthorised Rosters: All unapproved Planned and Timekeeping Engagements will appear on this widget to provide an overview to the User, showing which Rosters are not Authorised in a given period
- Upcoming Leave: All Authorised Leave will appear in the Widget to provide a summarized report to a Manager / User.
- Unapproved Leave: The purpose of this Widget is to highlight any Unapproved Leave Rosters. User can be redirected to the Actual Roster from the Widget to Approve it.
Navigating the Widgets
![]() Select Dates – Allows the User to Select the Start and End Dates for the Period they wish to view in the Widget.
Select Dates – Allows the User to Select the Start and End Dates for the Period they wish to view in the Widget.
![]() View Rosters – Opens the Roster Screen with the selected Rosters
View Rosters – Opens the Roster Screen with the selected Rosters
![]() Expand – Expands the Week / Employee into more Detail
Expand – Expands the Week / Employee into more Detail
![]() Collapse – Collapses the Detail back into Week / Employee
Collapse – Collapses the Detail back into Week / Employee
Rostering in the Manager Portal
Navigation and Rostering Overview
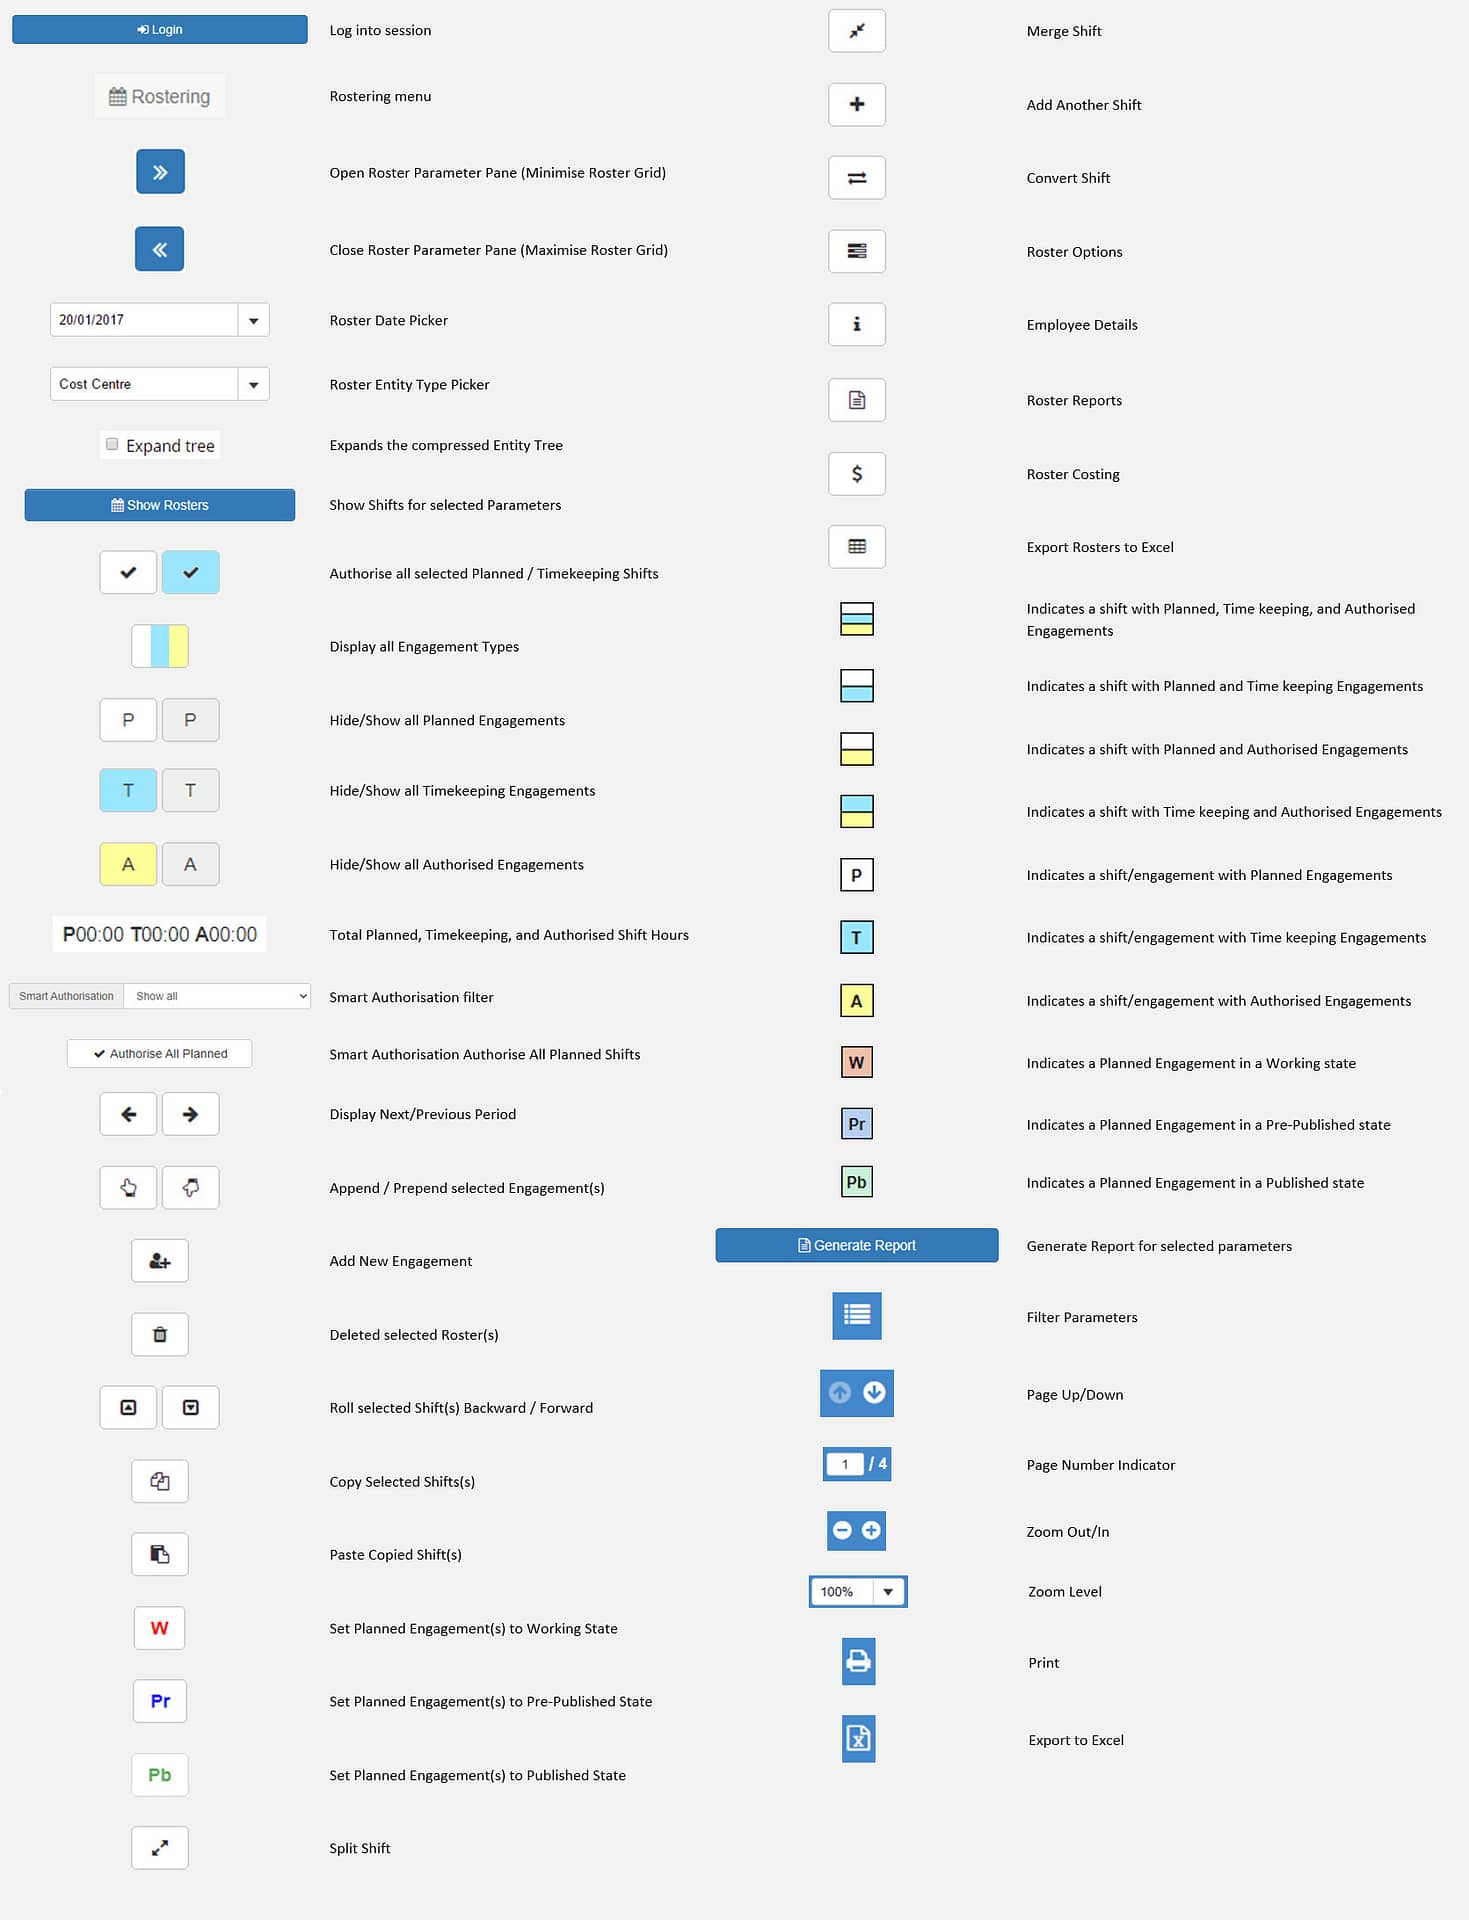
Toolbar Legend
Roster Screen Options and Preferences
There are a multitude of options and preferences that can be enabled/disabled to suit User’s needs in the Rostering screen, such as choosing to show or hide certain columns in the Roster Grid, display options, as well as the ability to automatically selected Entities that have Rosters.
To change options/preferences, select the ![]() button in the navigation pane. Alternatively, you can right click the Roster Grid and select “Roster Options”.
button in the navigation pane. Alternatively, you can right click the Roster Grid and select “Roster Options”. ![]()
General
The ‘General’ tab provides a list of general Rostering options Users can select/deselect.
- “Automatically select entities for retrieval when they are available” will automatically select all Entities in the Entity Tree that contain Roster data when the Entity Tree is loaded.
- “Enable Roster Acceptance Tracking” allows you to set Planned Shifts from Working-State to Pre-Published, or Published states.
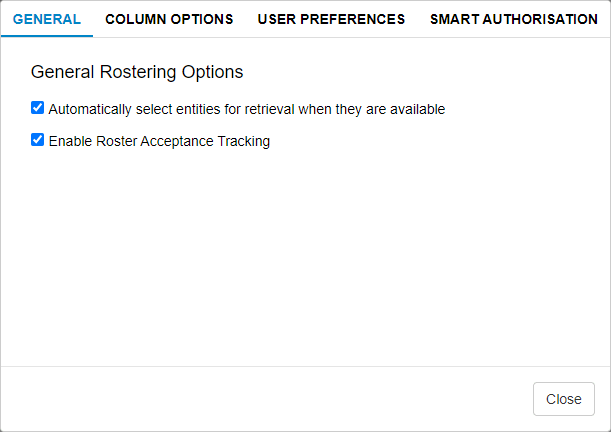
Figure #4: Options; General
Note: Roster Acceptance Tracking should only be utilised if the Employee Portal has been set up for the client. If you are unsure of whether you have the Employee Portal set up, please contact your Payroll Manager.
Column Options
The ‘Column Options’ tab provides a list of columns that can be shown or hidden within the Roster Grid.
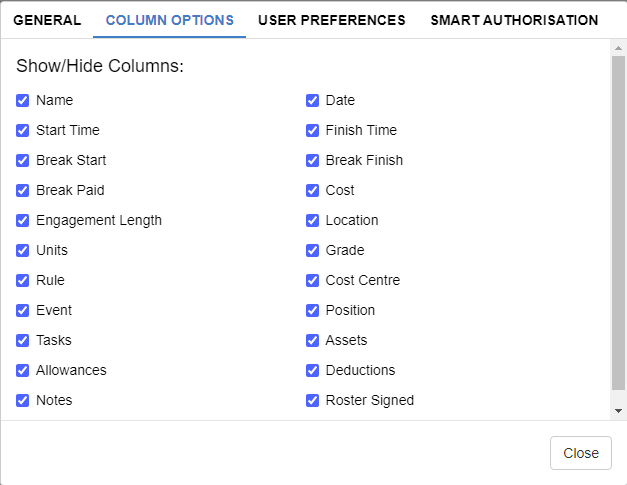
Figure #5: Options; Rostering Columns
User Preferences
The ‘User Preferences’ tab provides further options pertaining to time format, and Roster sorting.
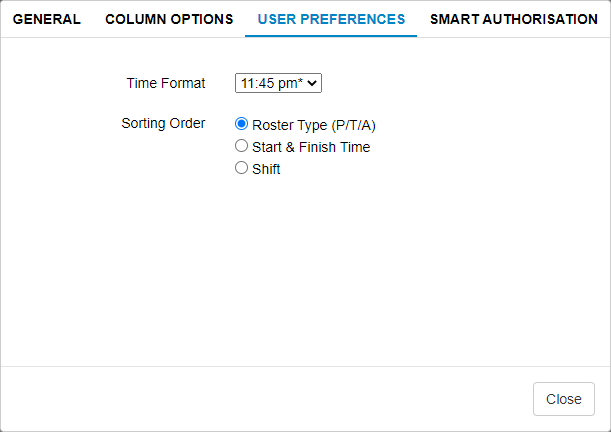
Figure #6: Options; User Preferences
Smart Authorisation
The ability to perform Smart Authorisation (automatic Authorisation) is also available in Inzenius, allowing the ability to Authorise a number of employee’s Rosters quickly and efficiently.
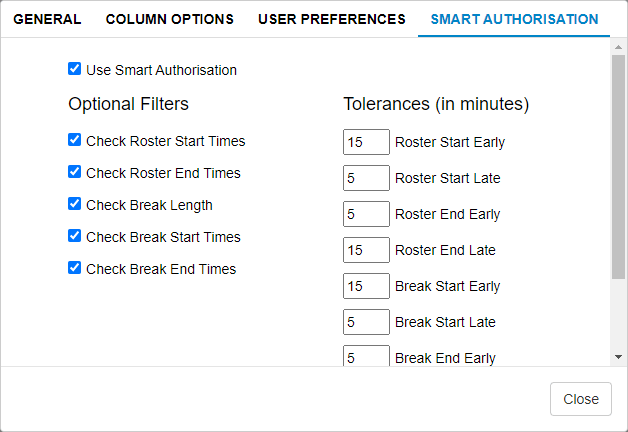
Figure #7: Options; Smart Authorisation Options
Employee Details Pane
The ![]() button shows additional information on a selected Employee to assist with rostering. When open the Employee Details screen will expand over the rostering grid.
button shows additional information on a selected Employee to assist with rostering. When open the Employee Details screen will expand over the rostering grid. ![]()
Employee Rosters
The “Employee Rosters” tab displays a supplementary Rostering Grid which will display all of the selected employee’s Rosters, including Rosters for other Locations that the logged in User may not necessarily access to. This supplementary Rostering Grid allows the current User to confirm if the employee has already been rostered on a particular day to avoid any overlapping of Shifts.
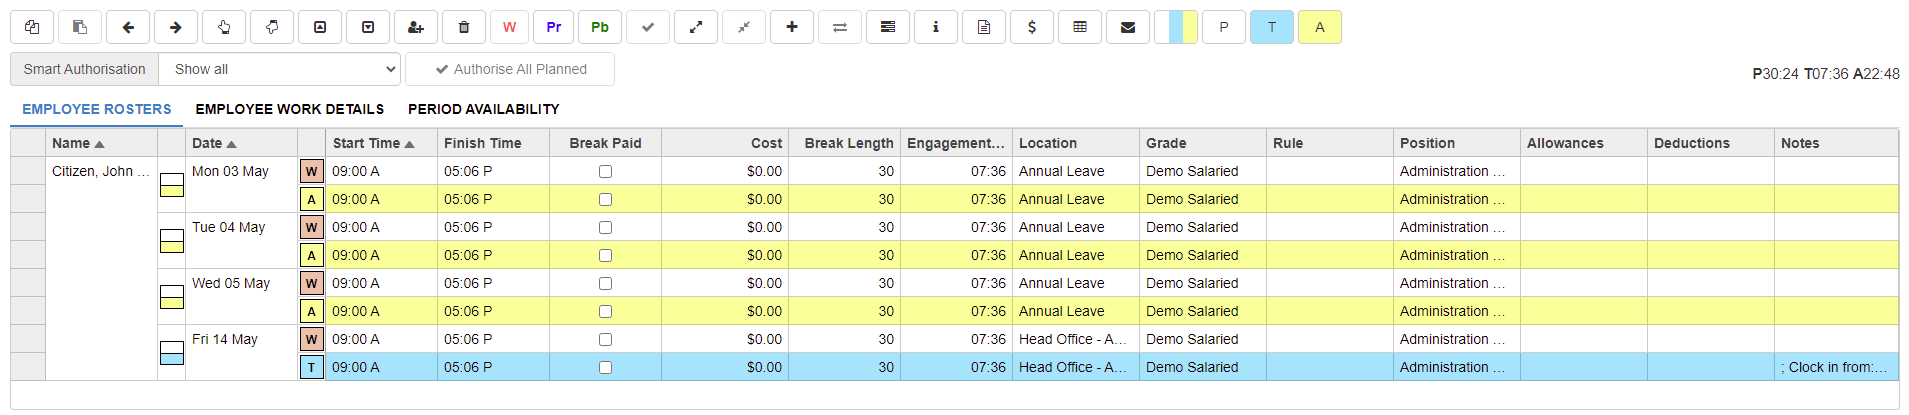
Figure #8: Employee Details – Supplementary Roster Grid
Employee Work Details
The ‘Employee Work Details’ tab displays the highlighted employee’s (in the Roster Grid) work details:
- Standard Work Times
- Holidays
- Leave Available
- Standard Days Off
- (Un)Availability
- Qualifications
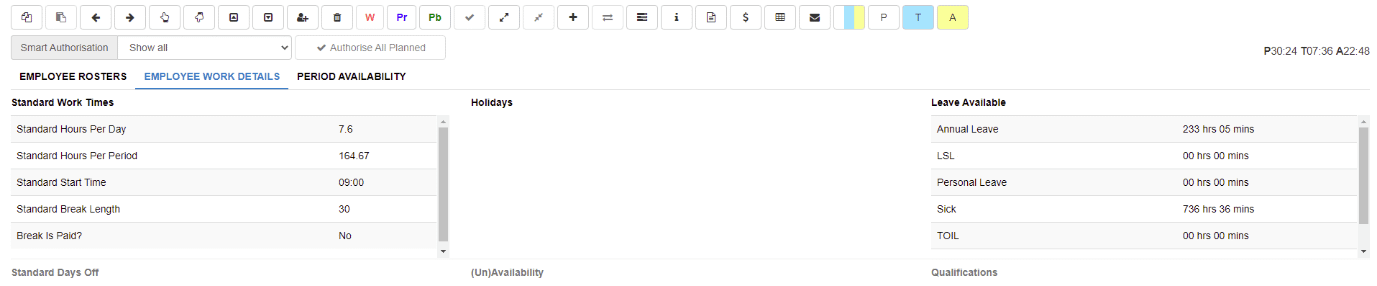
Figure #9: Employee Details – Employee Work Details
Period Availability
The “Period Availability” tab displays an overview of the selected employee’s Roster(s) for the current period retrieved in your Rostering Parameters; as well as summarises the number of shifts and hours worked for the retrieved period.
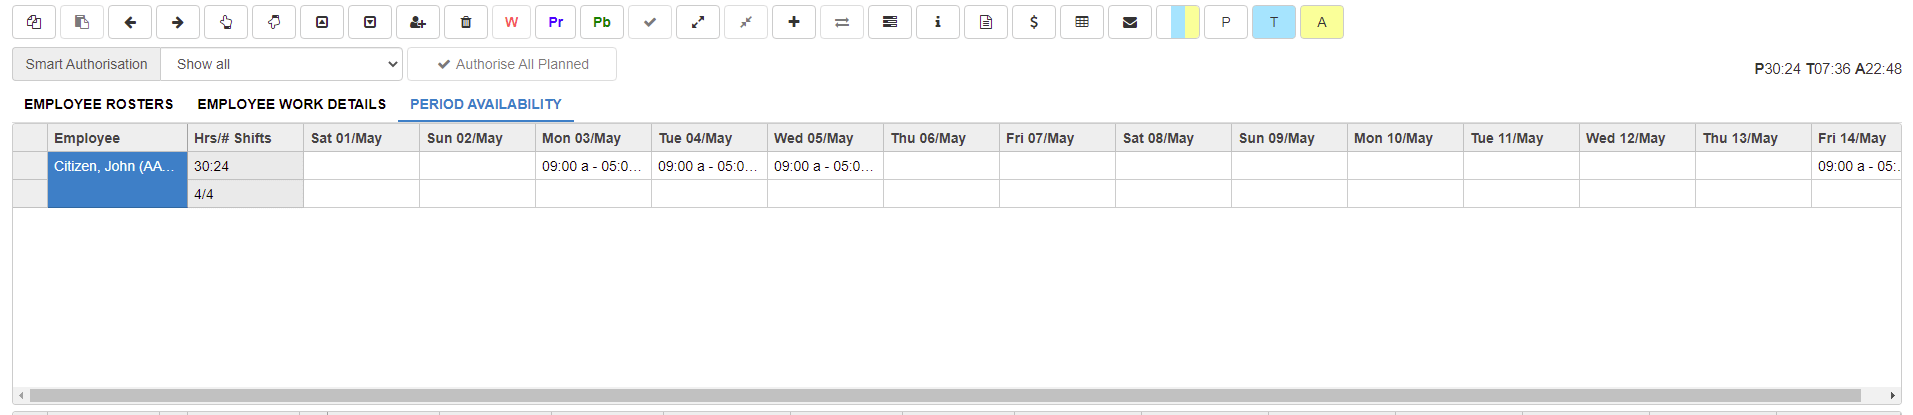
Figure #10: Employee Details – Period Availability
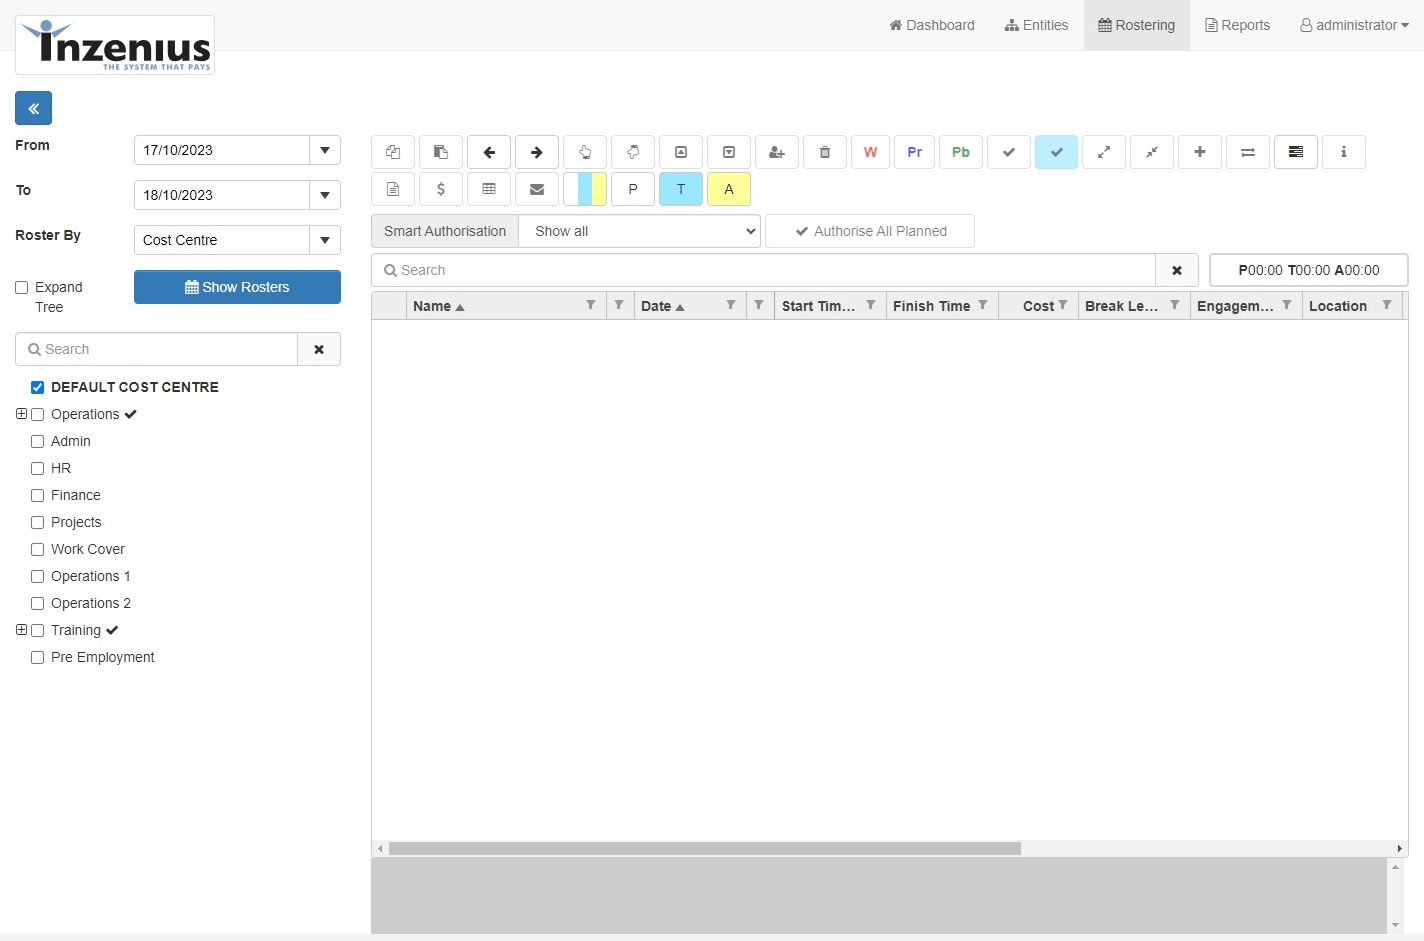
Setting Roster Parameters
Roster Parameters
To change the Rostering parameters, select the ![]() button (if not already open). This will open the Rostering Parameters, where you can begin filtering.
button (if not already open). This will open the Rostering Parameters, where you can begin filtering.
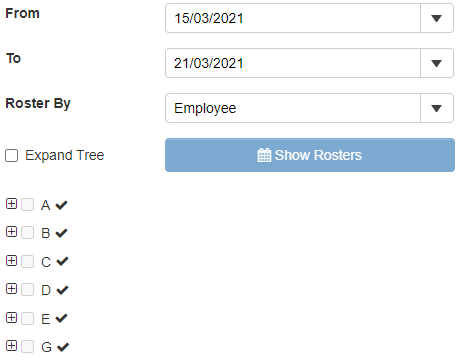
Figure #11: Rostering; Rostering Parameters
| From | Select from the calendar the date you wish to display Roster from |
| To | Select from the calendar the date you wish to display Rosters to |
| Roster By | Select from the drop-down menu the Entity type you wish to Roster by (Cost Centre, Employee, Event, Grade, Location, or Position) |
| Expand Tree | Flag this option to expand the Entity tree |
Entity Selection
The Entity Tree display will display according to the selection made in the “Roster by” drop-down menu; e.g., where “Location” is selected, the Location Entity Tree will be displayed.
To expand the Entity Tree and view child-Entities, select the “+” symbol to the left of the Entity Name. Conversely, to collapse the Entity Tree, select the “–“ symbol.
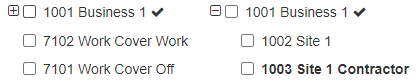
Figure #12: Entity Selection – Expanded Entity Tree
Clicking on the “![]() ” symbol to the right of the Entity will select the entity, if possible, and any child entities listed beneath.
” symbol to the right of the Entity will select the entity, if possible, and any child entities listed beneath.
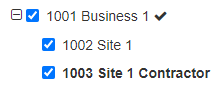
Figure #13: Rostering; Selecting all entities in a tree
As with the Inzenius Core Application, any bolded Entity names indicate that there is Roster data for the Entity within the current Roster Parameters set.
Once you have selected your Rostering parameters, select ![]() to populate the Rostering Grid.
to populate the Rostering Grid.
Any existing Rosters will be depicted in the Rostering grid if any match the parameters selected. If no Rosters are present for the selected period, the Rostering grid will appear blank.
To hide the Rostering Parameters and expand the Rostering grid, select the ![]() button.
button.
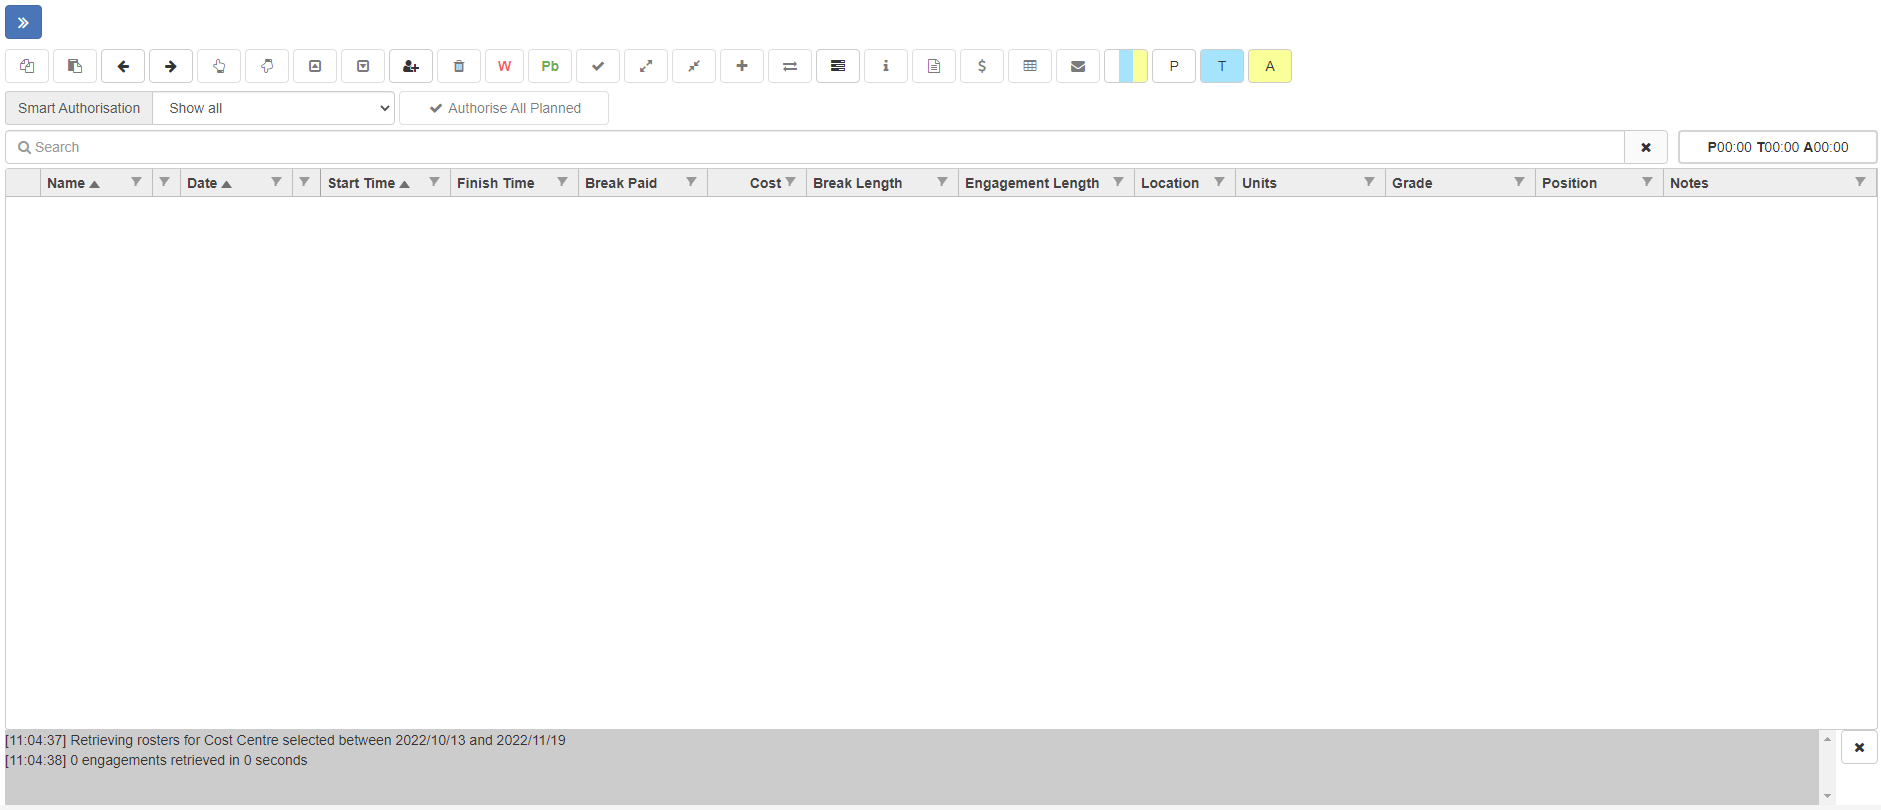
Figure #14: Rostering – Maximised Rostering Grid
Shifts and Engagements
Throughout this manual and the use of Inzenius, you will see reference to ‘Shifts’ and ‘Engagements’. Below will define these terms.
Shifts
Shifts are all Rosters for a day for an employee. A Shift can include one or multiple Planned, Timekeeping, and/or Authorised Engagements. This is easily denoted the “Date” column.

Figure #15: Example of a Shift for one day
It is possible to have multiple Shifts for the one day. Again, these are easily denoted by the “Date” column, where there is more than one of the same date present.

Figure #16: Example of a Multiple Shifts for one day

Figure #17: Example of one Shift with multiple Engagements for one day
Engagements and Engagement Types
Engagements are each singular line within a Shift. There are three types of Engagements; Planned, Timekeeping, and Authorised.

Figure #18: Example of a Shift with 3 Engagement Types
You can show/hide each Engagement Type in your Roster View by selecting/deselecting the toggle(s) required in the Roster toolbar.
| Show All Engagement Types | |
| Show/Hide Planned Engagements | |
| Show/Hide Timekeeping Engagements | |
| Show/Hide Authorised Engagements |
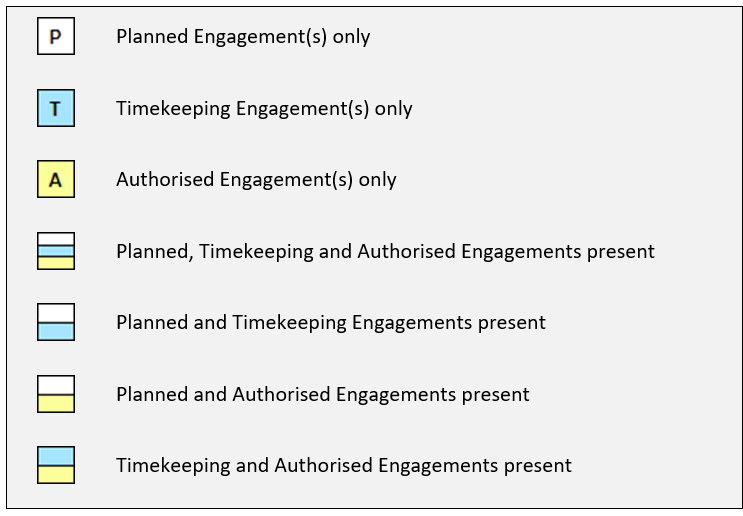
P/T/A Indicator Column
The P/T/A Indicator Column (Planned/Timekeeping/Authorised) is between the Employee Column and the Date Column. The icons displayed for each engagement denotes what type/s of engagements are present for the shift. This is important when you have hidden any of the engagement types in your roster view.

Figure #19: The P/T/A Indicator Column
Planned Engagements
New Rosters are, by default, created as a Planned Engagement. These Planned lines will appear as white Engagements, can be edited freely, and all fields can be altered to suit Rostering requirements.

Figure #20: Planned Engagements
Planned Engagements should represent what an employee is anticipated/budgeted to work.
Timekeeping Engagements
Timekeeping Engagements appear in the Roster Grid as blue lines, and are typically situated beneath its corresponding Planned line.

Figure #21: Timekeeping Engagements
Timekeeping Engagements are automatically created when employees Clock In/Out on an Inzenius (and/or external) Timekeeping Device, and represents what an employee actually worked.
Authorised Engagements
Authorised Engagements appear in the Roster Grid as yellow lines, and are typically situated beneath corresponding Planned/Timekeeping lines.

Figure #22: Authorised Engagements
They are manually created based on Planned or Timekeeping Engagements, and represent what an employee is to be paid for.
Tip: Planned, Timekeeping, and Authorised Engagements can have differing times and Entities, especially if circumstances change. It is the Authorised Engagement that is processed through payroll and paid to the employee, so any Authorised Rosters should be checked over prior to payroll processing.
Creating Rosters
Creating Employee Rosters
To add new Rosters, select the ![]() button from the Roster toolbar. Alternatively, you can right click the Roster Grid and select “Add New Shift or Engagement”.
button from the Roster toolbar. Alternatively, you can right click the Roster Grid and select “Add New Shift or Engagement”.
![]()
A list of employees applicable to work in the filtered Entities will be displayed. From the list, flag the employee(s) you wish to create a Roster for. Once you have flagged the employee(s), the ‘Roster Preview’ will populate based on existing Rosters that may be present. Indicating what days can and cannot have Rosters created. Employees can be further filtered by Qualifications that have been assigned to Employee Files if necessary.
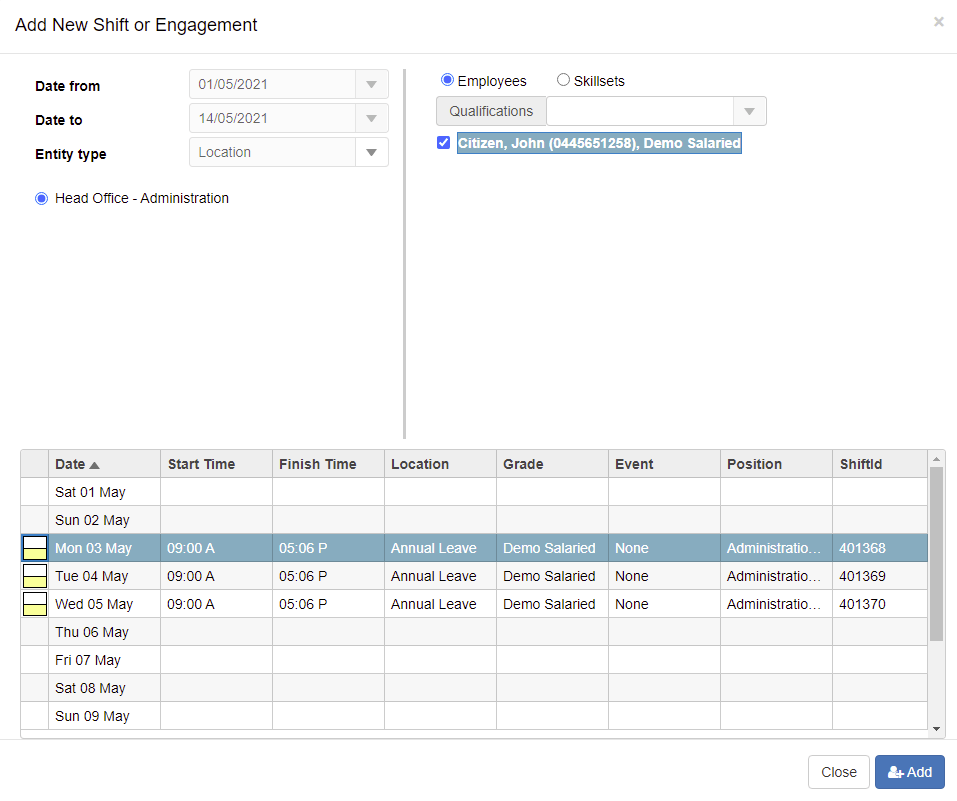
Figure #23: Rostering – Add New Shift or Engagement window
In the ‘Roster Preview’ field, highlight the date(s) you wish to Roster for.
Note: Consecutive dates can be selected by highlighting the first date in the Period and, holding down the ‘Shift’ key on your keyboard, highlighting the last day you wish to Roster for in the Period. The alternative to select individual days is available by holding down the ‘Ctrl’ key on your keyboard and clicking on specific dates.
Once all required employees have been selected, as well as corresponding days you wish to Roster to, select the ![]() icon to keep the “Add New Shift or Engagement” window open so that you may continue to add additional Rosters (if needed). Alternatively, you may click on
icon to keep the “Add New Shift or Engagement” window open so that you may continue to add additional Rosters (if needed). Alternatively, you may click on ![]() to close this window to return to the Roster Grid.
to close this window to return to the Roster Grid.
![]()
![]()
Similarly, if no further Shifts are required to be created, you may click on the ![]() button to close the window.
button to close the window.
Creating Skillset Rosters
There is also the facility to create Skillset Rosters. A Skillset Roster is simply a Shift/Engagement with a Grade linked, but no employee attached.
Skillset Rosters can be created if you have not decided which employee(s) will work, but are sure of the Shift requirements such as Grade (Base Rate) and other Entity Details (Location, Cost Centre, etc.). This will allow you to cost your Roster to obtain figures that will assist with budgeting labour costs.
Note: If there are any Allowances that are paid automatically as per the Grade configuration, they will be added to the Roster when Skillsets are created, as well as costed when generating a ‘Costing Report’.
As you would create a Roster for an employee, select the ![]() button from the Roster toolbar. Alternatively, you can right click the Roster Grid and select “Add New Shift or Engagement”.
button from the Roster toolbar. Alternatively, you can right click the Roster Grid and select “Add New Shift or Engagement”.
![]()
Select the “Skillsets” radio button to select the Grade(s) you wish the Skillset Rosters to linked to, and the dates you wish to Roster for.
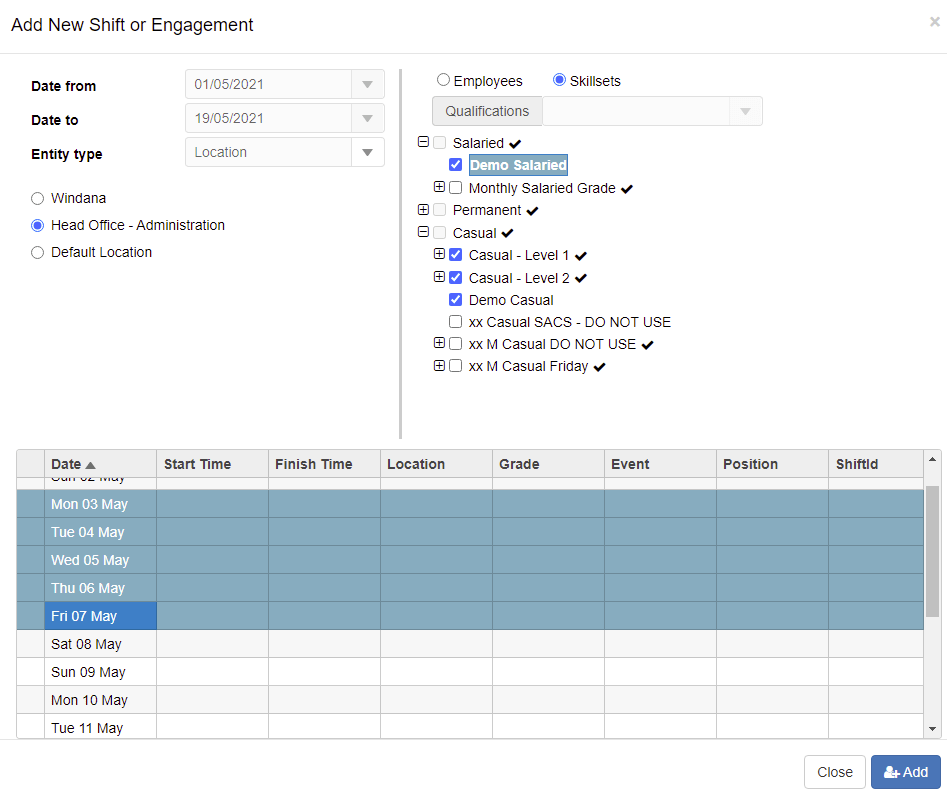
Figure #24: Rostering – Add New Shift or Engagement window (Skillsets)
Once the required Grade(s) have been selected, as well as corresponding days you wish to Roster to, select the ![]() icon to keep the “Add New Shift or Engagement” window open so that you may continue to add additional Rosters (if needed). Alternatively, you may click on
icon to keep the “Add New Shift or Engagement” window open so that you may continue to add additional Rosters (if needed). Alternatively, you may click on ![]() to close this window to return to the Roster Grid.
to close this window to return to the Roster Grid.
Tip: To automatically select all Child Entities, select the “![]() ” icon.
” icon.
Adding Units to a Roster
There is also the facility to Add and Manage Units via the Units Column in the Roster screen. The User can allocate Unit(s) to shifts for Costing and Reporting purposes.
To add Unit(s) to a Shift, select the ellipsis button ![]() in the Units column. A new window called “Select Units” will appear where you can select Unit(s) and add the required quantity to the Roster. The User can also add Comments as required.
in the Units column. A new window called “Select Units” will appear where you can select Unit(s) and add the required quantity to the Roster. The User can also add Comments as required.

Figure #25: Rostering – Add New Shift or Engagement window (Skillsets)
If there are no Units available for the selected Roster, the Select Units window will show “No units are available for the Selected roster”.
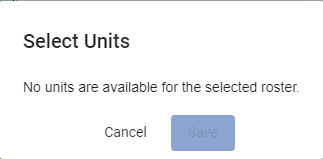
Figure #26: Rostering – Add New Shift or Engagement window (Skillsets)
Editing Employee Rosters
Engagements can be manipulated in much the same manner as per the core application Rostering module.
Editing Start/Finish Times and Break Length
To edit a Start Time, Finish Time, Break Start Time, or Break Finish Time, double click within the applicable field. From here you are able to type the required time in 24-hour format or 12-hour format appended with an ‘a’, ‘am’, ‘p’, or ‘pm’. If the minutes are omitted the portal will set the time to fall on the hour, for example ‘9’ or ‘9a’ will become “9:00am”.
Similarly, to edit the Break Length, double click within the Break Length field and enter the required duration in minutes. This will update the Break Start and Break Finish Times and place the break in the middle of the Shift for the selected Shift/Engagement.
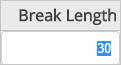
Figure #27: Break Length Field
Break Paid
Flagging the “Break Paid” option will ensure the Break Length is included in the Total Time (paid time) for each Engagement. By default, this option is not flagged as typically the Break is unpaid. To edit this, simply flag or unflag the option.

Figure #28: Rostering; Break Paid Field
Editing Entities
Changes to an employee’s Rostered Cost Centre, Grade, Location, Event, Position, Tasks, etc. can be conducted for either an Engagement (part of a day that can be made up with several Engagements) or a Shift (whole day).
To edit the Entities associated with a Shift/Engagement, simply select the appropriate Entity from the corresponding drop-down menu.

Figure #29: Drop-down Menu Picker Field (Location)
Editing/Applying Allowances and Deductions
If there are Allowances/Deductions assigned to the Grade and/or selected employee’s Employee File, they will be available for selection in the “Allowances”/ “Deductions” drop-down menu.
Payroll Rule
To assign a Payroll Rule, double click within the Rule field of the applicable Engagement. From here you are able to select from the drop-down menu the Payroll Rule you wish to assign.
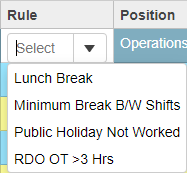
Figure #30: Payroll Rule selection
Roster Notes
To edit the Notes, double click within the Notes field of the applicable Engagement. From here you are able to type the required notes in the field, or select an option from the drop-down menu. When selecting an option from the drop-down menu any notes currently filled in will be replaced with the selected option.
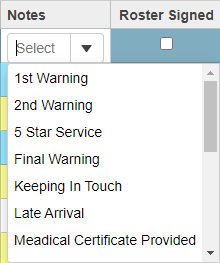
Figure #31: Notes drop-down menu
Editing Functions
Deleting Rosters
Where Rosters are no longer required for an employee or Skillset, they can be deleted using the delete function if the User has sufficient privileges.
To delete a Roster (Planned, Timekeeping, or Authorised) for an employee or Skillset, highlight the individual Engagement, or select multiple Shifts/Engagements, and select the ![]() button from the Roster toolbar. Alternatively, you can right click the selected day(s) in the Roster grid and select “Delete Selected Engagement(s)”.
button from the Roster toolbar. Alternatively, you can right click the selected day(s) in the Roster grid and select “Delete Selected Engagement(s)”.
![]()
You will then be prompted to confirm if you wish to delete the selected Engagement(s). Select “OK” to proceed with deletion, or “Cancel” to cancel deletion; noting that once deleted, this action cannot be undone.
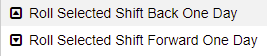
Rolling Rosters Forward/Backward
The Rolling Rosters function provides the option to Roll a selected Shift forward one day, or Roll a selected Shift back one day, allowing duplication of a Shift without the need to recreate from scratch.
To Roll a Planned Shift, highlight the individual day, and select the ![]() or
or ![]() button from the Roster Toolbar. Alternatively, you can right click the selected day in the Roster grid and select from either “Roll Selected Shift Back One Day” or “Roll Selected Shift Forward One Day”.
button from the Roster Toolbar. Alternatively, you can right click the selected day in the Roster grid and select from either “Roll Selected Shift Back One Day” or “Roll Selected Shift Forward One Day”.
Copying and Pasting Rosters
The Inzenius Manager Portal also provides the option to copy and paste selected Shifts forward by a cycle, depending on the number of days retrieved in your Rostering Parameters. This feature is especially useful to create Planned Rosters for employees who work regular hours with little variation in days and times.
To Copy a Planned Engagement, highlight the required Shifts and/or Engagements, and select the ![]() button from the Roster toolbar. Alternatively, you can right click the selected day(s) in the Roster grid and select “Copy Selected Shift(s)”.
button from the Roster toolbar. Alternatively, you can right click the selected day(s) in the Roster grid and select “Copy Selected Shift(s)”.
![]()
Once you have copied the applicable Roster(s), to move to the next Period forward in time, selected the ![]() button from the Roster toolbar. Alternatively, you can right click in the Roster grid and select “Display Next Period”.
button from the Roster toolbar. Alternatively, you can right click in the Roster grid and select “Display Next Period”.
![]()
To Paste a Planned Engagement in the new Period, select the ![]() button from the Roster toolbar. Alternatively, you can right click in the Roster grid and select “Paste Copied Shift(s)”.
button from the Roster toolbar. Alternatively, you can right click in the Roster grid and select “Paste Copied Shift(s)”.
![]()
Prepending and Appending Engagements
Prepending and Appending Engagements provides the ability to add to the start of the Shift, or the end of the Shift. This may be used when an employee works in different departments/Locations, different Positions, or assigned to more than one event on the same day.
Prepend Engagement
To Prepend an Engagement, highlight the individual Shift and select the ![]() button from the Roster toolbar. Alternatively, you can right click the selected Shift in the Roster grid and selected “Prepend Engagement(s)”.
button from the Roster toolbar. Alternatively, you can right click the selected Shift in the Roster grid and selected “Prepend Engagement(s)”.![]()

Figure #32: Prepended Engagement
Append Engagement
To Append an Engagement, highlight the individual Shift and select the ![]() button from the Roster toolbar. Alternatively, you can right click the selected Shift in the Roster grid and select “Append Engagement(s)”.
button from the Roster toolbar. Alternatively, you can right click the selected Shift in the Roster grid and select “Append Engagement(s)”. ![]()

Figure #33: Appended Engagement
Split Shifts and Merged Shifts
Splitting Shifts allows for Engagements that have been Prepended or Appended to be split, to be separated to individual Shifts. Similarly, merging Shifts allows for Engagements that have been previously split to be merged into a single Shift with multiple Engagements.
Split Shifts
To Split a Shift, highlight an individual Engagement within the Shift and select the ![]() button from the Roster toolbar. Alternatively, you can right click the selected Engagement in the Roster grid and select “Split Shift”.
button from the Roster toolbar. Alternatively, you can right click the selected Engagement in the Roster grid and select “Split Shift”. ![]()

Figure #34: Split Shifts (2 x Engagements, 2 x separate Shifts for one Day)
Merged Shifts
To Merge a Shift, highlight both Shifts and select the ![]() button from the Roster toolbar. Alternatively, you can right click the selected Shifts in the Roster grid and select “Merge Shifts”.
button from the Roster toolbar. Alternatively, you can right click the selected Shifts in the Roster grid and select “Merge Shifts”. ![]()

Figure #35: Merged Shift (2 x Engagements, 1 x Shift for one day)
Leave Requests and Rostering an Employee to Leave
When an employee takes Leave, it is required to be added to the Rosters to ensure payroll processes and makes automatic adjustments to balance accordingly. Leave Rosters are either created automatically upon employees submitting Leave Requests via the Web Kiosk/Employee Portal, or manually created via the Rostering screen.
Leave Requests
Where an employee submits Leave Requests via the Web Kiosk/Employee Portal, Leave Rosters are automatically created if the employee has sufficient Leave Balance to cover the requested days. Here, an email is then sent to the employee confirming their submission and another email is sent to their selected Manager and/or Payroll to advise that Leave has been created for approval/rejection.
To approve the employee’s Leave Request, Managers will need to Authorise the automatically created Leave Roster and advise the employee of the result via return-email. To reject the employee’s Leave Request, Managers will need to delete the Leave Roster(s) or assign a working Location and advise the employee of the result via return-email.
Rostering an Employee to Leave
To manually Roster an employee to a Leave type, simply select from the alphabetised drop-down “Location” menu the appropriate Leave Location you wish to assign to the employee.
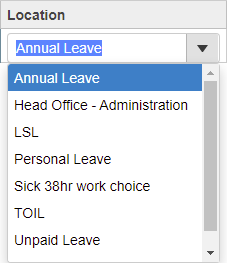
Figure #36: Location drop-down menu
Converting Rosters
Rosters can be swapped in the event you wish to switch the Rosters between employees, or convert an Employee Roster (i.e., assigned to a specific employee) to a Skillset Roster (i.e., assigned to a Grade); and vice-versa.
Converting Rosters (Employee/Skillset) to Employee Roster
Highlight the Rosters you wish to convert to a Skillset Roster, and select the ![]() button from the Roster toolbar. Alternatively, you can right click the selected Roster(s) in the Roster grid and select “Convert Engagement(s)”.
button from the Roster toolbar. Alternatively, you can right click the selected Roster(s) in the Roster grid and select “Convert Engagement(s)”. ![]()
In the ‘Convert Engagement(s)’ window, select the new employee from the list of available employees flagged to work at the assigned Location, Cost Centre and Position. Additionally, you can convert the Grade assigned to the original Roster to the selected employee’s Default Grade by flagging “Convert assigned Grade to Employee’s Default Grade?” option.
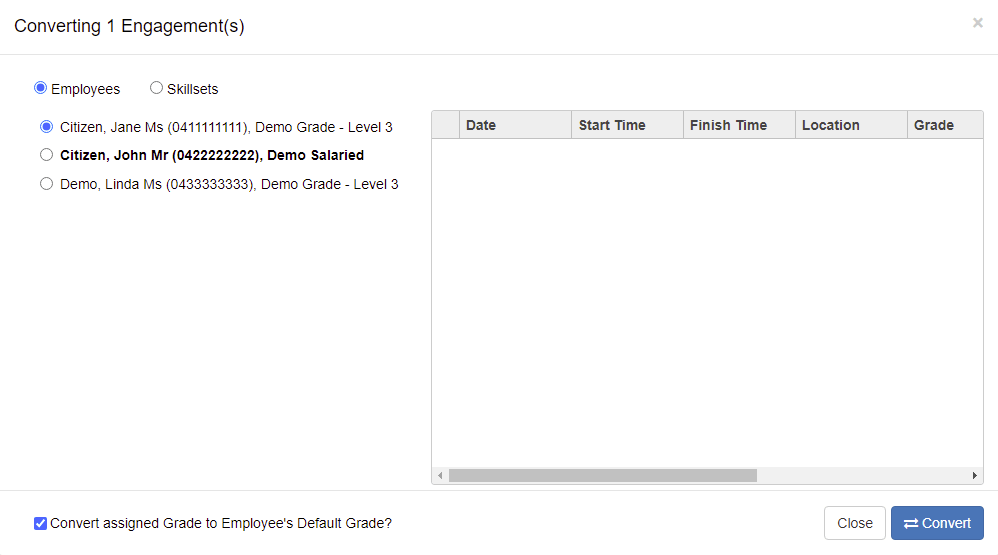
Figure #37: Convert Engagement(s) window – Employee selection
Once you have selected the new employee to be assigned to the Roster, select “Convert”.
Converting Rosters (Employee/Skillset) to Skillset Roster
Similarly, you can convert the selected Roster(s) to a Skillset by selecting the “Skillsets” radio button within the ‘Convert Engagement(s)’ window. To convert the selected Roster(s) to a Skillset, simply select the Grade you wish to assign to the Roster.

Figure #38: Convert Engagement(s) window – Skillset Grade selection
Authorising Rosters
Once the Planned/Timekeeping Engagements have been entered, they are required to be Authorised in order to be picked up by the Pay Run Controller and processed through payroll.
Authorise Planned Lines
To Authorise Planned line(s), highlight the Planned Engagement(s) you wish to Authorise, and select the ![]() button from the Roster toolbar.
button from the Roster toolbar.
Authorise Timekeeping Lines
Similarly, to Authorise Timekeeping line(s), highlight the Timekeeping Engagement(s) you wish to Authorise, and select the ![]() button from the Roster toolbar.
button from the Roster toolbar.
Smart Authorisation
The ability to perform Smart Authorisation is also available in the Inzenius Manager Portal, allowing the ability to Authorise a number of employee’s Rosters quickly and efficiently.
To change Smart Authorisation preferences, select the ![]() button from the Roster toolbar. Alternatively, you can right click the Roster grid and select “Roster Options”.
button from the Roster toolbar. Alternatively, you can right click the Roster grid and select “Roster Options”.
![]()
Smart Authorisation Settings and Filters
For Smart Authorisation to be enabled, the “Use Smart Authorisation” option will need to be flagged.
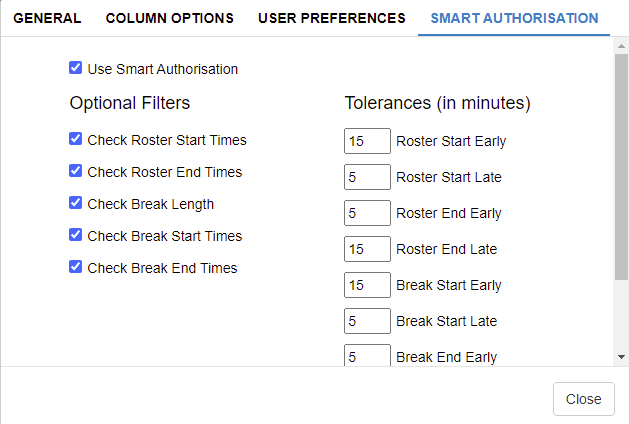
Figure #39: Roster Options – Smart Authorisation Options
When Smart Authorisation is enabled, the Roster screen will display a filter, allowing you to quickly and easily perform Authorisation (based on the checks flagged and tolerances entered).
To utilise Smart Authorisation, select an option from the Smart Authorisation filters drop-down menu and select the “Authorise All Planned” button.
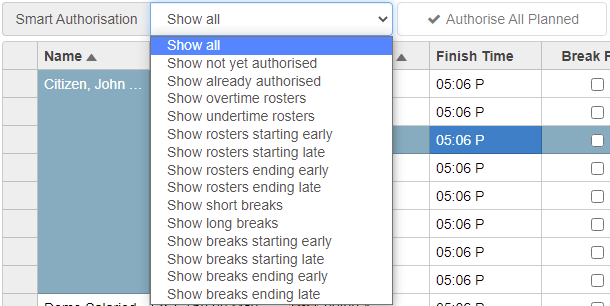
Figure #40: Smart Authorisation Filters
| Matching Criteria Option | Description |
| Show all | Displays all Planned, Timekeeping, and Authorised Rosters |
| Show not yet authorised | Displays all Planned and Timekeeping Rosters unauthorised |
| Show already authorised | Displays Planned and/or Timekeeping Rosters already authorised |
| Show undertime rosters | Displays all Timekeeping Rosters with “Total” time less than the corresponding Planned Roster |
| Show roster starting early | Display all Timekeeping Rosters with “Start” times earlier than the corresponding Planned Roster |
| Show rosters ending early | Displays all Timekeeping Rosters with “Finish” times earlier than the corresponding Planned Roster |
| Show rosters ending late | Displays all Timekeeping Rosters with “Finish” times later than the corresponding Planned Roster |
| Show short breaks | Displays all Timekeeping Rosters with “Break” times shorter than the corresponding Planned Roster |
| Show long breaks | Displays all Timekeeping Rosters with “Break” times longer than the corresponding Planned Roster |
| Show breaks starting early | Displays all Timekeeping Rosters with “Break Start” times earlier than the corresponding Planned Roster |
| Show breaks starting late | Displays all Timekeeping Rosters with “Break Start” times later than the corresponding Planned Roster |
| Show breaks ending early | Displays all Timekeeping Rosters with “Break Finish” times earlier than the corresponding Planned Roster |
| Show breaks ending late | Displays all Timekeeping Rosters with “Break Finish” times later than the corresponding Planned Roster |
Table #1: Smart Authorisation Filters
Engagement States
Engagement States show the progress of the Roster through the different stages in the Roster Acceptance process. The Engagement State structures is Working > Pre-Published > Published. These Engagement States work in conjunction with the Web Kiosk/Employee Portal.
In order to utilise this function, you will need “Enable Roster Acceptance Tracking” enabled in the ‘General’ tab of the Rostering Options and have the Web Kiosk/Employee Portal set up. When this option is enabled, the Roster toolbar will display the following options.
![]()
These options will provide the Roster with a system of planning which is more interactive and allows for real time inputs from all staff members, e.g., Rostering officers can perform their planning based on sending out an initial and a second round of Rosters based on each employees’ input, reducing the requirement for meeting and excessive communication.
The Engagement State Column
The Engagement State Column is located between the “Date” and “Start Time” columns. Only Planned Engagements will show an Engagement State icon; Timekeeping and Authorised lines will show the ![]() and
and ![]() icons accordingly.
icons accordingly.
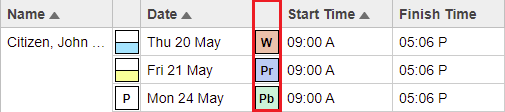
Figure #41: The Engagement State Column
| Indicates a Planned Engagement | |
| Indicates a Time keeping Engagement | |
| Indicates an Authorised Engagement | |
| Indicates a Planned Engagement in the Working state | |
| Indicates a Planned Engagement in the Pre-Published state | |
| Indicates a Planned Engagement in the Published state |
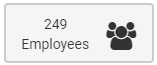
Entities
Similar to the Inzenius Core application, Users of the Manager Portal will be able to View, Add, Edit and Delete Location and Cost Centre Entities from the Entities Page. In the Manager Portal, Users will be able to enter the GPS location for Locations and Cost Centres, by either entering the GPS Coordinates or clicking on the Map displayed to Pin it.

Figure #42: The Entities Page
An Entity Tree will be available for Locations, Cost Centres, Events and Positions. Once a Location, Cost Centre, Event or Position is selected from the Entity Tree it will show that selection’s details.
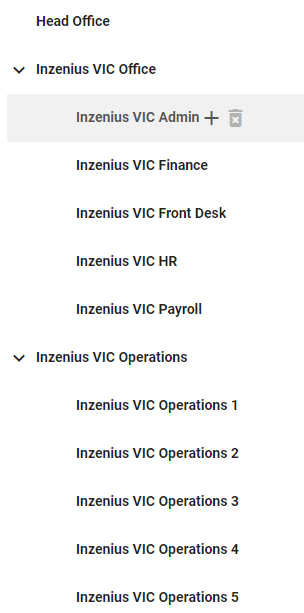
Figure #43: The Entity Tree
 |
Indicates Total Employees in Select Location / Cost Centres |
| Add New Entity | |
| Delete Existing Entity |
Locations
Locations are utilised to depict the specific department where Employees can be Rostered to (where the employee will be working), and also as a way to further granulise Costings and Reports. A Manager can also be assigned for the specific Location.
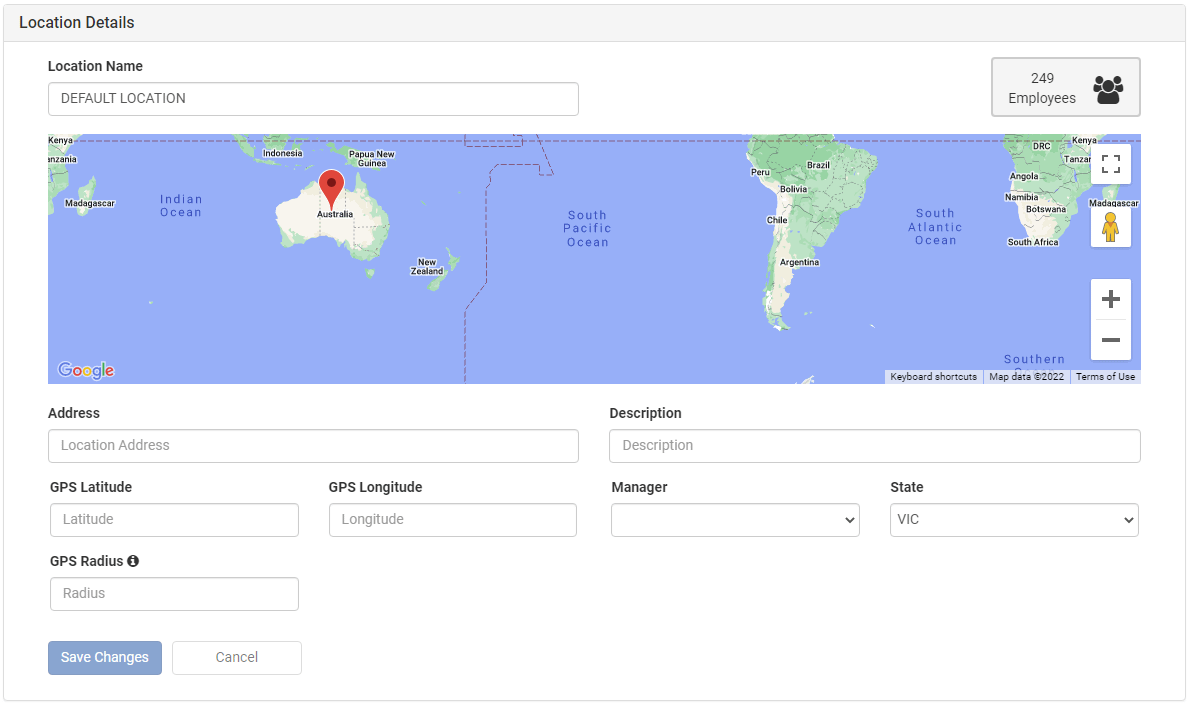
Figure #44: The Location Details Window
Alert: The State/Territory selected can affect Payroll processing and some Reporting, therefore should be assigned correctly.
Cost Centres
Cost Centres are utilised as an efficient way to Group and Summarise in Costings and Reporting. A Manager can also be assigned for the specific Cost Centre.
Figure #45: The Cost Centre Details Window
Events
Events can be setup as an efficient way to Roster employees and trap costs to specific Events held.
Figure: The Event Details Window
Positions
Positions can be setup as a useful way for managers to inform their employees of the Position they will be undertaking during a shift.
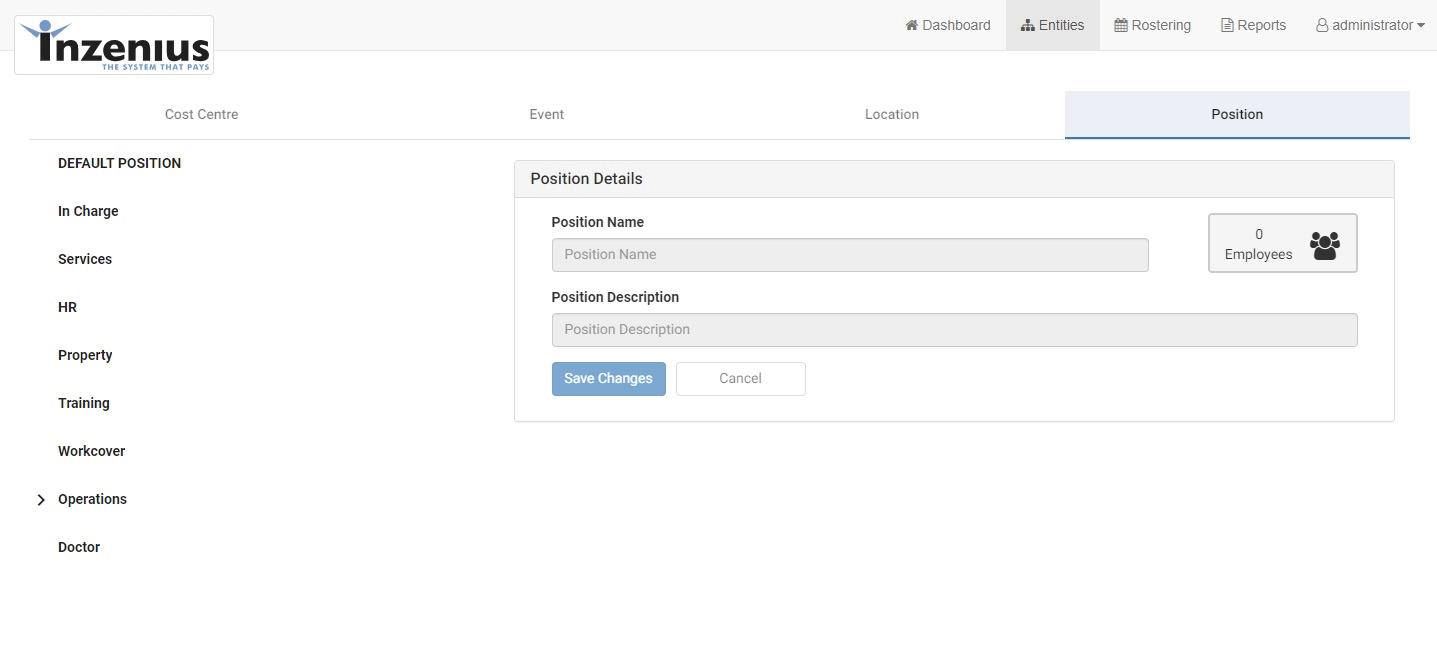
Figure: The Position Details Window
Roster Reports
Similar to the Inzenius Core Application, there are a host of available Roster Reports available within the ‘Rostering’ page of the Inzenius Manager Portal.
Reports List & Navigation
To open the Reports List, click on the Reports button ![]() in the Rostering page.
in the Rostering page.

Select the Report you require and click “Show Report”.
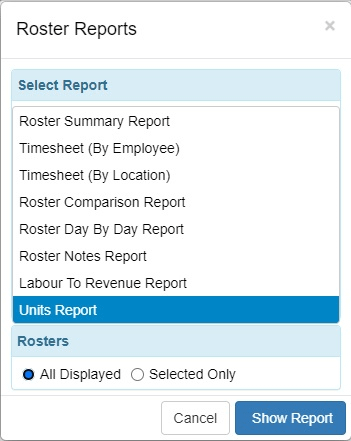
Note: Reports available will depend on your businesses configuration and User permissions.
Once selected, the Reports page will pop open. All reports include the same navigation buttons:
![]()
| Button/s | Description |
| Report Options | |
| Page Up / Down | |
| Zoom In / Out | |
| Print (or Save to PDF) | |
| Export to Excel |
Reports Options Displayed vary between the reports:
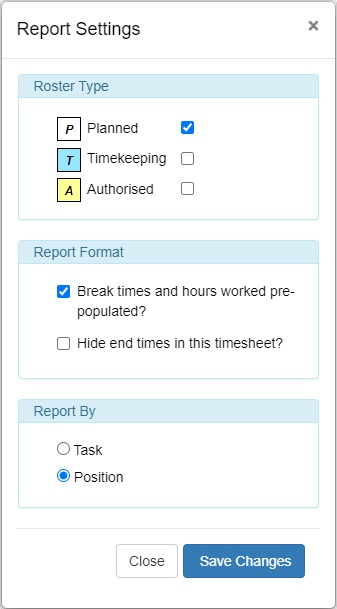
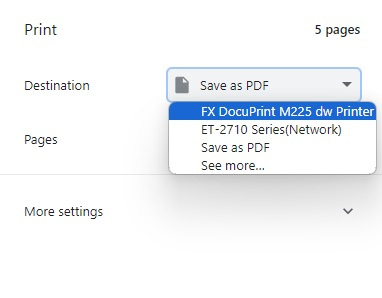
The Print button also allows you to select “Save as PDF” to save the report as a PDF.
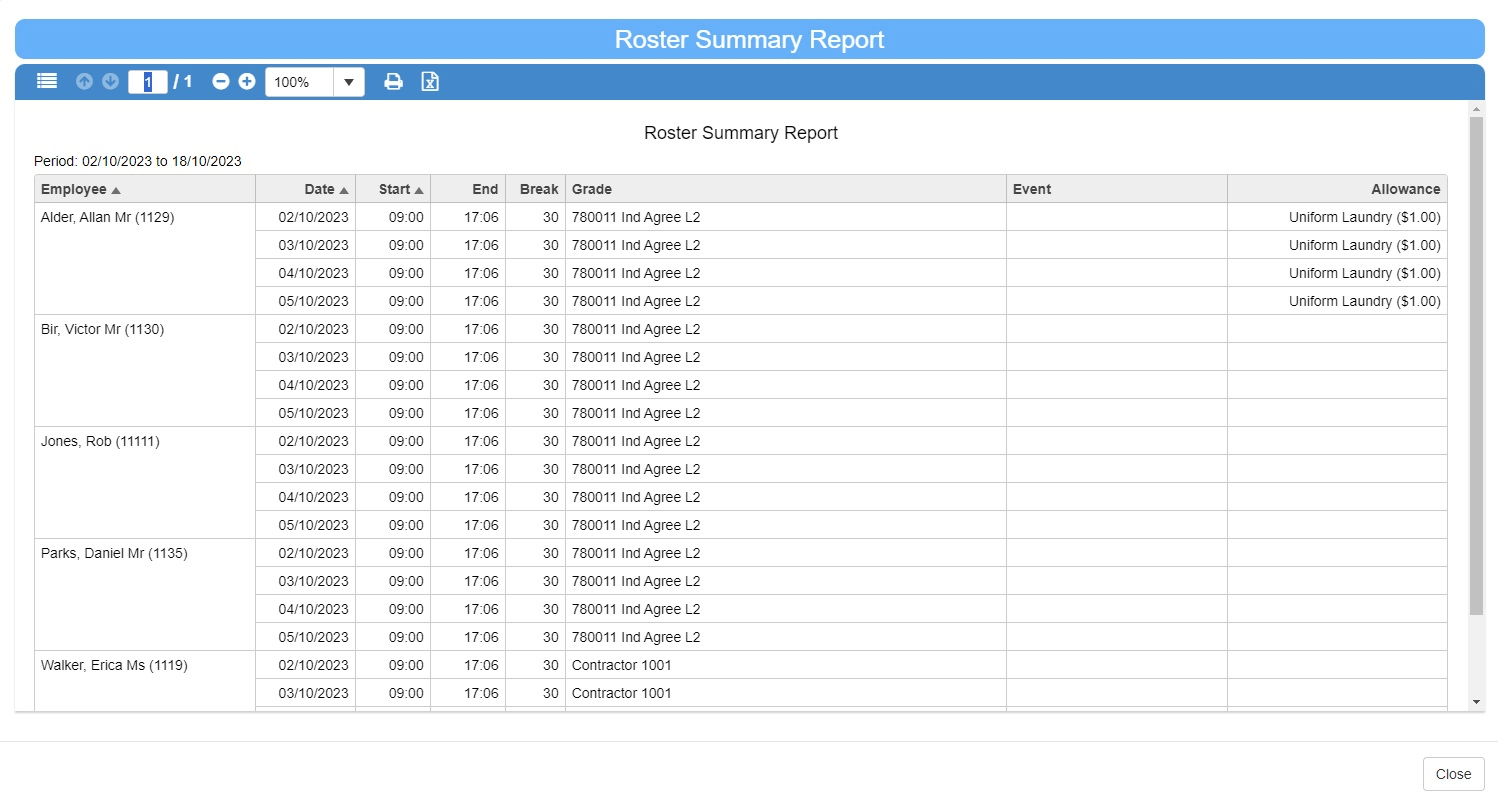
Roster Summary Report
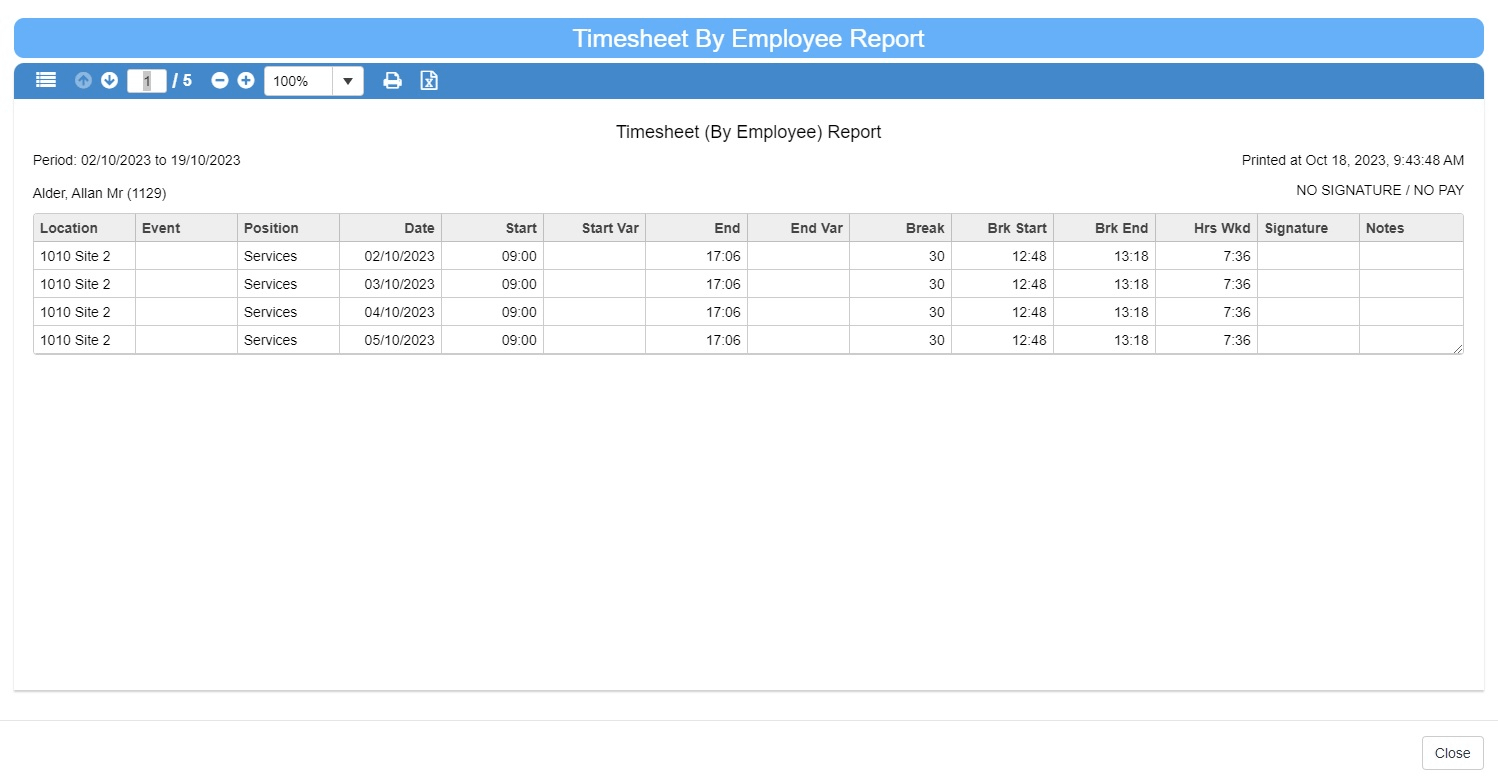
Timesheet (By Employee)
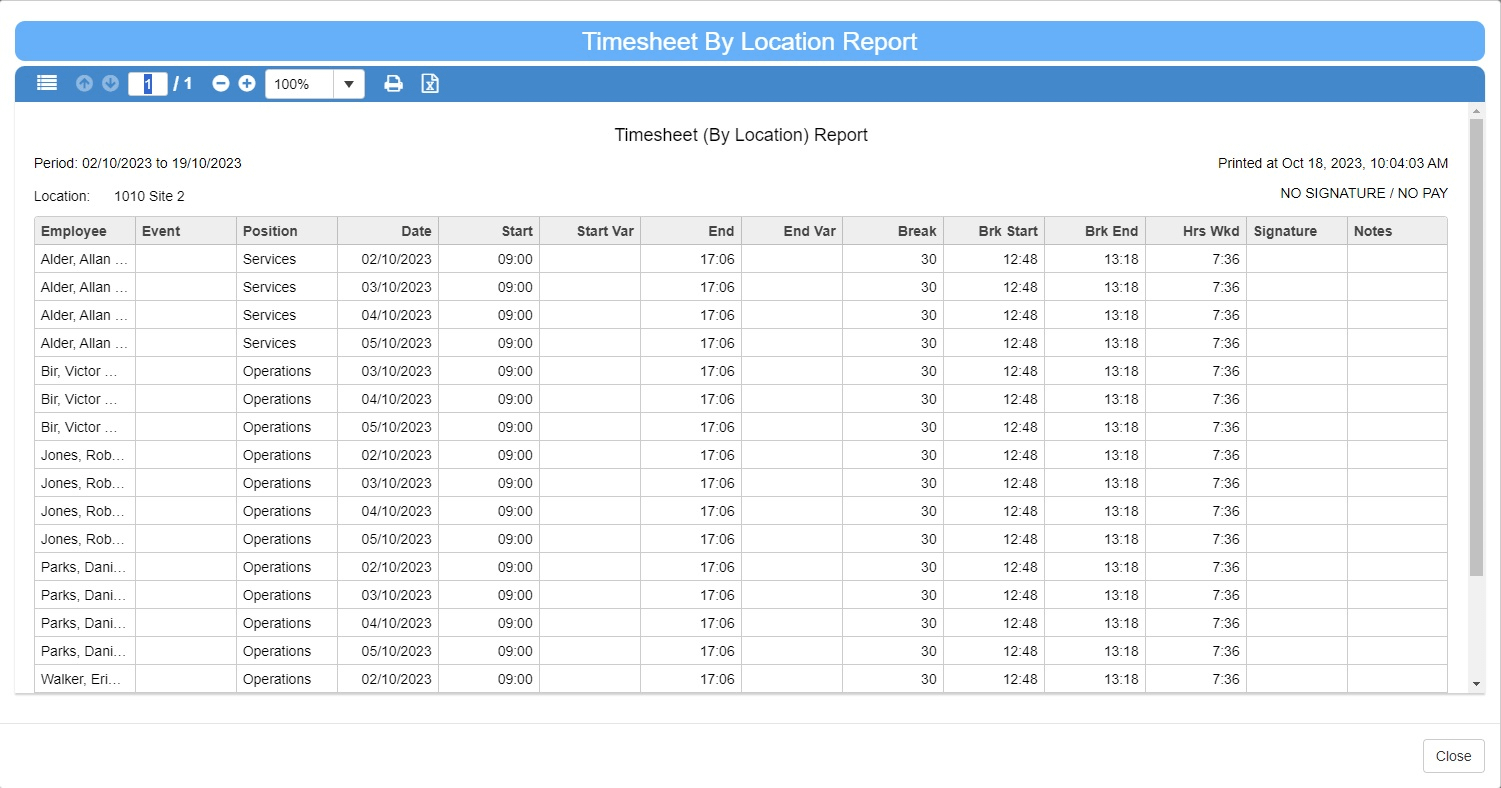
Timesheet (By Location)
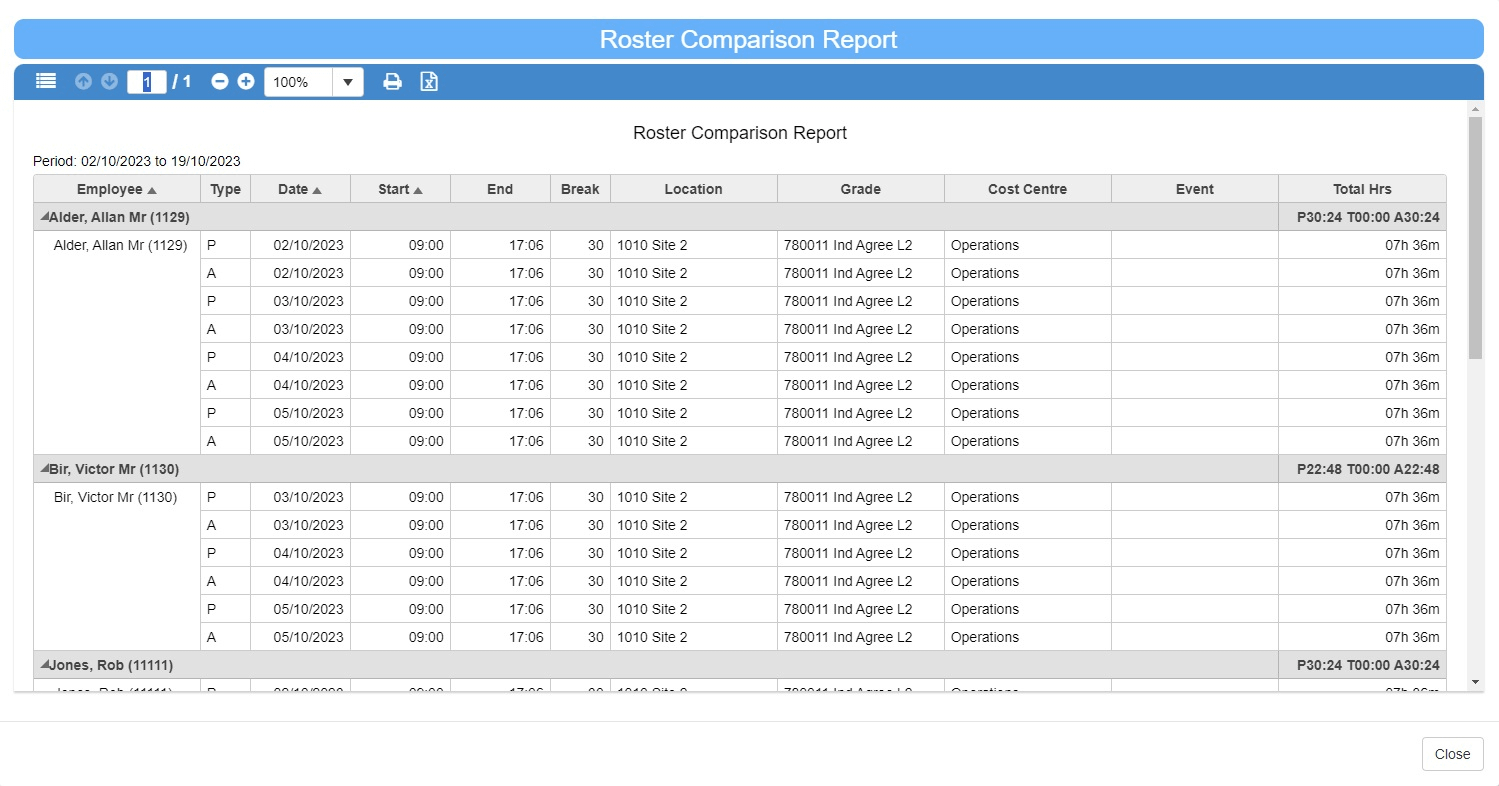
Roster Comparision Report
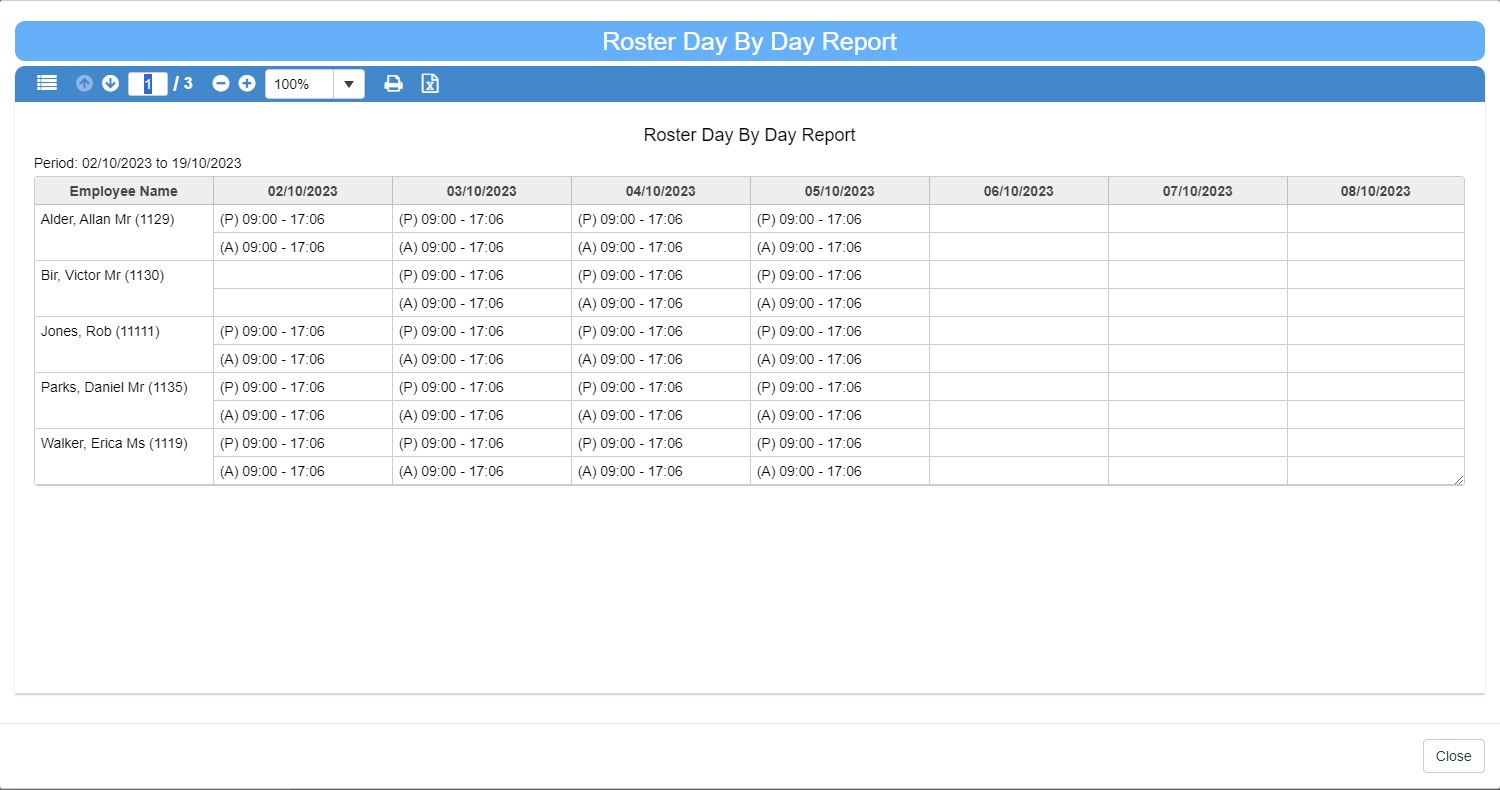
Roster Day By Day Report
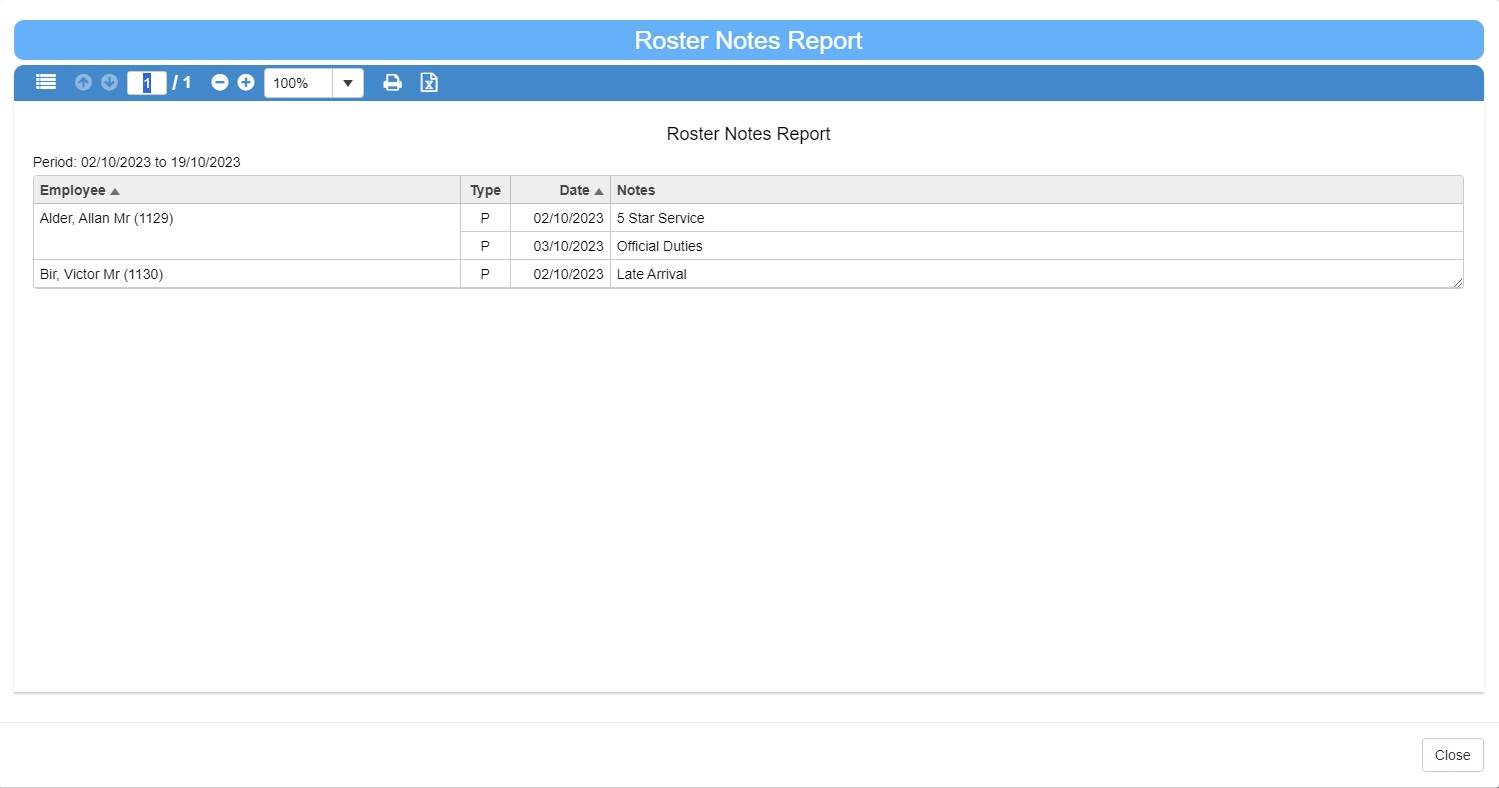
Roster Notes Report
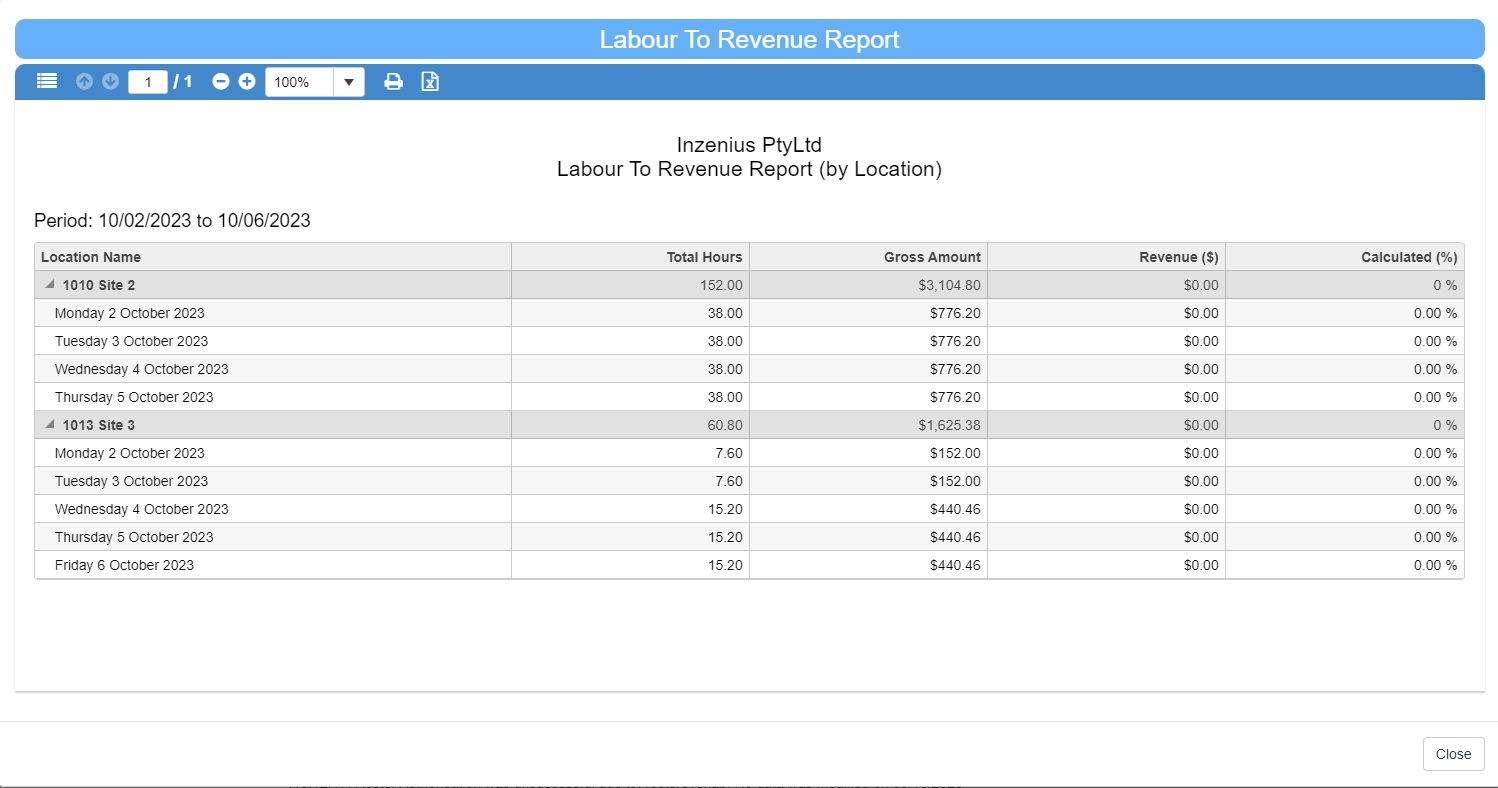
Labour To Revenue Report
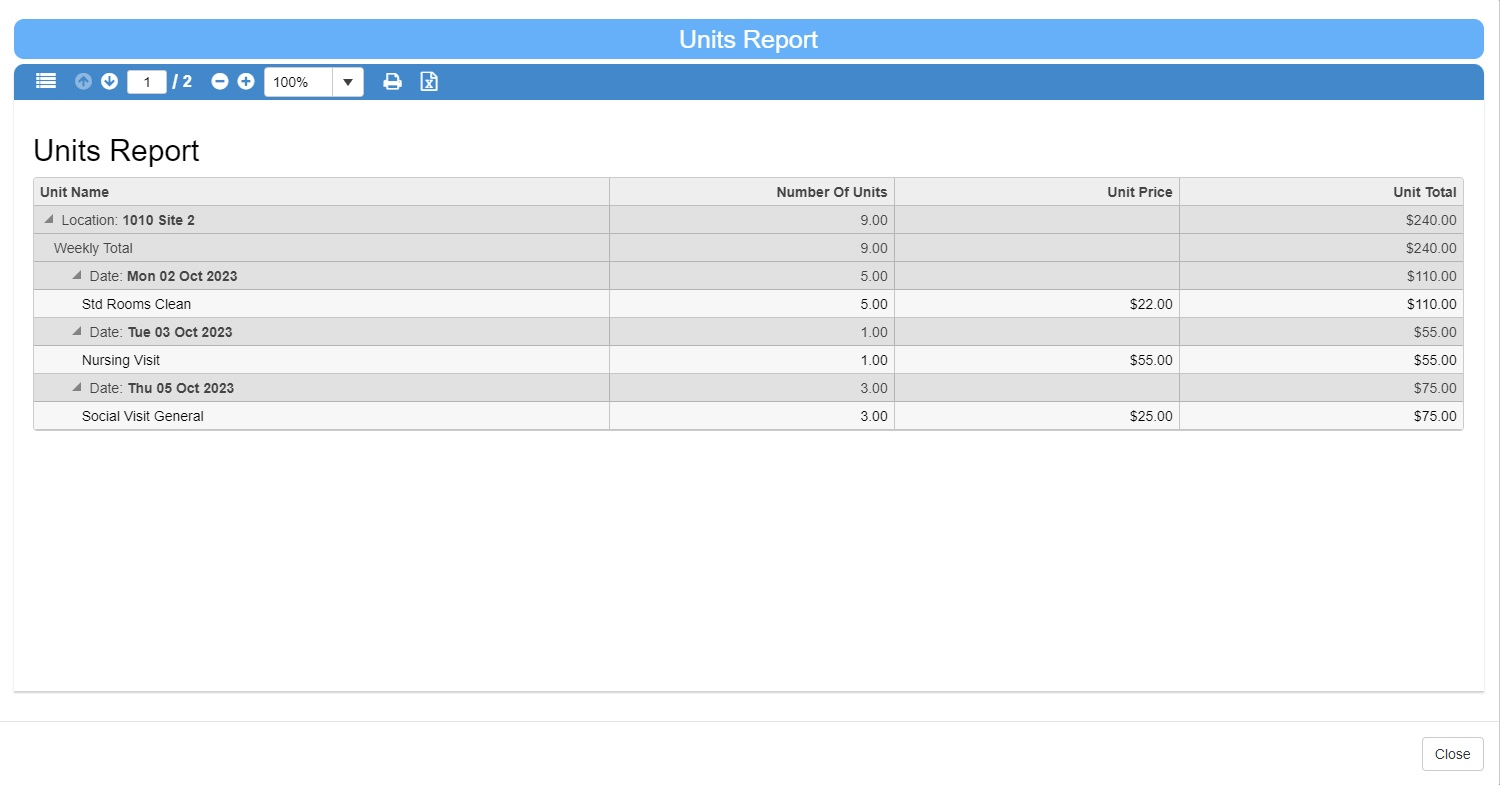
Units Report
Roster Costing
The ‘Roster Costing’ Report provides a breakdown of costs for employees and their respective Engagement/Shifts selected.
To generate the ‘Roster Costing’ Report, select the ![]() button from the Roster toolbar. Alternatively, you can right click the selected Engagement(s)/Shift(s) in the Roster grid and select “Roster Costing”.
button from the Roster toolbar. Alternatively, you can right click the selected Engagement(s)/Shift(s) in the Roster grid and select “Roster Costing”.
![]()
From here, you are able to generate the Costing Report based on your reporting selection.
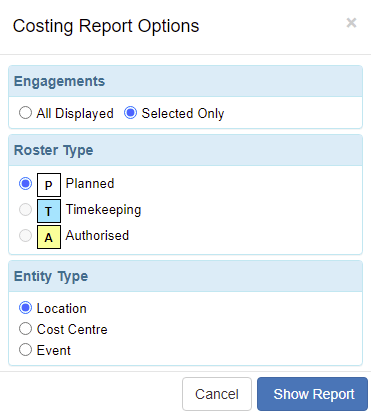
Figure #46: Costing Report Parameters
Note: Parameters vary depending on the Report selected.
| Entity Type | Description |
| Location | The Costing Report will be grouped by Location and will provide a grand total for each, with the sub-totals for each employee |
| Cost Centre | The Costing Report will be grouped by Cost Centre and will provide a grand total for each, with the sub-totals for each employee |
| Event | The Costing Report will be grouped by Event and will provide a grand total for each, with the sub-totals for each employee |
Table #2: Costing Report Entity Types
Note: The ‘Cost Engagements’ Report costs at a Roster level – thus, any Time Period Overtime, Payroll Rules and Allowances/Deductions applied at the time of Pay Run execution (at the Payroll level) will not be costed.
Export Rosters to Excel
Rosters can be exported from the Inzenius Manager Portal to an Excel Spreadsheet if required. To export Rosters to Excel, select the ![]() button from the Roster toolbar. Alternatively, you can right click in the Roster grid and select “Export Rosters to Excel”. You will then be prompted to select where you wish to save the Excel file.
button from the Roster toolbar. Alternatively, you can right click in the Roster grid and select “Export Rosters to Excel”. You will then be prompted to select where you wish to save the Excel file.
![]()
Email Timesheet
Timesheets can be emailed to employees directly from the Inzenius Manager Portal, thus removing the need to generate the Timesheet (by Employee/Location) reports, save to PDF and send or print manually.
To email Timesheets, select the ![]() button from the Roster toolbar. Alternatively, you can right click in the Roster grid and select “Send Timesheets via Email”.
button from the Roster toolbar. Alternatively, you can right click in the Roster grid and select “Send Timesheets via Email”.
![]()
In the ‘Email Timesheets’ pop-up window, you are able to manually enter recipients’ email addresses, as well as enter an email address you wish to Bcc. Alternatively, you can tick the “Send Timesheets to related Employees” option which will automatically reference the email address for each employee present in your Rostering grid.

Figure #47: Email Timesheets
| Email Timesheet Field | Description |
| To | Option to manually enter recipient email address(es) |
| Bcc | Option to enter Bcc email address(es) |
| Send Timesheets to related Employees | Option to automatically send Timesheet to pertinent employees |
| Subject | Enter email Subject line |
| Message | Automatic Message which will prepopulate the employee’s First Name and message upon sending |
| Rosters | Option to send all displayed employees Timesheets to necessary employees, or send the selected Timesheets to the applicable employees |
| Roster Type | Send Planned, Timekeeping, or Authorised Rosters |
| Timesheet Format | Show/hide Break Times and/or End Times |
Table #3: Email Timesheets Field Information
Additional Manager Portal Reports
Some additional Manager Portal Reports may/may not be available to all Clients. To discuss additional reporting options, please contact Inzenius Support (support@inzenius.com).
Standard Manager Portal Reports available to all Clients are the ‘Timekeeping Report’ and ‘Weekly Roster Report’. These reports are exportable to Excel, and/or may be printed if required.
Timekeeping Report
For Clients who utilise one of Inzenius’ Timekeeping options, the Timekeeping Report may be utilised to display employee’s Timekeeping Data for a selected Period, and will highlight any Timekeeping Rows that may need to be investigated accordingly.
The Timekeeping Report will highlight Timekeeping Records in red where an employee has recorded a Clock IN entry, but not a Clock OUT entry.

Figure #48: Timekeeping Report – Where Timekeeping Line has no Clock OUT entry
Conversely, the Timekeeping Report will highlight Timekeeping Records in blue where an employee has recorded a Clock OUT entry, but not a Clock IN entry.

Figure #49: Timekeeping Report – Where Timekeeping Line has no Clock IN entry
If the employee’s Timekeeping Row is complete, this will be displayed as a white row.

Figure #50: Timekeeping Report – Where Timekeeping Line is complete
Timekeeping Report: GPS Enabled Timekeeping Options
For Clients who utilise Inzenius’ Voice Validation Timekeeping system (or an external GPS enabled TK system), the Timekeeping Report will display coordinates relating to where the employee has recorded Timekeeping.
Additionally, a Google Maps view of any logged coordinates is available within the Timekeeping Report. Where an employee Clocks In/Out via a GPS enabled Timekeeping System, the Google Map view will display a location pin at the Location (within a 5km tolerance) associated with the coordinates.
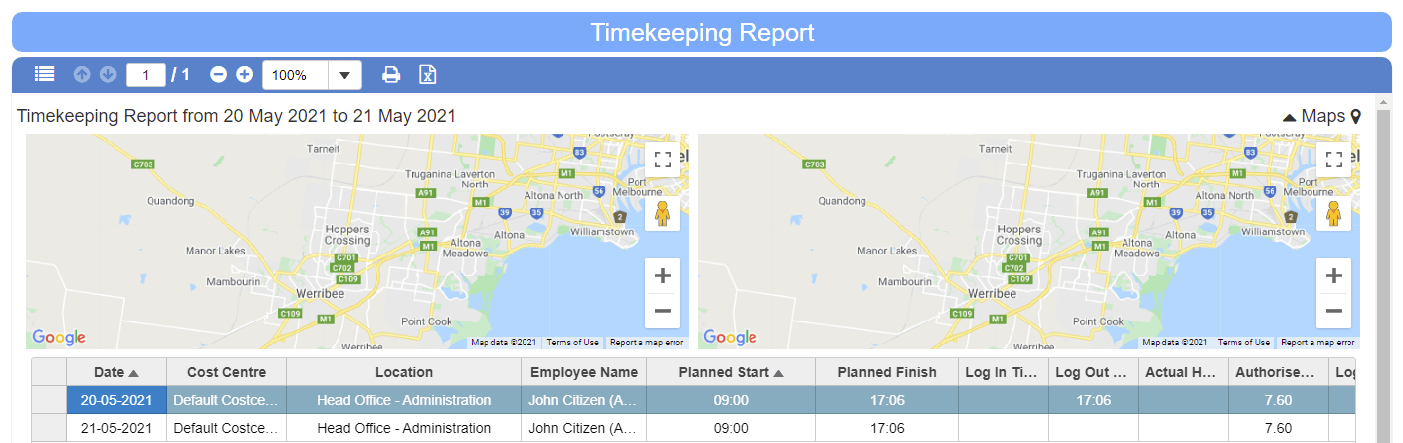
Figure #51: Timekeeping Report – Google Map view
Note: The Google Maps will remain empty if you do not utilise GPS enabled Timekeeping. If you are interested in GPS enabled Timekeeping options, please contact support@inzenius.com for further information.
Note 2: When the Timekeeping Report is exported, the Google Maps view will not be included in the export.
Weekly Roster Report
The Weekly Roster Report provides a summary of Rosters for 7 days. The 7 days included in the Report will be dependent on the “From” date entered in your Reporting Parameters.
Figure #52: Weekly Roster Report
User Options
The User Options drop-down menu is where Users are able to change their own password, and/or Logout of the Manager Portal.
Change Password
When changing your password, you must complete all fields to successfully save your changes. Further, your new password must meet the following criteria to ensure that it complies with security protocols:
- Be at least 12 characters in length
- Contain at least 1 uppercase letter
- Contain at least 1 lowercase letter
- Contain at least 1 number
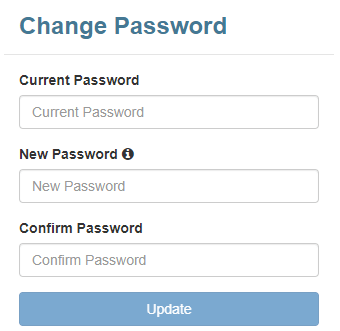
Figure #53; Change Password Screen
Logout
Selecting the ‘Logout’ option will immediately end your session and log you out of the Manager Portal, and redirect you back to the ‘Login’ page of the Manager Portal.