Rostering
Inzenius Rostering Manual Overview
The Inzenius Rostering screen has been designed for departmental level scheduling, including forecast labour reporting, employee notification, and cost management efficiency. The ability to have employees selected for Shifts based on their skills, permissions, and availabilities simplifies the Rostering process. Departmental templates can be readily produced for ongoing use and past Rosters can be copied from periods or events of a similar nature for future reuse. Rosters, once developed, can be published to the Web Kiosk for employee notification or acceptance.
Navigation and Rostering Overview
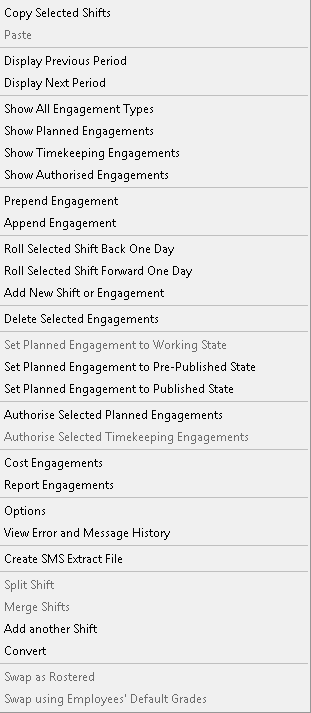
Toolbar Legend
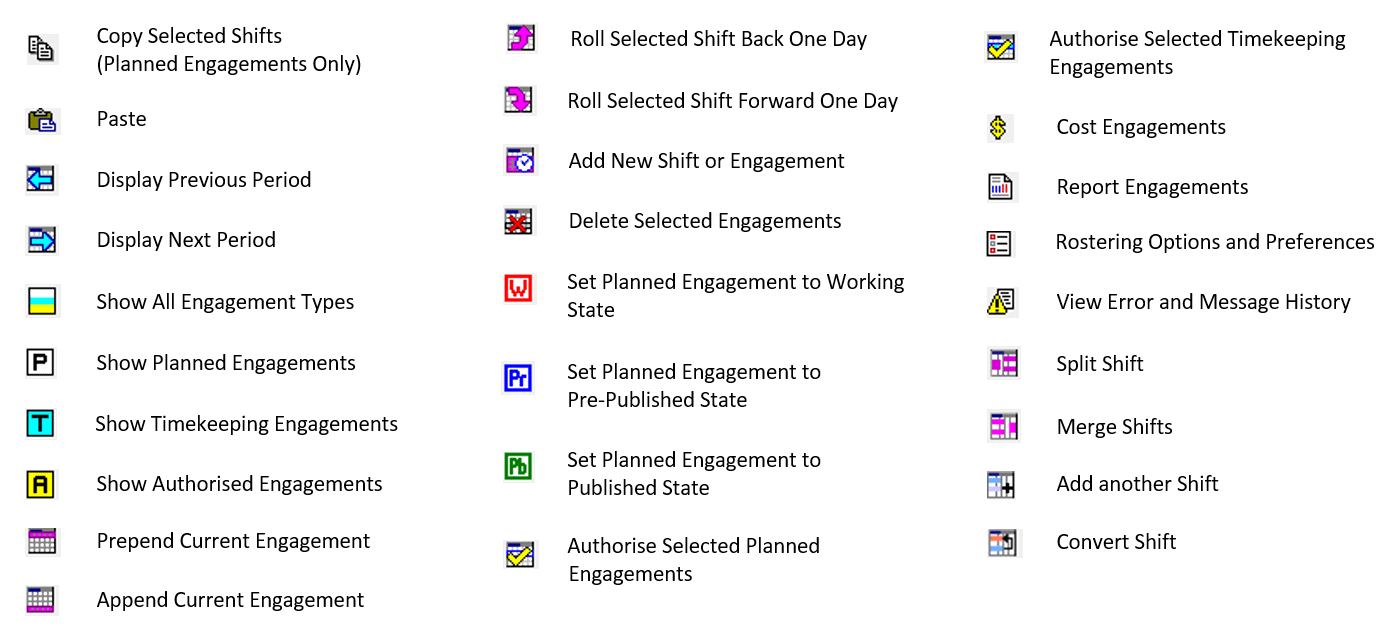
These options are also available by right clicking the mouse on a selected roster.
Roster Screen Options and Preferences
There are a multitude of options and preferences that can be enabled/disabled to suit User’s needs in the Rostering screen, such as choosing to show or hide certain columns in the Roster Grid, display options, as well as the ability to automatically select Entities that have Rosters.
Note: Preferences set in the ‘Rostering Options’ screen will only affect the User logged in.
To change options/preferences, select the ![]() button from the Roster toolbar. Alternatively, you can right click the Roster Grid and select “Options”.
button from the Roster toolbar. Alternatively, you can right click the Roster Grid and select “Options”. ![]()
General
The ‘General’ tab provides a list of general Rostering options Users can select/deselect.
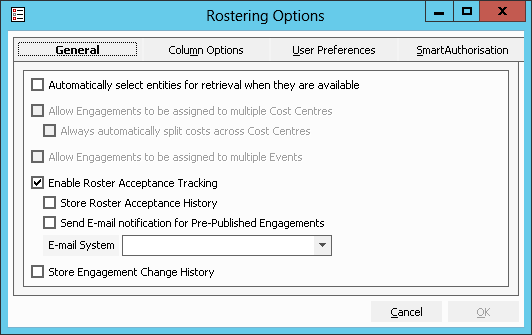
Figure #1: Rostering Options ‘General’ Tab
Note: Roster Acceptance Tracking should only be utilised if the Web Kiosk has been set up for the client. If you are unsure of whether you have the Web Kiosk set up, please contact your Payroll Manager.
Column Options
The ‘Column Options’ tab provides a list of columns that can be shown or hidden within the Roster Grid.
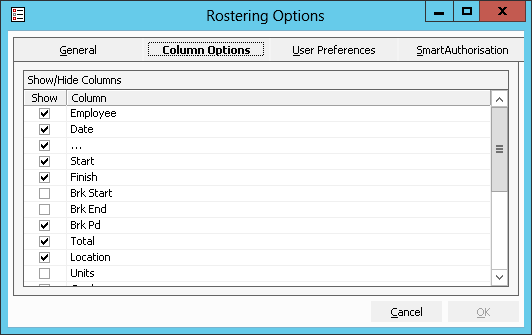
Figure #2: Rostering Options ‘Column Options’ Tab
User Preferences
The ‘User Preferences’ tab provides further options pertaining to time format, roster sorting, and the way in which warnings and errors are presented.
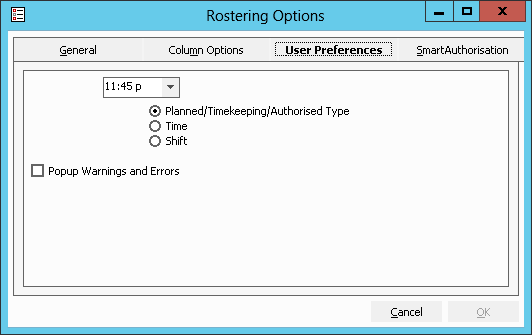
Figure #3: Rostering Options ‘User Preferences’ Tab
Note: Selection of “Popup Warnings and Errors” will ensure that each time a warning or error is apparent, it is presented in a popup dialogue screen, as opposed to the bottom of the Rostering screen. This setting will mean that all warnings and errors will be displayed on screen, including if an employee has been Rostered to a shift longer than their Standard Hours, if an employee has a negative Leave balance, etc.
Smart Authorisation
The ability to perform Smart Authorisation (automatic Authorisation) is also available in Inzenius, allowing the ability to Authorise a number of employee’s Rosters quickly and efficiently.

Figure #4: Rostering Options ‘Smart Authorisation’ Tab
Roster Viewing Pane
The Roster Viewing Pane, located in the middle of the Roster screen, has a variety of display options to optimise the Rostering process.
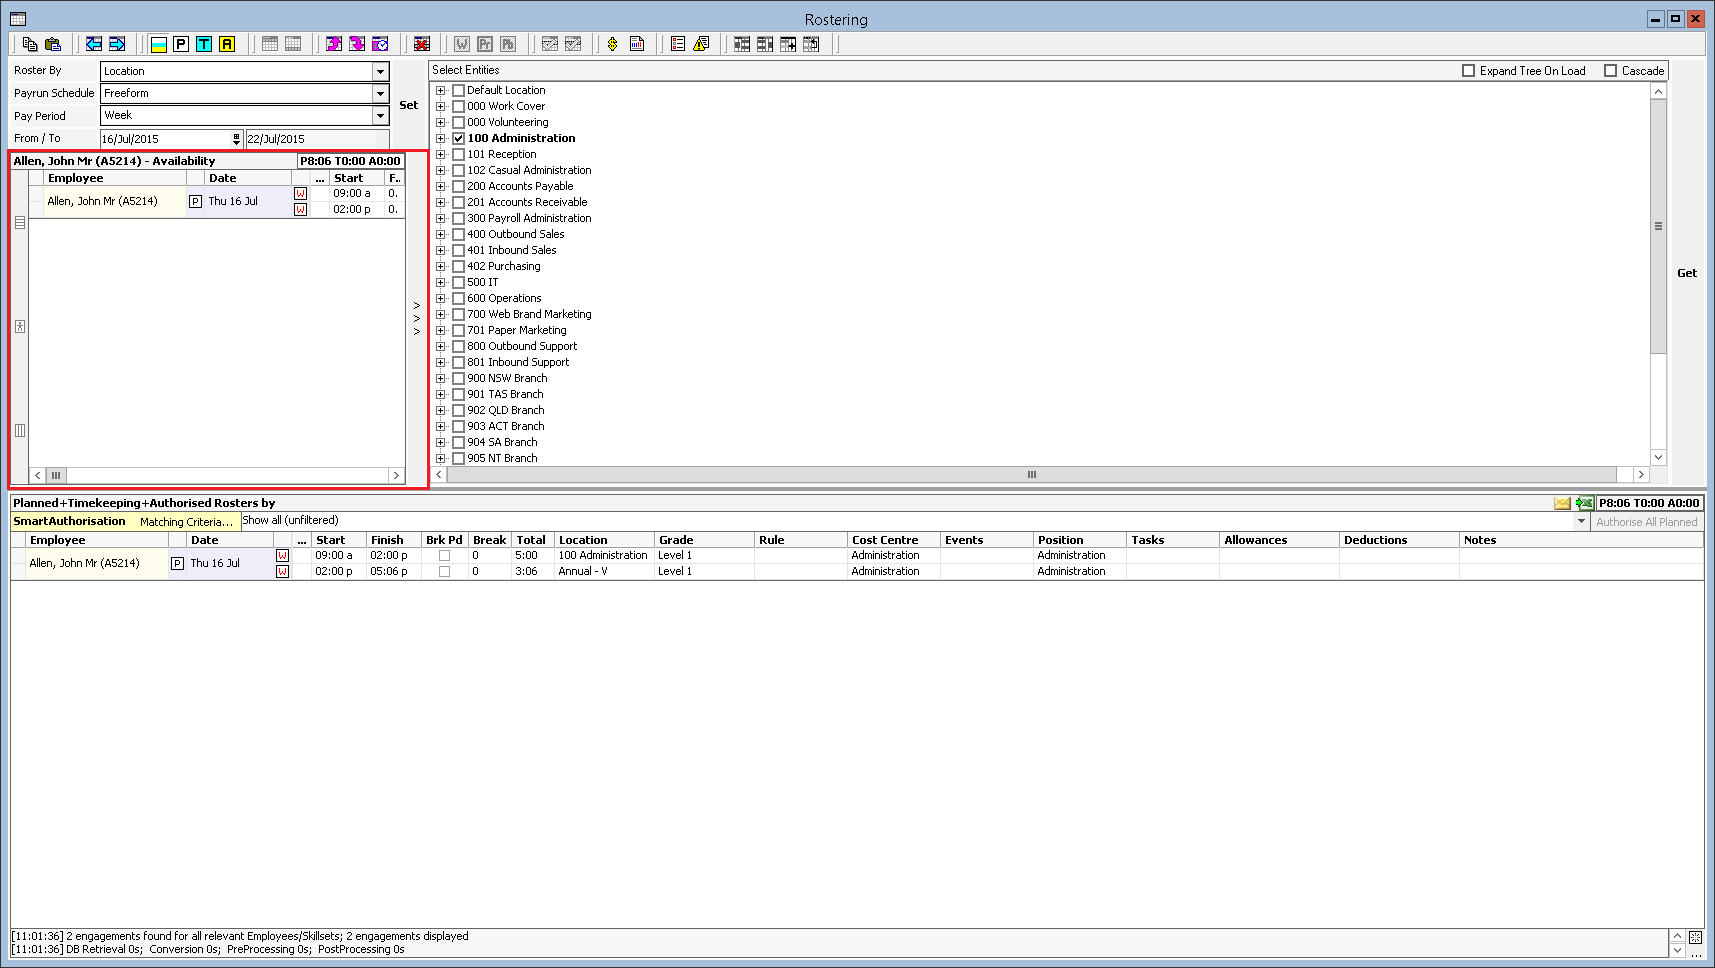
Figure #5: Roster Viewing Pane
When the Rostering screen is first opened, the Viewing Pane will be minimised to allow for larger view of the ‘Select Entities’ tree. To expand the Viewing Pane to full view, select the arrow buttons.
Show Availability by Date for Selected Employee
By selecting the “Show Availability by Date for selected Employee” button, the Viewing Pane displays the highlighted employee’s (in the Roster Grid) availability for the selection Period.

Figure #6: Rostering screen, Show Availability by Date for selected Employee
The “Show Availability by Date for selected Employee” Viewing Pane will enable the User to see if the employee is Rostered to an Entity (Cost Centre, Location, Position, or Grade) other than those they have access to view. This assists with Rostering where an employee often works in multiple Locations ran by different Managers.
Additionally, the total Planned, Timekeeping, and Authorised hours are displayed as a way to efficiently Roster employees to a minimum or maximum set of hours.
Show Selected Employee’s Work Time Details
By selecting the “Show selected Employee’s work time details” button, the Viewing Pane displays the highlighted employee’s (in the Roster Grid) work details.

Figure #7: Rostering screen, Show elected Employee’s work time details
The “Show selected Employee’s work time details” Viewing Pane will enable the User to view ‘Standard Work Times’, ‘Holidays’, ‘Leave Available’, ‘Standard Days Off’, ‘Availability’/’Unavailability’, and ‘Qualifications’, all configured within and obtained from the Employee File.
The work details screen removes the need to locate the Employee File for basic information utilised for Rostering purposes.
Additionally, the total Planned, Timekeeping, and Authorised hours are displayed as a way to efficiently Roster employees to a minimum or maximum set of hours.
Show Availability by Employee For all Days in Period
By selecting the “Show Availability by Employee for all days in period” button, the Viewing Pane displays the highlighted employee’s (in the Roster Grid) availability for the Period selected (as per Roster parameters) in a format similar to a calendar/timesheet.

Figure #8: Rostering screen, Show Availability by Employee for all days in period
The “Show Availability by Employee for all days in period” Viewing Pane will enable the User to have a table format view of the hours the employee is Rostered to for the Period.
Furthermore, this view can be saved to Excel and printed directly from the Rostering screen, by utilising the “Export Grid to Excel” ![]() or “Print Roster”
or “Print Roster” ![]() buttons in the top right corner of this Rostering pane.
buttons in the top right corner of this Rostering pane.
Setting Parameters
Selecting existing or creating new Rosters works on a 2-step parameter selection process: Roster Parameters > Entity Selection. Once the parameters have been defined, the final step is to begin creating or edit existing Rosters.
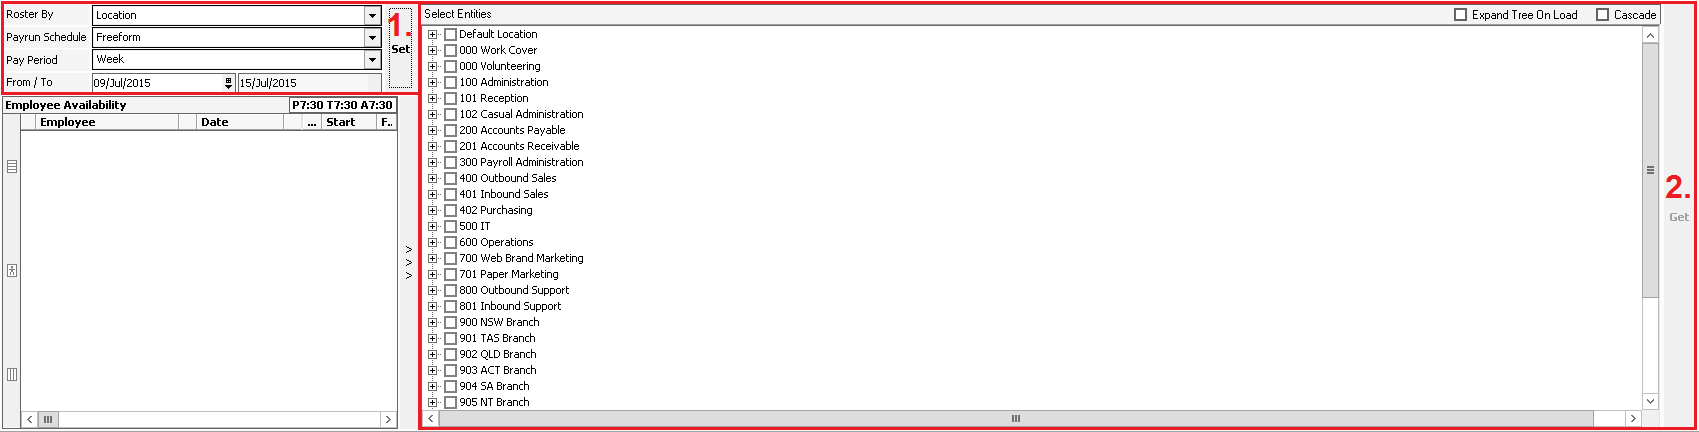
Figure #9: Rostering screen, selection process
Roster Parameters
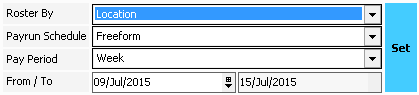
Figure #10: Rostering Parameters
Tip: The ‘Pay Period’ option “4Weekly” will display 4 whole weeks (e.g. 06/07/2015 – 03/08/2015), whereas the option “Month” will display the calendar month dates (i.e. 01/07/2015 – 31/07/2015).
Once all required parameters have been input, select the “Set” button to retrieve the list of Cost Centres, Employees, Events, Grades, Locations or Positions (depending on your chosen ‘Roster By’ value).
Entity Selection
The Entity Selection menu will display a list of Entities available to view Rosters for. The type of Entities shown depends on the ‘Roster By’ value selected.
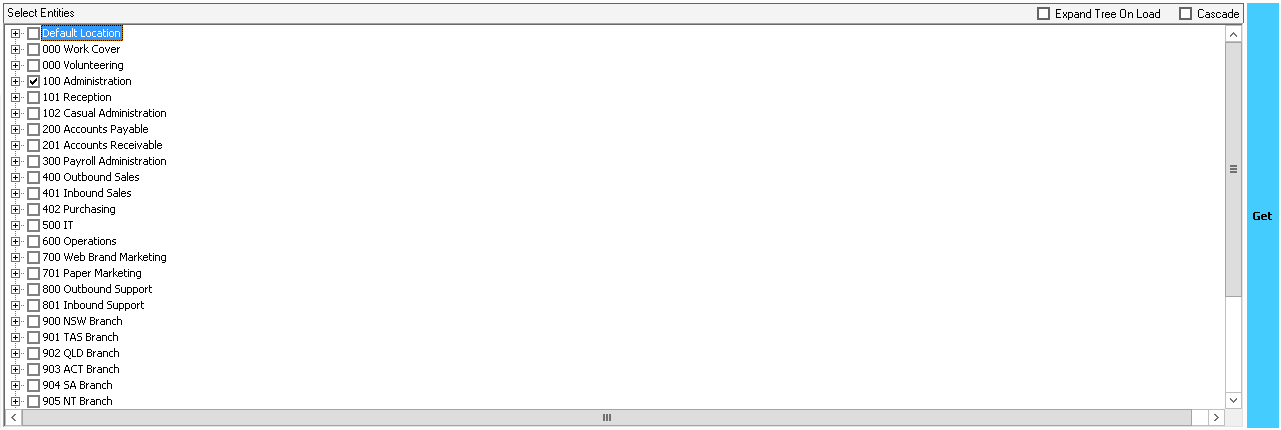
Figure #11: Rostering Entity Selection
Entities that already have Rosters attached to them for the Period selected will be displayed in bold.
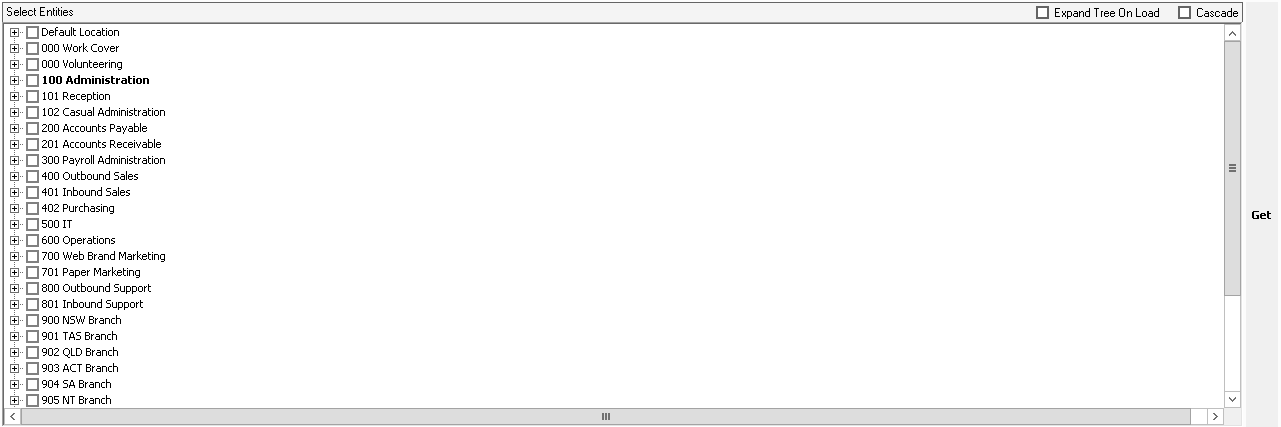
Figure #12: Rostering Entity Selection (Bolded with Rosters)
Tip: Flag ‘Expand Tree On Load’ before selecting the “Set” button to expand all Entities within the Entity tree.
Tip: Flag ‘Cascade’ to automatically select all Child Entities when a Parent Entity is selected.
From the Entity Selection, flag the applicable Entities and select the “Get” button to generate Rosters.
With the Roster Parameters and Entity Selection now set, Rosters will be able to be edited or created as required.
Shifts and Engagements
Throughout this manual and the use of Inzenius, you will commonly see reference to ‘Shifts’ and ‘Engagements’. Below will define these terms.
Shifts
Shifts are all Rosters for a day for an employee. A Shift can include one or multiple Planned, Timekeeping, and/or Authorised Engagements. This is easily denoted by the “Date” column.
![]()
Figure #13: Example of a Shift for One Day
It is possible to have multiple Shifts for the one day. Again, these are easily denoted by the “Date” column, where there is more than one of the same date present.

Figure #14: Example of Multiple Shifts for One Day

Figure #15: Example of Multiple Engagements in One Shift for One Day
Engagements and Engagement Types
Engagements are each singular line within a Shift. There are three types of Engagements; Planned, Timekeeping, and Authorised.

Figure #16: Example of a Shift with all 3 Engagement types
You can show or hide each engagement type in your roster view by selecting or deselecting the toggle/s required.
![]()
![]() Show All Engagement Types
Show All Engagement Types
![]() Show Planned Engagements
Show Planned Engagements
![]() Show Timekeeping Engagements
Show Timekeeping Engagements
![]() Show Authorised Engagements
Show Authorised Engagements
P/T/A Indicator Column
The P/T/A Indicator Column (Planned / Timekeeping / Authorised) is between the Employee Column and the Date Column. The icons displayed for each engagement denotes what type/s of engagements are present for the shift. This is important when you have hidden any of the engagement types in your roster view.
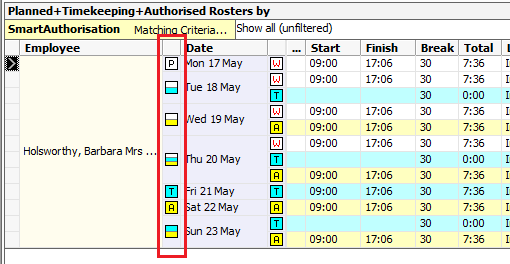
Figure #17: The P/T/A Indicator Column
![]() Planned Engagement/s only
Planned Engagement/s only
![]() Timekeeping Engagement/ only
Timekeeping Engagement/ only
![]() Authorised Engagement/s only
Authorised Engagement/s only
![]() Planned, Timekeeping and Authorised Engagements present
Planned, Timekeeping and Authorised Engagements present
![]() Planned and Timekeeping Engagements present
Planned and Timekeeping Engagements present
![]() Planned and Authorised Engagements present
Planned and Authorised Engagements present
![]() Timekeeping and Authorised Engagements present
Timekeeping and Authorised Engagements present
Planned Engagements
New Rosters are, by default, created as a Planned Engagements. These Planned lines will appear as white Engagements, can be edited freely, and all fields can be altered to suit Rostering requirements.
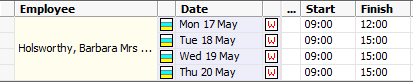
Figure #18: Examples of Planned Engagements (Planned Engagements Only Toggled)
Planned Engagements should represent what an employee is anticipated to work.
Timekeeping Engagements
Timekeeping Engagements appear on the Roster as blue lines and are typically situated underneath Planned lines (depending on User preferences.

Figure #19: Examples of Timekeeping Engagements (Timekeeping Engagements Only Toggled)
They can be manually created or automatically created using imported data from an external timekeeping source (device or software), and represent what an employee actually worked.
Authorised Engagements
Authorised Engagements appear on the Roster as yellow lines, and are typically situated underneath corresponding Planned/Timekeeping lines (depending on User preferences).

Figure #20: Examples of Authorised Engagements (Authorised Engagements only Toggled)
They are manually created based on Planned or Timekeeping Engagements, and represent what an employee is to be paid for.
Alert: Planned, Timekeeping, and Authorised Engagements can have differing times and Entities, especially if circumstances change. It is the Authorised Engagement that is processed through payroll and paid to the employee, so any Authorised Rosters should be checked over prior to payroll processing.
Creating Rosters
Rostering by Employee
To add new Rosters, select the button ![]() from the Roster toolbar. Alternatively, you can right click the Roster Grid and select “Add New Shift or Engagement”.
from the Roster toolbar. Alternatively, you can right click the Roster Grid and select “Add New Shift or Engagement”. ![]()
A list of employees applicable to work in the filtered Entities will be displayed. From the list, flag the employee(s) you wish to create a Roster for. Once you have flagged the employee(s), the ‘Select a Day’ field will populate based on existing Rosters that may be present, indicating what days can and cannot have Rosters created.
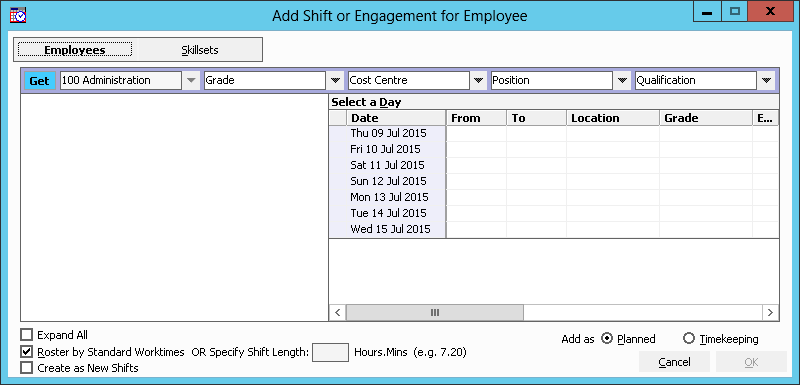
Figure #21: Add Shift or Engagement for Employee ‘Employees’ Tab
Once all required filters have been configured, to retrieve the list of employees, click the “Get” button.
In the ‘Select a Day’ field, highlight the date(s) you wish to Roster for.
Tip: Consecutive dates can be selected by highlighting the first date in the Period and, holding down the ‘Shift’ key on your keyboard, highlighting the last day you wish to Roster for in the Period. The alternative to select individual days is available by holding down the ‘Ctrl’ key on your keyboard and clicking on specific dates.
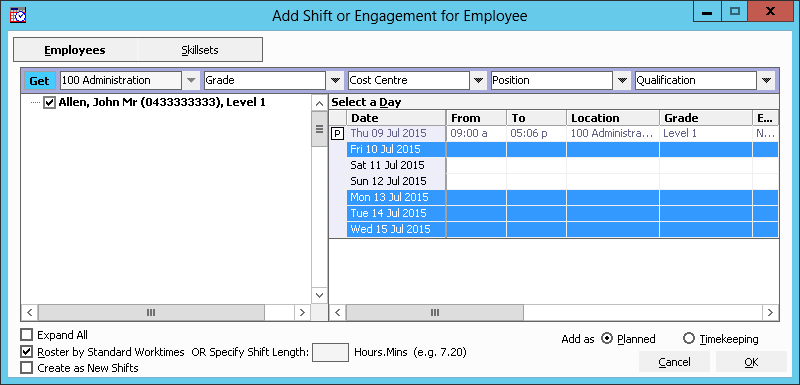
Figure #22: Add Shift or Engagement for Employee ‘Employees’ Tab (Filtered)
Tip: If the employee has existing Rosters, these days will be displayed in the ‘Select a Day’ field greyed out with Roster information pre-populated. Next to the date will be a symbol indicative of the Roster Type; Planned, Timekeeping, or Authorised. If these days are highlighted, Skillset Rosters will be created. If a new Shift is to be created in addition to the existing one, the “Create as New Shifts” option should be used.
Note: “Roster by Standard Worktimes” will pre-populate the Roster Start, Finish, Break Start, and Break Finish Times with the Employee File Standard Hours. If this option is not flagged, you can choose to specify a Shift Length (which will pre-populate for the selected number of hours based on the Employee File Standard Start Time), or simply create as blank Rosters.
Once all required employees have been selected, as well as corresponding days you wish to Roster to, select the “OK” button to complete creation.
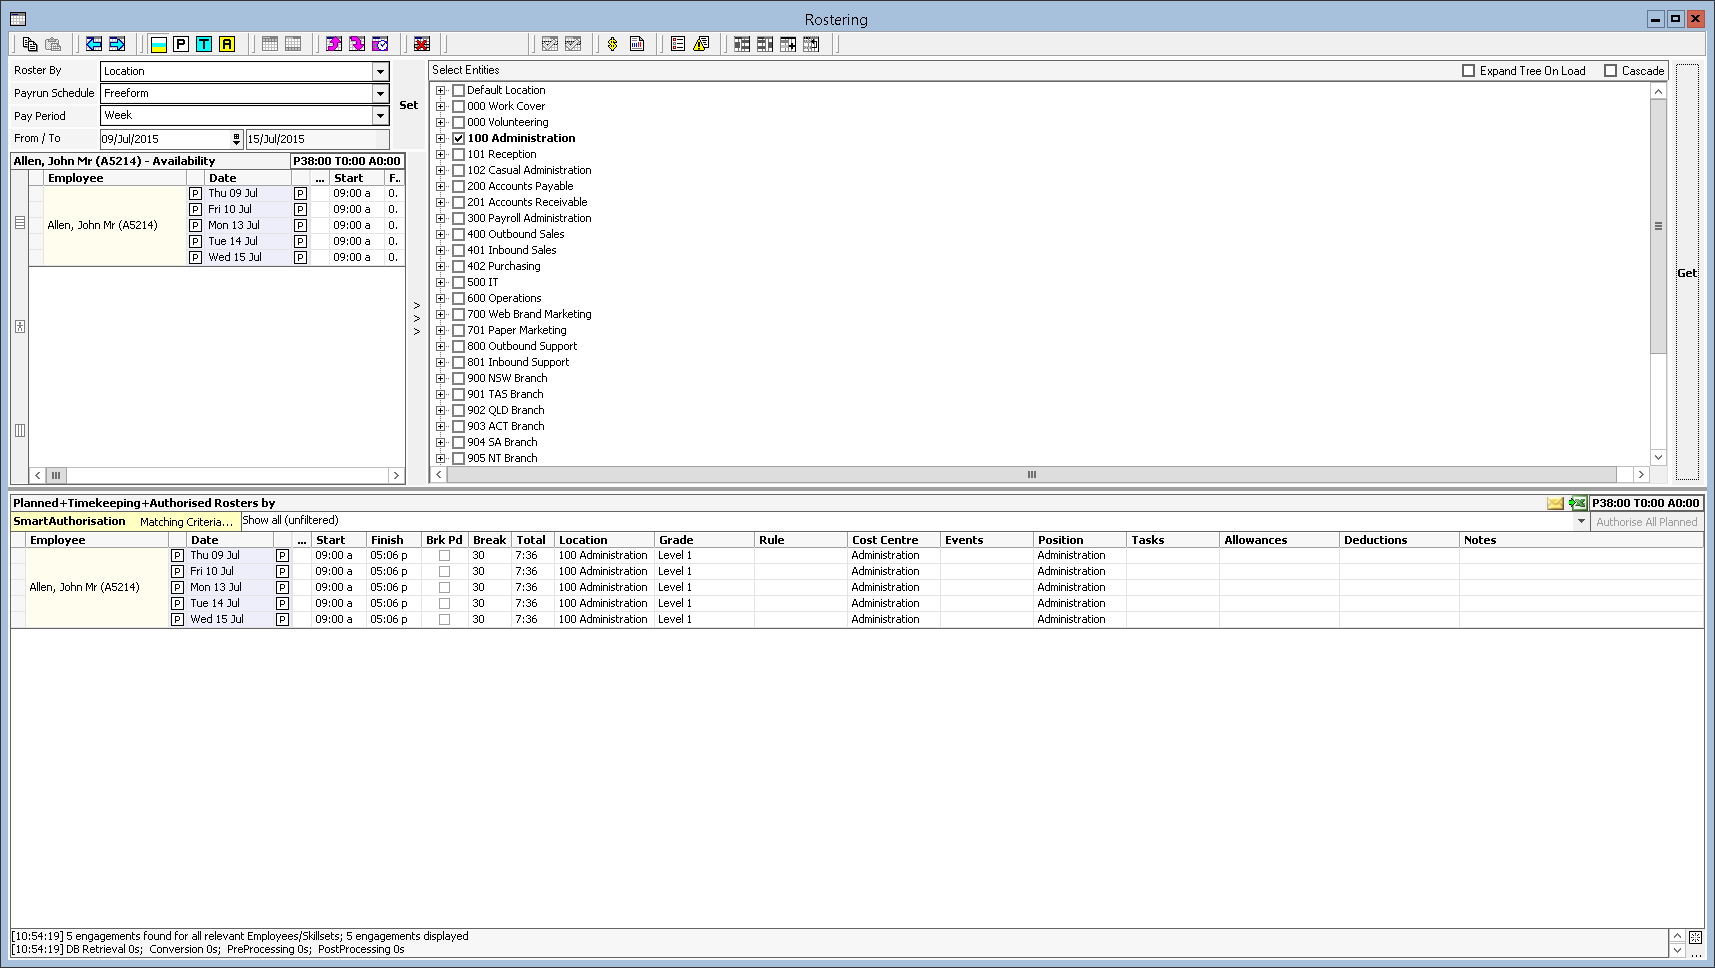
Figure #23: Roster Grid with Employee Rosters
Rostering by Skillset
There is also the facility to create Skillset Rosters. A Skillset Roster is simply a Shift/Engagement with a Grade linked but no employee attached.
Skillset Rosters can be created if you have not decided which employee will work, but are sure of the Shift requirements such as Grade (Base Rate) and other Entity details (Location, Cost Centre etc.). This will allow you to cost your Roster to obtain figures that will assist with budgeting labour costs.
Note: If there are any Allowances that are paid automatically as per the Grade configuration, they will be added to the Roster when Skillsets are created, as well as costed when generating a ‘Costing Report’.
As you would create a Roster for an employee, select the button ![]() from the Roster toolbar. Alternatively, you can right click the Roster Grid and select “Add New Shift or Engagement”.
from the Roster toolbar. Alternatively, you can right click the Roster Grid and select “Add New Shift or Engagement”. ![]()
Select the ‘Skillsets’ tab to create Skillset Rosters.
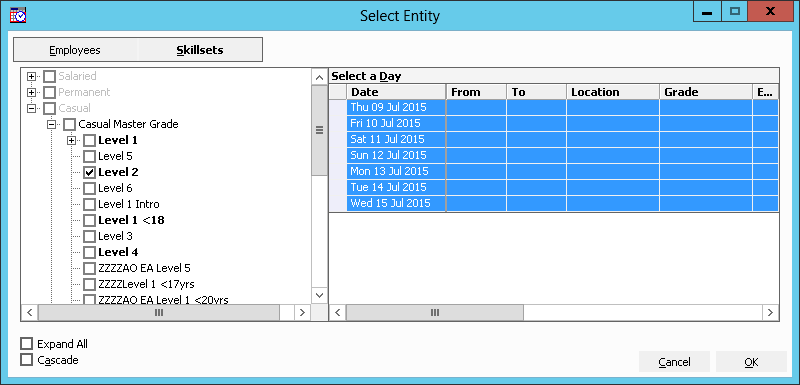
Figure #24: Select Entity ‘Skillsets’ Tab
Once the required Grade(s) have been selected, as well as corresponding days you wish to Roster to, select the “OK” button to complete creation.
Tip: Flag ‘Expand All’ to expand all Entities within the Entity tree.
Tip: Flag ‘Cascade’ to automatically select all Child Entities when a Parent Entity is selected.
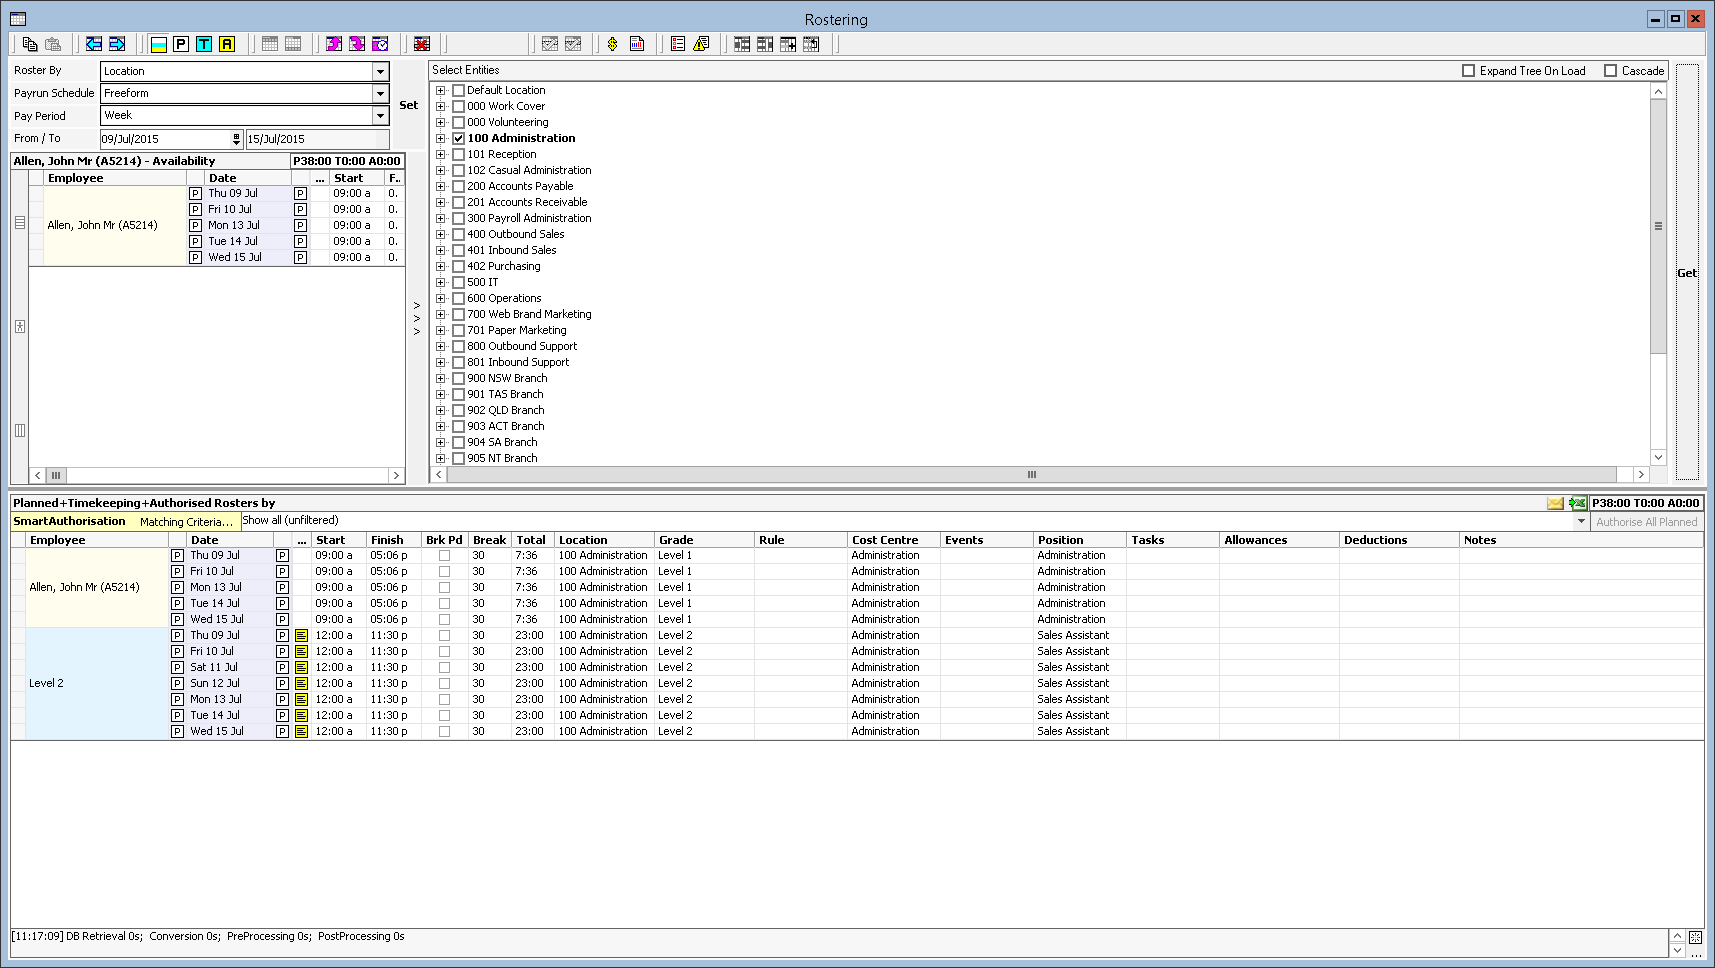
Figure #25: Roster Grid with Skillset Rosters
Note: Roster Times (Start, Finish, Break, etc.) will be created as blank rosters, allowing for the User to input the desired times.
Editing Employee Rosters
Changes to an employee’s Rostered Cost Centre, Grade, Location, Event, Position, Tasks etc. can be conducted for either an Engagement (part of a day that can be made up with several Engagements) or a Shift (whole day).
Entity changes can be made by selecting either the ellipsis ![]() or drop-down
or drop-down ![]() menu in each applicable column of the Roster Grid.
menu in each applicable column of the Roster Grid.
Editing Location, Cost Centre, and Position
Locations, Cost Centres and Positions (that the employee is assigned to in the Employee File) can be selected from the tree view upon clicking the ellipsis ![]() or via the alphabetised drop-down
or via the alphabetised drop-down ![]() menu. Users will only be able to view Locations, Cost Centres, and Positions as per their User configuration.
menu. Users will only be able to view Locations, Cost Centres, and Positions as per their User configuration.
Note: Rosters will be costed to the changed Location or Cost Centre.
Editing Grade and Rules
Grades can be selected from the tree view upon clicking the ellipsis ![]() or via the alphabetised drop-down
or via the alphabetised drop-down ![]() menu. Users will only be able to view Grades as per their User configuration.
menu. Users will only be able to view Grades as per their User configuration.
Applying Payroll Rules or altering Grades enables employees to be paid at higher rates than that of their Default Grade. By changing the Grade and selecting a Payroll Rule to be applied, the Rostered Grade’s rates will be overridden accordingly.
Note: A configuration flag can be applied to your Database that will cause Payroll Rules to override/reference the rate from the Employee’s Default Grade if this is preferred.
Editing/Applying Allowances and Deductions
Allowances and Deductions can be selected from the list upon clicking the ellipsis ![]() or via the alphabetised drop-down
or via the alphabetised drop-down ![]() menu. Allowances and Deductions populated will only be those that pertain to the Rostered Grade (Grade Based) or Employee File (Personal Based).
menu. Allowances and Deductions populated will only be those that pertain to the Rostered Grade (Grade Based) or Employee File (Personal Based).
Notes
Messages for each Engagement or Shift can be added, facilitating the electronic distribution of the message to the employee or provide employee performance data for each Shift worked through Timesheet generation. They will also be visible to the employee if the Pre-Publish/Publish State function is utilised.
To record a Note against an employee’s Shift or Engagement, select the ellipsis ![]() where you will be prompted to enter text.
where you will be prompted to enter text.
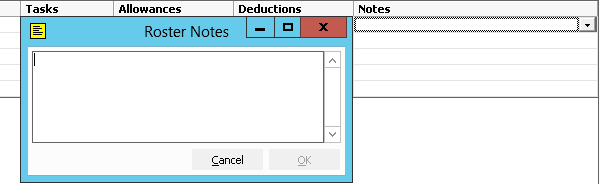
Figure #26: Roster Notes
Note: Alternatively – should Notes be configured – by selecting the drop-down menu a list of default Notes will be available.
Editing Functions
Deleting Rosters
In cases where Rosters are no longer required for an employee or Skillset, they can be deleted using the Delete Rosters button if the User has sufficient privileges.
To Delete a Roster (Planned, Timekeeping, or Authorised) for an employee or Skillset, highlight the individual day or employee (if wishing to delete all days), and select the ![]() button from the Roster toolbar. Alternatively, you can right click selected day(s) in the Roster Grid and select “Delete Selected Engagements”.
button from the Roster toolbar. Alternatively, you can right click selected day(s) in the Roster Grid and select “Delete Selected Engagements”. ![]()
Once you have deleted the Roster(s), the screen will be refreshed and the Roster Grid will no longer display the deleted Roster(s).
Alert: If Rosters are deleted Inzenius are unable to restore these changes. Please only delete Rosters if you are absolutely sure they are not required.
Rolling Rosters
The Rolling Rosters function provides the option to Roll a selected Shift forward one day or Roll a selected Shift back one day, allowing duplication of a Shift without the need to recreate from scratch.
To Roll a Planned Shift, highlight the individual day, and select the ![]() or
or ![]() button from the Roster toolbar. Alternatively, you can right click the selected day in the Roster Grid and select from either “Roll Selected Shift Back One Day”
button from the Roster toolbar. Alternatively, you can right click the selected day in the Roster Grid and select from either “Roll Selected Shift Back One Day” ![]() or “Roll Selected Shift Forward One Day”
or “Roll Selected Shift Forward One Day” ![]() .
.
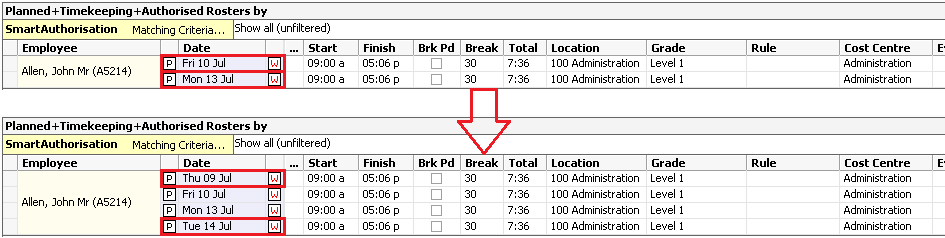
Figure #27: Shifts Rolled Backwards and Forwards One Day
Planned Engagements will be Rolled forward or back, depending on the selection, whilst keeping the original Engagement. If the original Engagement is no longer suitable, simply delete it.
Note: Timekeeping and Authorised Engagements are unable to be Rolled back/forward.
Copying and Pasting Rosters
Inzenius also provides the option to copy and paste selected Shifts forward by a cycle, depending on Rostering Parameters “Pay Period” (Pay Run Pay Period if Pay Run Schedule selected, otherwise Freeform, Day, Week, Fortnight, 4Weekly, or Month). This feature is especially useful to create Planned Rosters for employees who work regular hours with little variation in days and times.
To Copy a Planned Engagement, highlight the individual day or employee (if wishing to copy all days), and select the ![]() button from the Roster toolbar. Alternatively, you can right click the selected day(s) in the Roster Grid and select “Copy Selected Shifts”
button from the Roster toolbar. Alternatively, you can right click the selected day(s) in the Roster Grid and select “Copy Selected Shifts” ![]() .
.
Once you have copied the applicable Roster(s), to move to the next Period forward in time, select the ![]() button from the Roster toolbar. Alternatively, you can right click in the Roster Grid and select “Display Next Period”
button from the Roster toolbar. Alternatively, you can right click in the Roster Grid and select “Display Next Period” ![]() .
.
To Paste a Planned Engagement in the new Period, select the ![]() button from the Roster toolbar. Alternatively, you can right click in the Roster Grid and select “Paste”
button from the Roster toolbar. Alternatively, you can right click in the Roster Grid and select “Paste” ![]() .
.
Figure #28: Copy and Paste Roster
Planned Engagements will be copied forward a cycle whilst keeping the original Rosters. If either Rosters are no longer suitable, simply delete them.
Alert: Timekeeping and Authorised Engagements are unable to be Copied and Pasted.
Prepended and Appended Engagements
Prepending and Appending Engagements provides the ability to add to the start of the Shift or the end of the Shift. This may be used when an employee works in different departments, different positions, or are assigned to more than one event on the same day.
Prepend Engagement
To Prepend an Engagement, highlight the individual Shift, and select the ![]() button from the Roster toolbar. Alternatively, you can right click the selected shift in the Roster Grid and select “Prepend Engagement”
button from the Roster toolbar. Alternatively, you can right click the selected shift in the Roster Grid and select “Prepend Engagement” ![]() .
.
The applicable Engagement will then become ‘prepended’ and an additional Planned Engagement will appear before the original Planned Engagement, with a “Finish” time the same as the “Start” time of the original, and a blank “Start” time.

Figure #29: Prepended Engagement
Input a “Start” time and, if applicable, from the drop-down menus select the appropriate Location, Grade, Cost Centre, Position, Event etc.
Append Engagement
To Append an Engagement, highlight the individual Shift, and select the button ![]() from the Roster toolbar. Alternatively, you can right click the selected shift in the Roster Grid and select “Append Engagement”
from the Roster toolbar. Alternatively, you can right click the selected shift in the Roster Grid and select “Append Engagement” ![]() .
.
The applicable Engagement will then become ‘appended’ and an additional Planned Engagement will appear after the original Planned Engagement, with a “Start” time the same as the “Finish” time of the original, and a blank “Finish” time.

Figure #30: Appended Engagement
Input a “Finish” time and, if applicable, from the drop-down menus select the appropriate Location, Grade, Cost Centre, Position, Event etc.
Note: The ability to both “Prepend” and “Append” the same Engagement is available, providing the entered times do not overlap existing Shifts.
Split Shifts and Merge Shifts
Splitting Shifts allows for Engagements that have been Prepended or Appended to be split, to be separated to individual Shifts. Similarly, merging Shifts allows for Engagements that have been previously split to separate Shifts, to be merged into a single Shift with multiple Engagements.
These options are particularly useful if an employee is paid at multiple rates (i.e. two different Grades) whose Grades encompass different penalty rates (Unsociable Hours, Non-Base Rates, etc.).
Split Shifts
To Split a Shift, highlight an individual Engagement within the Shift and select the ![]() button from the Roster toolbar. Alternatively, you can right click the selected engagement in the Roster Grid and select “Split Shift”
button from the Roster toolbar. Alternatively, you can right click the selected engagement in the Roster Grid and select “Split Shift” ![]() .
.
The applicable Engagements will then be ‘split’ indicating they are separate from one another.

Figure #31: Split Shifts
Note: Shifts that have been Split will be costed separately.
Merge Shifts
To Merge a Shift, highlight both Shifts and select the ![]() button from the Roster toolbar. Alternatively, you can right click the selected shift in the Roster Grid and select “Merge Shifts”
button from the Roster toolbar. Alternatively, you can right click the selected shift in the Roster Grid and select “Merge Shifts” ![]() .
.
The applicable Shifts will then be ‘merged’ indicating that they are now one Shift (with two Engagements)

Figure #32: Merged Shifts
Note: Shifts that have been Merged will be costed as one Shift.
Rostering an Employee to Leave
When an employee takes Leave, it is required to be added to the Rosters to ensure payroll processes and makes automatic adjustments to the balance accordingly. This is conducted by altering the Rostered Location to the Leave Location for all, or part of, a Shift.
To Roster an employee to a Leave type, select from the alphabetised drop-down menu the Leave Location you wish to assign to the employee.
Alternatively, you can select the ellipsis button ![]() next to the Location to open a tree view of all accessible Locations for the employee. Leaves available will be situated at the bottom of the “Select Locations/Leaves” screen.
next to the Location to open a tree view of all accessible Locations for the employee. Leaves available will be situated at the bottom of the “Select Locations/Leaves” screen.
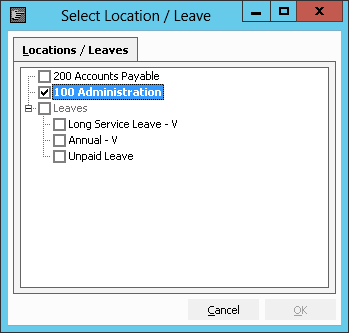
Figure #33: Rostering Select Location / Leave

Figure #34: Rostering screen, Leave Location
When authorised, this Roster will then be paid in Payroll processing as the Leave type and reduce the employee’s Leave balance by the total hours Rostered to the Leave.
Adding Units to Roster
Units can be added and managed via the Units Column in the Roster Screen. Users can allocate Unit(s) to Shifts for Costing and Reporting purposes. To use Unit functionality on Roster, Units must first be created. How to create Units is covered in the Inzenius References Manual.
The Units column is located between the Grade and Location Columns in the Roster Screen. To add Unit(s) to a Shift, select the ellipsis button ![]() in the Units column for that Engagement. A new window called “Select Units” will appear where you can select Unit(s) and add the required quantity to the Roster. The User can also add Comments as required.
in the Units column for that Engagement. A new window called “Select Units” will appear where you can select Unit(s) and add the required quantity to the Roster. The User can also add Comments as required.

Figure #35: Units Column
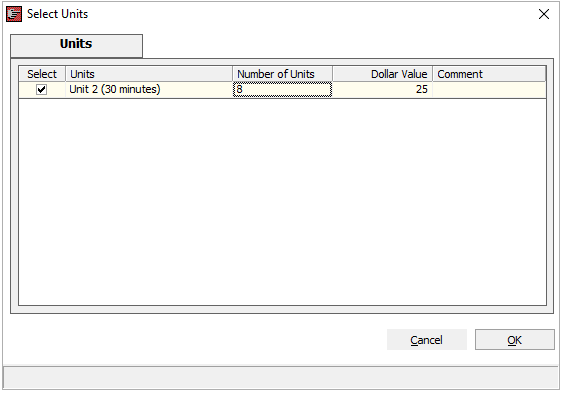
Figure #36: Select Unit Screen
If there are no Units available for the selected Roster, the Select Units window will be blank.
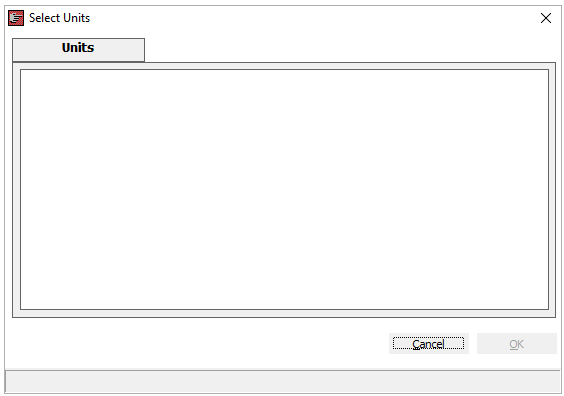
Figure #37: Select Unit Screen with no Units
Converting Rosters
Swapping Employee Rosters
Employee Rosters can be swapped in the event you wish to switch the Rosters between employees.
Swap as Rostered
Swapping Employee Rosters as Rostered simply means you are swapping the entire Shift (including assigned Entities such as Grade, Location, Position, and Cost Centre). Highlight both Employee Rosters you wish to swap, right click and select “Swap as Rostered” ![]() .
.

Figure #38: Swap Employee Rosters as Rostered (Before)

Figure #39: Swap Employee Rosters as Rostered (After)
Swap Using Employees’ Default Grades
Swapping Employee Rosters using employees’ Default Grades means you are swapping the entire Shift, including assigned Entities such as Location, Position, and Cost Centre), however the Grade will be re-assigned as the employee’s Default Grade. Highlight both Employee Rosters you wish to swap, right click and select “Swap using Employees’ Default Grades” ![]() .
.

Figure #40: Swap Employee Rosters Using Employees’ Default Grades (Before)

Figure #41: Swap Employee Rosters Using Employees’ Default Grades (After)
Converting Rosters (Employee/Skillset) to Skillset Rosters
Once you are ready to assign Skillsets to a particular employee, or change Employee Rosters to Skillsets, highlight the Grade/Employee (under the “Employee” column) in the Roster Grid and either select the ellipsis button ![]() or the
or the ![]() button from the Roster toolbar. Alternatively, you can right click the Engagement and select “Convert”
button from the Roster toolbar. Alternatively, you can right click the Engagement and select “Convert” ![]() .
.
Figure #42: Highlighted Skillset Rosters (Ellipsis Option)
If you only wish to assign one day/Engagement at a time, you can select the desired date under the “Date” column and select the ellipsis button.
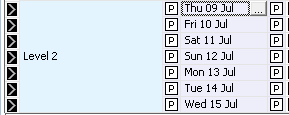
Figure #43: Highlighted Skillset Roster (Day Ellipsis Option)
The Select Employees screen will open. Navigate to the ‘Skillsets’ tab and select the Skillset Grade.
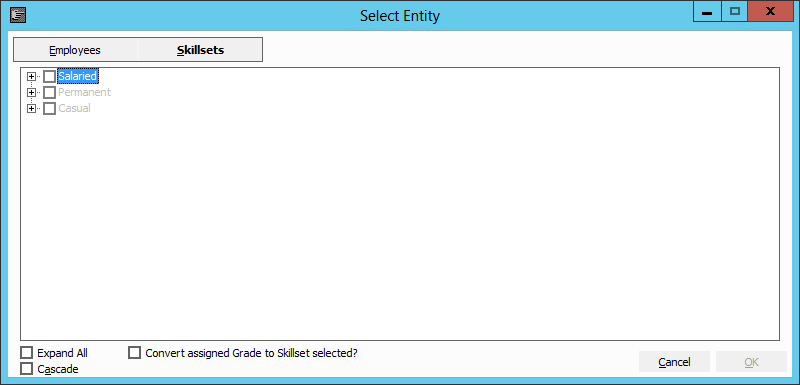
Figure #44: Select Entity ‘Skillsets’ Tab
Note: “Convert assigned Grade to Skillset selected?” will change the assigned Roster Grade if the currently assigned Grade differs from the Skillset Grade selected.
![]()
Figure #45: Employee to Skillset Rosters (Before)
![]()
Figure #46: Employee to Skillset Rosters (After)
Converting Rosters (Employee/Skillset) to Employee Rosters
Once you are ready to assign Skillsets to a particular employee, or change Employee Rosters to Skillsets, highlight the Grade/Employee (under the “Employee” column) in the Roster Grid and either select the ellipsis button![]() or the
or the ![]() button from the Roster toolbar. Alternatively, you can right click the Engagement and select “Convert”
button from the Roster toolbar. Alternatively, you can right click the Engagement and select “Convert” ![]() .
.
The Select Employees screen will be prompted, with the screen listing only employees who meet all assigned criteria of the Employee/Skillset Roster to be converted (Grade, Location, Cost Centre, and Position).
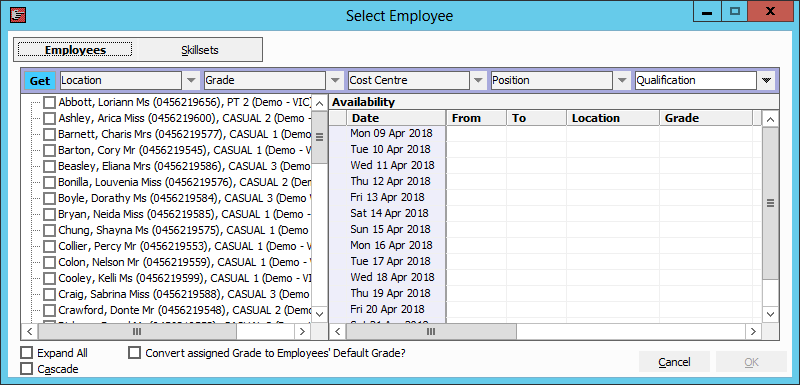
Figure #47: Select Employee ‘Employees’ Tab
Note: “Convert assigned Grade to Employees’ Default Grade?” will change the assigned Roster Grade if the currently assigned Grade differs from the selected Employee’s Default Grade.
Tip: If a single employee is assigned, all selected Skillset Rosters will be assigned to the single employee. If multiple employees are selected, one Roster will be assigned per selected employee. Therefore, if there are more Skillset Rosters than employees selected to be assigned, there will be remaining unassigned Skillset Rosters.
![]()
Figure #48: Skillset to Employee Rosters (Before)
![]()
Figure #49: Skillset to Employee Rosters (After)
Authorising Times
Once the Planned/Timekeeping Engagements have been entered, they are required to be Authorised in order to be picked up by the Pay Run Controller and processed through payroll.
Authorise Planned Lines
To Authorise a Planned line, highlight the individual day or employee (if Authorising all days), and select the ![]() button from the Roster toolbar. Alternatively, you can right click selected days in the Roster Grid and select “Authorise Selected Planned Engagements”
button from the Roster toolbar. Alternatively, you can right click selected days in the Roster Grid and select “Authorise Selected Planned Engagements” ![]() .
.
Authorise Timekeeping Lines
To Authorise a Timekeeping line, highlight the individual day or employee (if Authorising all days), and select the ![]() button from the Roster toolbar. Alternatively, you can right click the selected days in the Roster Grid and select “Authorise Selected Timekeeping Engagements”
button from the Roster toolbar. Alternatively, you can right click the selected days in the Roster Grid and select “Authorise Selected Timekeeping Engagements” ![]() .
.
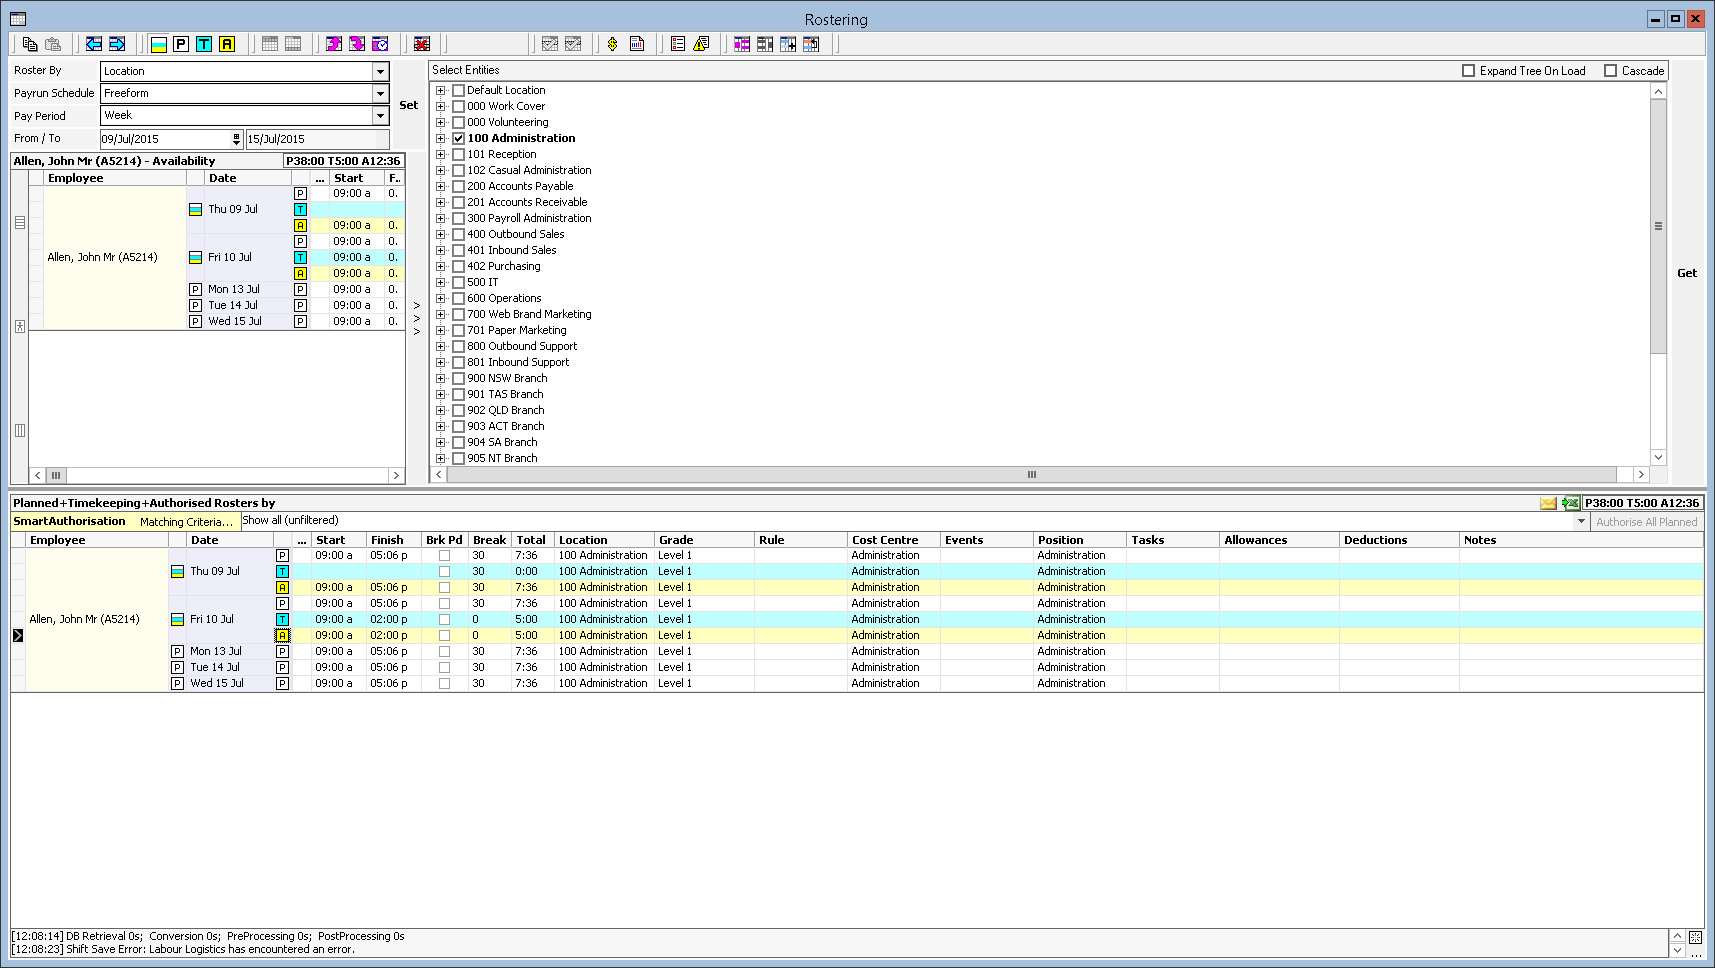
Figure #50: Rostering Planned, Timekeeping, and Authorised Engagements
Note: It is possible to Authorise individual days or all the days in a Period for an employee. Simply highlight the individual day you wish to Authorise or click on the employee’s name in the grid to Authorise all the days.
Note: You can also Authorise a number of employees by highlighting the first employee’s name, selecting the ‘Shift’ key on your keyboard, and clicking the final employee. This will highlight all employees selected.
These times can be altered by typing over the existing Start/Finish times, as well as Entities be assigned using the drop-down menus.
Tip: When keying times into the system, instead of typing in “9:00” for 9AM or “17:00” for 5PM, you can simply type “9a” or “5p”.
Smart Authorisation
The ability to perform Smart Authorisation (automatic Authorisation) is also available in Inzenius, allowing the ability to Authorise a number of employee’s Rosters quickly and efficiently.
To change Smart Authorisation preferences, select the ![]() button from the Roster toolbar. Alternatively, you can right click the Roster Grid and select “Options”
button from the Roster toolbar. Alternatively, you can right click the Roster Grid and select “Options” ![]() .
.
Smart Authorisation Settings
For Smart Authorisation to be enabled, the “Use Smart Authorisation” option will need to be flagged.
Figure #51: Rostering Options ‘Smart Authorisation’ Tab
When Smart Authorisation is enabled, the Roster screen will display a filter, allowing you to quickly and easily perform Authorisation (based on the checks flagged and tolerances entered).
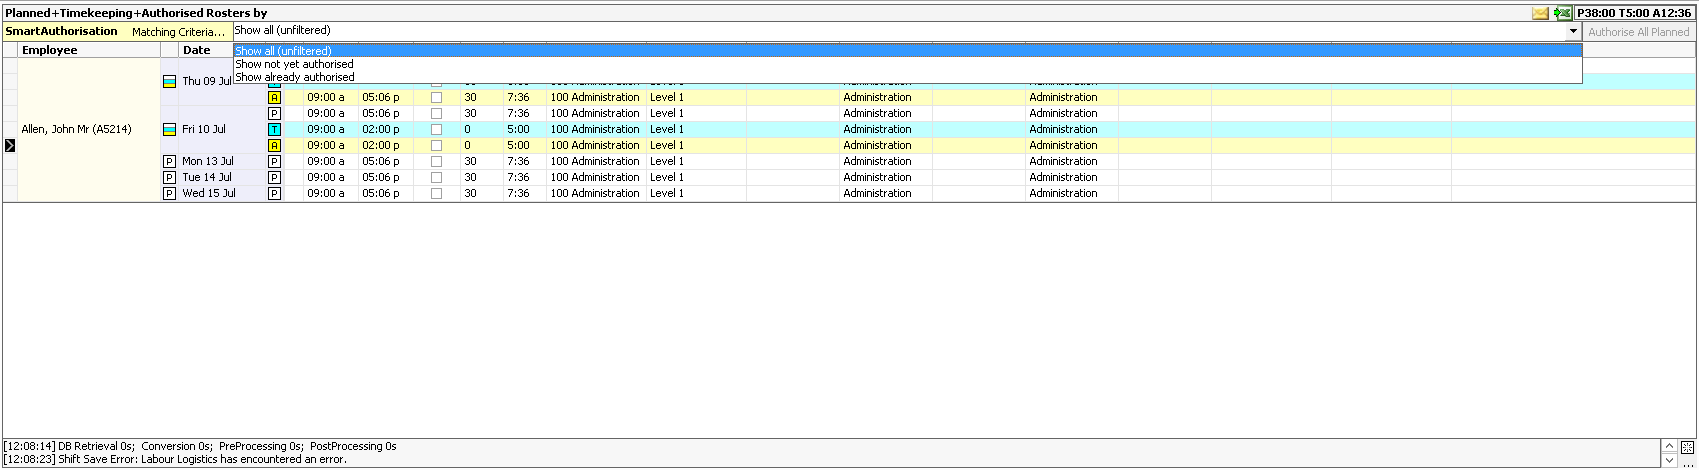
Figure #52: Rostering Smart Authorisation
To utilise Smart Authorisation, select an option from the Smart Authorisation ‘Matching Criteria’ and select the “Authorise All Planned” button.
![]()
Figure #53: Smart Authorisation selection
Depending on the Roster variables entered, different ‘Matching Criteria’ will be displayed. The following table describes each ‘Matching Criteria’ type and their meaning.
| Matching Criteria Option | Description |
| Show all (unfiltered) | Displays all Planned, Timekeeping, and Authorised Rosters |
| Show not yet authorised | Displays all Planned and Timekeeping Rosters unauthorised |
| Show already authorised | Displays Planned and/or Timekeeping Rosters already authorised |
| Show undertime | Displays all Timekeeping Rosters with “Total” time less than the corresponding Planned Roster |
| Show rosters ending early | Displays all Timekeeping Rosters with “Finish” times earlier than the corresponding Planned Roster |
| Show short breaks | Displays all Timekeeping Rosters with “Break” times shorter than the corresponding Planned Roster |
| Show rosters where times cannot be analysed automatically | Displays all Planned and Timekeeping Rosters that do not match any of the above criteria |
Table #1: Smart Authorisation Matching Criteria
Note: If Shifts contain a Planned, Timekeeping, and Authorised Engagement, the ‘Matching Criteria’ option “Show not yet Authorised” will display the Planned or Timekeeping Engagement that was not Authorised, as Authorised Engagements cannot be created for both Roster types in one Shift.
Note: If Shifts contain a Planned, Timekeeping, and Authorised Engagement, the ‘Matching Criteria’ option “Show already authorised” will display both the Planned and Timekeeping Engagements as well as the Authorised, despite only one Roster type selected for Authorisation.
Engagement States
Engagement States show the progress of the roster through the different stages in the Roster Acceptance process. The Engagement State structure is Working > Pre-Published > Published. These Engagement States work in conjunction with the Employee Portal.
In order to utilise this function, you will need “Enable Roster Acceptance Tracking” enabled in the ‘General’ tab of the Rostering Options and have the Employee Portal set up. When this option is enabled, the Roster toolbar will display the following options: ![]()
These options provide the Roster with a system of planning which is more interactive and allows for real time inputs from all staff members, e.g.: Rostering officers can perform their planning based on sending out an initial and a second round of Rosters based on each employees’ input, reducing the requirement for meetings and excessive communication.
The Engagement State Column
The Engagement State Column is located between the Date and the Notes ellipsis “…” Columns. Only Planned Engagements will show an Engagement State ![]() icon, Timekeeping and Authorised lines will show the
icon, Timekeeping and Authorised lines will show the ![]() and
and ![]() icons.
icons.
![]() Planned Engagement/s in the Working State
Planned Engagement/s in the Working State
![]() Planned Engagement/s in the Pre-Published State
Planned Engagement/s in the Pre-Published State
![]() Planned Engagement/s in the Published State
Planned Engagement/s in the Published State
![]() Timekeeping Engagement/s
Timekeeping Engagement/s
![]() Authorised Engagement/s
Authorised Engagement/s

Figure #54: The Engagement State Column
Working State
When “Enable Roster Acceptable Tracking” is turned on, all Planned Engagements will immediately see a ![]() symbol, denoting the Engagement is in a “Working” State.
symbol, denoting the Engagement is in a “Working” State.
Engagements that are in a “Working” State will be able to be altered freely in the Rostering screen without consequence as they are not yet displayed in the Employee Portal.

Figure #55: Working State Engagements
Tip: See the Employee Portal Manual for further explanation on the Employee Portal.
Pre-Published State
Once Planned – or “Working” State – Engagements have been finalised and are ready for the employee to view/accept, they are to be “Pre-Published”. When an Engagement is in a “Pre-Published” State, denoted by a ![]() symbol, Rosters will be posted to the Employee Portal, where employees have the ability to review the Planned Engagement and accept or decline accordingly.
symbol, Rosters will be posted to the Employee Portal, where employees have the ability to review the Planned Engagement and accept or decline accordingly.

Figure #56: Pre-Published State Engagements
Engagements that are in a “Pre-Published” State are unable to be altered in the Rostering screen (until, if required, they are altered to “Working” State).
To “Pre-Publish” Engagements
To Pre-Publish a Planned Engagement, highlight the individual day or employee (if wishing to post out all days), and select the ![]() button from the Roster toolbar. Alternatively, you can right click selected day(s) in the Roster Grid and select “Set Planned Engagement to Pre-Published State”
button from the Roster toolbar. Alternatively, you can right click selected day(s) in the Roster Grid and select “Set Planned Engagement to Pre-Published State” ![]() .
.
This action will now send the request to the Employee Portal for the employee to see and the respective Engagement(s) will be altered from a “Working” State to a “Pre-Published” State.
Published State
If a “Pre-Published” Engagement has been accepted by the employee in the Employee Portal, they are altered to “Published”. When an Engagement is in a “Published” State, denoted by a ![]() symbol, Rosters will be unable to be accepted/declined in the Employee Portal. Should an employee wish to change their acceptance of a roster, they will need to contact their Rostering Manager.
symbol, Rosters will be unable to be accepted/declined in the Employee Portal. Should an employee wish to change their acceptance of a roster, they will need to contact their Rostering Manager.

Figure #57: Published State Engagements
Engagements that are in a “Published” State are unable to be altered in the Rostering screen (until, if required, they are altered to “Working” State). Rosters that have already been accepted by Employees shouldn’t be altered without communicating that change to the Employee. Ideally, Rosters being changed should be altered back to the Pre-Published State for Employees to Re-Accept.
To “Publish” Engagements
To Publish a Planned Engagement, highlight the individual day or employee (if wishing to lock down all days), and select the ![]() button from the Roster toolbar. Alternatively, you can right click selected day(s) in the Roster Grid and select “Set Planned Engagement to Published State”
button from the Roster toolbar. Alternatively, you can right click selected day(s) in the Roster Grid and select “Set Planned Engagement to Published State” ![]() .
.
This action will now ‘lock down’ Rosters in both the Rostering screen and Employee Portal. The respective Engagement(s) will be altered from a “Pre-Published” State to a “Published” State. Published Engagements will also be highlighted in green.
Exporting and Importing Rosters
Rosters can be exported from and imported to Inzenius directly from the Rostering screen. This functionality replaces the existing Roster Import Utility, which functioned outside of the main application. Existing Rosters can be exported for manipulation and editing, as well as the ability to add new Rosters in bulk via import.
Exporting Rosters
Exporting Rosters will see all selected Rosters within the Roster grid exported to a standard import template in .XLSX format. To export, select the “Export Data” ![]() button at the top right-hand side of the Roster grid.
button at the top right-hand side of the Roster grid.
Once exported and saved, you can view and edit the sheet accordingly for import.

Figure #58: Exported Rosters (Export Data)
Alert: Please be advised that all data formatting should be actioned in line with the template requirements, as outlined in the ‘1.9.7 Rostering Export & Import Manual’. See the manual for more detailed information on functionality.
Importing Rosters
When you are ready to import Rosters (edited from existing Rosters, or new Rosters), select the “Import Data” ![]() button at the top right-hand size of the Roster grid.
button at the top right-hand size of the Roster grid.
You will be prompted to select the Location of your completed template. Once imported, you will be advised how many Employee Shifts and Skillset Shifts were created/updated (affected). The Rostering grid will depict the imported/updated Rosters.
![]()
Figure #59: Imported Rosters (Roster Grid)
Alert: Please be advised that all data formatting should be actioned in line with the template requirements, as outlined in the ‘1.9.7 Rostering Export & Import Manual’. See the manual for more detailed information on functionality.
Emailing Timesheets and Exporting Timesheets to Excel
Emailing Timesheets
Timesheets can be e-mailed to employees directly from Inzenius, thus removing the need to generate the Reports, save to PDF, and send or print manually.
To e-mail Timesheets directly from the Roster screen, select the “Send Timesheets via Email” button ![]() located at the top right of the Roster Grid.
located at the top right of the Roster Grid.
This will prompt an “E-mail Timesheets” screen where you will be required to complete the standard e-mailing software fields.
Note: Where there are more than one employee’s Rosters loaded in the Roster Grid and the “Send Timesheets to related Employees” option is flagged, a secondary option will be available where you can select to send Timesheets to “All Displayed Employees” or “Selected Only”.
Note: The Business Unit ‘Email Setup’ tab will need to be configured in order for this functionality to be available.
Exporting Timesheets to Excel
Timesheets can also be exported directly to Excel, removing the need to generate the Reports and save to Excel.
To Export Timesheets directly from the Roster screen, select the “Export Roster to Excel” button ![]() located at the top right of the Roster Grid.
located at the top right of the Roster Grid.
This will prompt a save to location screen where you can select the required file location to be saved to Excel (.xls) format.
After the file location has been selected and the Report saved, an “Export Succeeded” screen will be prompted, requesting if you wish to open the file.
Once the Roster export is opened, the spreadsheet will appear with full detail from the Roster grid.

Figure #60: Exported Timesheets
Creating an SMS Extract
It is also possible to create an SMS Extract from the Roster to be utilised in conjunction with a third-party SMS sender, in order to send Roster details to all or selected employees. Alternatively, it can simply be used for Reporting purposes.
The feature allows the User to create an extract in Comma-Separated Values (.csv) file format that includes the following Roster Details:
Employee Number, Employee ID, Employee Name, Shift Start Day, Shift Start Time, Shift End Time, Location, Employee Phone Number, and SMS Text.
To create the Extract, first select any Roster(s) within the Rostering window and right click. In the right click menu, select “Create SMS Extract File” ![]() .
.
This will open the “SMS Engagements” prompt window where you are able to specify to use “All Displayed” or “Selected Only” Rosters and where additional SMS Text can be entered.
Alert: Using the SMS Extract does not send an SMS from the system. You will be required to upload the SMS Extract file into your relevant third-party provider.