Pay Run Controller
Overview
The Pay Run Controller is a centralised screen where all payments can be made. This includes the processing of Regular Pay Runs, Manual (ad-hoc) Pays, Rebank Pays, Final and ETP/Lump Sum Pays.
Pay Run Controller
The Pay Run Controller is the centre for all payroll actions, such as execution of Pay Runs, employee termination/lump sum payments, pay adjustments, making payments outside of typical Pay Run dates, and viewing previously committed data and generating both EFT Files and Payslips.
Navigating the Pay Run Controller
Due to Pay
When opening the Pay Run Controller, the ‘Due to Pay’ tab is depicted, where each Pay Run Schedule’s current Pay Period will be displayed, with the date due to be run. Any pending Manual, Final, ETP/Lump Sum or Rebank Payments will also be depicted.
This is where each payment type is created, edited, reviewed, and committed.
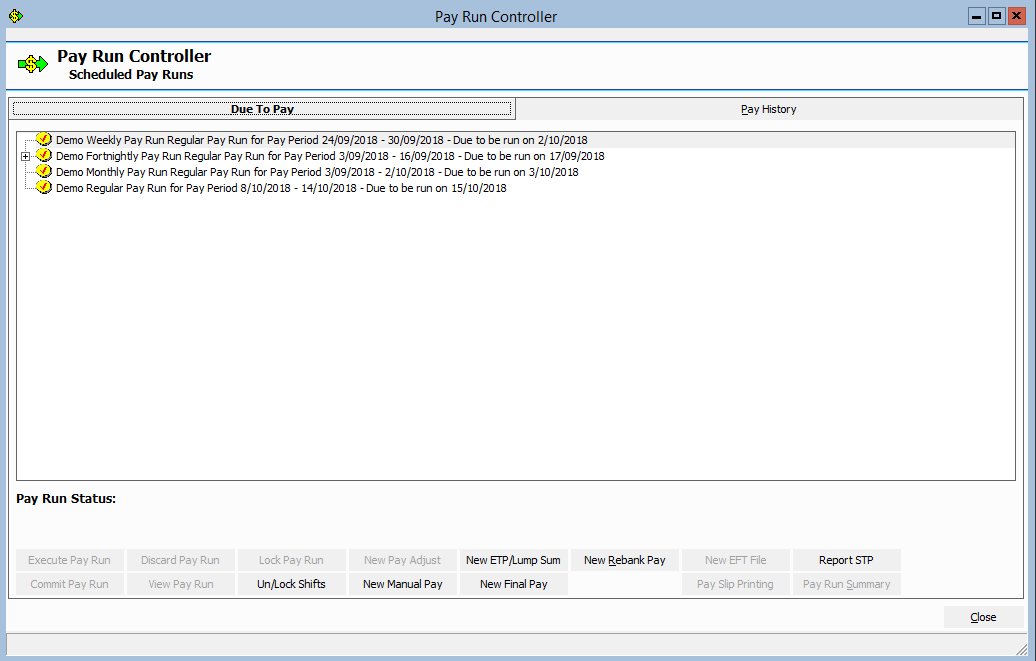
Figure #1: Pay Run Controller ‘Due to Pay’ Tab
Note: Pay Runs are not required to be executed on the specified date and can be ran earlier or later at the Users discretion. However, it is advised that Pay Runs be executed after the last date of the Pay Period to avoid any potential missed Rosters etc.
Pay History
The ‘Pay History’ tab is where Users can view all Committed Manual, Final, ETP/Lump Sum and Rebank Pays, as well as the Regular Pay Runs (with Pay Adjustments). Payslips, EFT Files, and reporting can also be accessed from the Pay History tab.
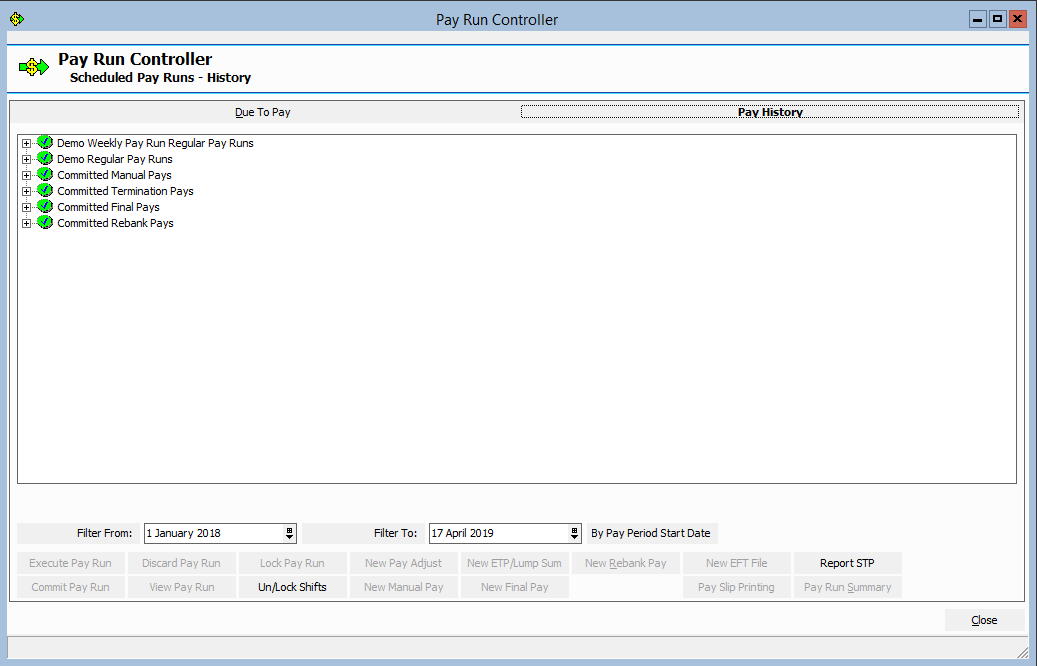
Figure #2: Pay Run Controller ‘Pay History’ Tab
The Payroll Process (Flowchart)
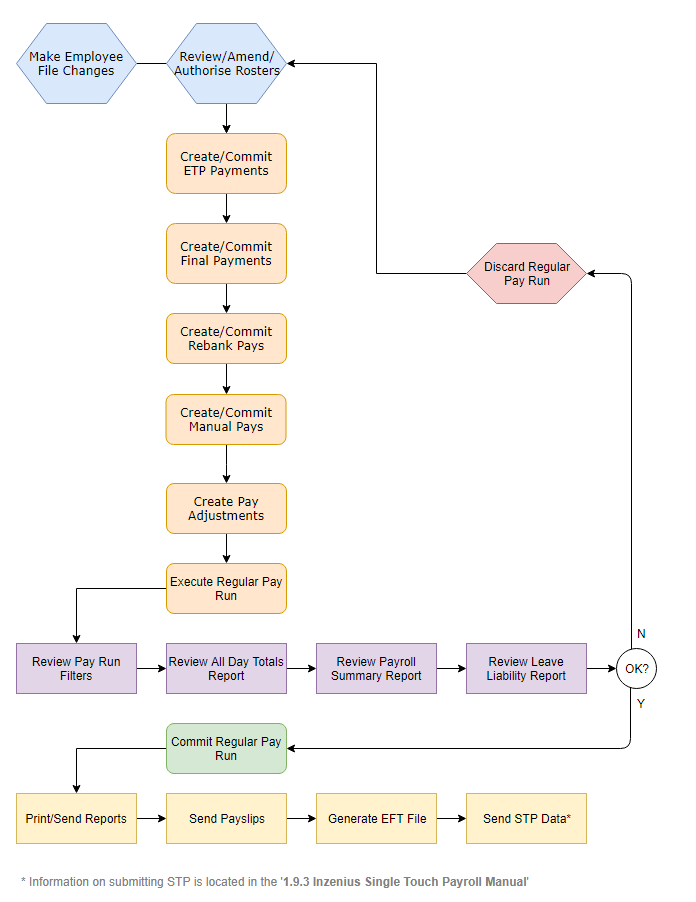
Figure #3: Inzenius Payroll Process
Un/Lock Pay Run
Lock Pay Run
If the User processing payroll wishes, the Pay Run can be locked prior to execution.
Similar to executing a Pay Run (without beginning payroll calculations), all Entities linked to the Pay Run will be locked for editing. This includes all Grades attached to the Pay Run, Employee Files attached to Grades, Allowances, Deductions, Leave types, Payroll Rules, as well as assigned Locations, Positions and Cost Centres (to Employee Files).
![]()
Figure #4: Pay Run Controller “Lock Pay Run” Button
![]()
Figure #5: Pay Run Controller Locked Pay Run
The Pay Run will now be displayed with a red ‘tick’ symbol, indicating the Pay Run, and all entities, are locked for editing.
Note: When Pay Runs have been locked, all associated data within the applicable areas of the Labour Logistics Panel will be ‘greyed out’, depicting the data cannot be edited until the Pay Run is executed and committed or Unlocked.
Unlock Pay Run
![]()
Figure #6: Pay Run Controller “Unlock Pay Run” Button
![]()
Figure #7: Pay Run Controller Unlocked Pay Run
The Pay Run will be displayed with a yellow ‘tick’ symbol, indicating it is ready for processing (execution).
Un/Lock Shifts
If the User processing payroll wishes, the Rosters pertaining to the Pay Run Pay Period can be locked prior to execution.
When Rosters are locked, all Entities (Locations, Cost Centres, Positions, Employee Files, Grades and Events) with Rosters within the Pay Run Pay Period selected cannot be edited. New Rosters within the Pay Period cannot be created and existing Rosters within the Pay Period cannot be deleted.
![]()
Figure #8: Pay Run Controller “Un/Lock Shifts” Button
The “Selection Tool” will prompt you to select if you wish to “UnLock Shifts” or “Lock Shifts”.
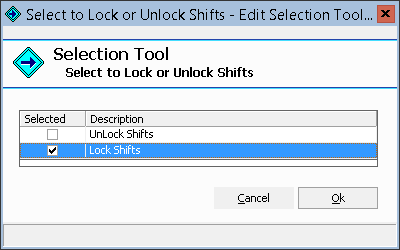
Figure #9: Pay Run Controller Lock or Unlock Shifts Option
ETP/Lump Sum (Eligible Termination Payment)
ETP/Lump Sums (Eligible Termination Payments) should be entered prior to Pay Runs being executed.
Employee Selection
You will be prompted with the “Employee Selection” tab, where the employee you wish to create the ETP/Lump Sum for is selected.
![]()
Figure #10: ETP/Lump Sum ‘Employee Selection’ Tab
To select an employee, enter all or part of an Employee Number or Name, click on “Apply Filter” and a list of applicable employees will generate. Highlight the employee to be paid, select the Termination Date from the calendar, and enter the Termination Reason.
Note: Terminating an employee from the ETP/Lump Sum screen will ensure all future Rosters (after the date of Termination) are converted to Skillset Rosters, preventing the occurrence of corrupt Shifts.
Note: Terminating the employee will also disable any User accounts associated with the Employee File.
Note: If you need to process both a Final Pay and an ETP/Lump Sum, it is recommended that the ETP/Lump Sum Pay be processed first without a Termination Date. This will then allow you to process any additional Pay Types such as a Manual Pay and/or Final Pay to pay out any regular wages, Leave Payouts and/or Superannuation Adjustments. If you process an ETP C Payment for an employee, the employee will receive both a PAYG Payment Summary which will contain all regular wages (and any Lump Sum Payments), as well as an ETP Payment Summary at the end of the financial year.
Termination Pay
Select the ‘ETP/Lump Sum Pay’ Tab and enter the payment details applicable:
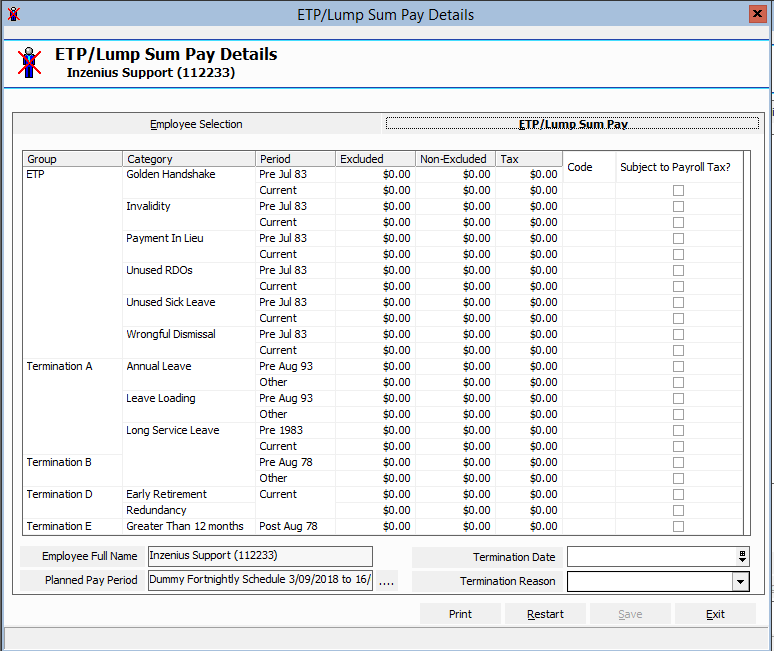
Figure #11: ETP/Lump Sum Pay Details Tab.
Note: The “Print” button will export the list, as per the “ETP/Lump Sum Details” screen, with any
Figures input to Excel, ready for printing.
Note: To restart the ETP/Lump Sum process, select the “Restart” button. This will remove all previously entered data and begin ‘afresh’.
Once complete, click “Save”. You will be prompted with a “Save Confirmation” message, requesting confirmation to convert future Rosters (if any) to Skillset Rosters.
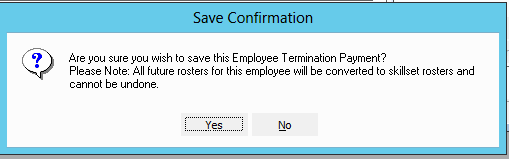
Figure #12: ETP/Lump Sum Save Confirmation
The ETP/Lump Sum will appear within the Pay Run Controller under “Pending Termination Pays”, where it can be reviewed and committed accordingly.
![]()
Figure #13: Pay Run Controller Pending Termination Pay
Once an ETP/Lump Sum has been committed, the record is moved to the ‘Pay History’ tab of the Pay Run Controller under “Committed Termination Pays”. From here, the EFT File can be generated for payment and the Payslip for printing. Reports can also be generated from the ETP/Lump Sum in the ‘Pay History’.
Final Pay
Final Pays should be created and committed prior to the Regular Pay Runs executed. ![]()
Note: The employee’s last pay is utilised for the basis of these calculations. Only employees who have been paid in a Regular Pay Run at least once can be processed via a Final Pay. If an employee has not been processed in a Regular Pay, a Manual Pay will need to be created instead, and the Employee File manually Terminated.
Note: If you need to process both a Final Pay and an ETP/Lump Sum, it is recommended that the ETP/Lump Sum Pay be processed first without a Termination Date. This will then allow you to process any additional Pay Types such as a Manual Pay and/or Final Pay to pay out any regular wages, Leave Payouts and/or Superannuation Adjustments. If you process an ETP C Payment for an employee, the employee will receive both a PAYG Payment Summary which will contain all regular wages (and any Lump Sum Payments), as well as an ETP Payment Summary at the end of the financial year.
The Final Pay function will automatically pay out any types of Leave that are owed to an employee, as well as pay any Authorised Rosters from the first date of the current Pay Period (according to the Pay Run Schedule their Grade is attached to) and up to and including their Termination date. The system will pro-rate an employee’s Leave balance up to and including their Termination date.
Once an employee has had a committed Final Pay, their Leave accruals for all Leave types (either paid out or not) will be zeroed out. The system will also calculate the tax on the Final Pay, as per ATO legislation.
Final Pay Witholding
Unused Leave payouts are taxed differently to normal wages. The ATO has detailed instructions here: https://www.ato.gov.au/tax-rates-and-codes/payg-withholding-schedule-7-tax-table-for-unused-leave-payments-on-termination-of-employment.
Inzenius will automatically calculate the Marginal Rate based on the Schedule 7. Should the Leave payout be less than $300, then the ATO advises (see previous link) that the Tax withheld should be the lesser of:
- Marginal Tax Rate
OR
- 32%
Currently, the Inzenius Final Pay cannot automate this step. To alter the Tax withheld on a Pending Final Pay:
- Highlight the Final Pay and click on the “Edit Final Pay” button.
- Click on the Taxation Tab
- Enter the Payment Amount to adjust the original Tax amount by (eg. if original amount is $100, and you want to alter it to $40, enter in -$60), select Payment Reason and tick the “Is Final Pay Tax” checkbox.
- Click “Save Payment”.
Settings
You will be prompted with the “Settings” tab, where the employee you wish to create the Final Pay for is selected.

Figure #14: Final Pay ‘Settings’ Tab
To select an employee, enter all or part of an Employee Number or Name, click on “Apply Filter” and a list of applicable employees will generate. Highlight the employee to be paid, and click “Next”.
Pay Run Config
In the ‘Payrun Config’ Tab, select the Termination Date from the calendar and enter the Termination Reason.

Figure #15: Final Pay ‘Pay Run Config’ Tab
If required, the Grade, Location, Cost Centre and Position for the payment can be changed, by clicking on the relevant ellipsis button ‘…’ and selecting the new Grade, Location, Cost Centre or Position.
Note: The current functionality will only allow you to Terminate an employee during their next Pay Run Schedule Pay Period.
Leaves
In the ‘Leaves’ Tab, the applicable Leaves you wish to pay out to the employee should be flagged.
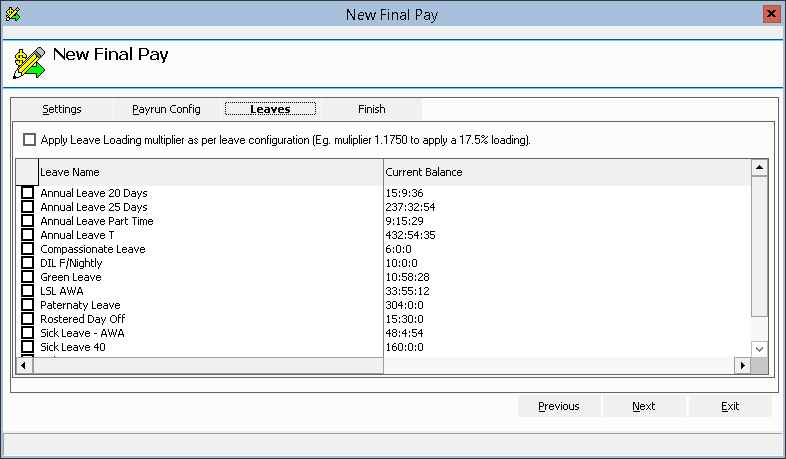
Figure #16: Final Pay ‘Leaves’ Tab
Finish
In the ‘Finish’ Tab, the “Final Pay Summary” will display the selection criteria, where the User can review.
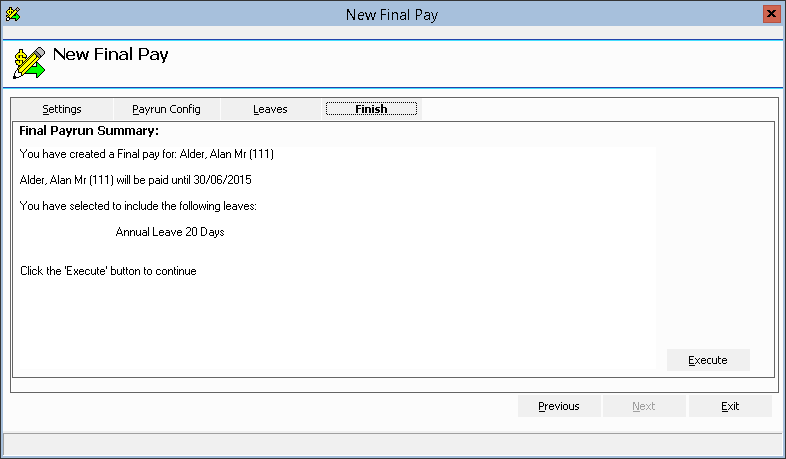
Figure #17: Final Pay ‘Finish’ Tab
When saving, you will be prompted with an execution confirmation message, requesting confirmation to convert future Rosters (if any) to Skillset Rosters.
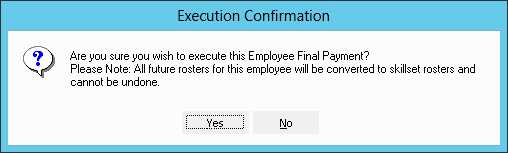
Figure #18: Final Pay Execution Confirmation
You will then be prompted with a “Create another Final Pay” screen, asking if another Final Pay is required to be created.
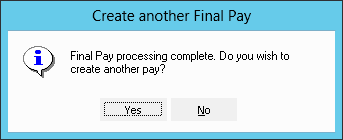
Figure #19: Final Pay Create another Final Pay
The Final Pay will appear within the Pay Run Controller under “Pending Final Pays”, where it can be reviewed and committed accordingly.
![]()
Figure #20: Pay Run Controller Pending Final Pay
Once a Final Pay has been committed, the record is moved to the “Pay History” tab of the Pay Run Controller under “Committed Final Pays”. From here, the EFT File can be generated for payment and the Payslip for printing. Reports can also be generated from the Final Pay in the ‘Pay History’.
Note: Employees that have a committed Final Pay will not appear in the employee list when the Regular Pay Run is being executed.
Rebank Pay
Rebank Pays, set up similar to Pay Adjustments and Manual Pays, are negative payments processed against the current Regular Pay Run Period to claw back funds from an employee (if they have manually refunded the amount outside of the system). ![]()
Note: Clients will need to claw back any amounts overpaid outside of the system. Rebank Pays are simply balancing/correctional transactions which will indicate that amount(s) have been transferred back to the business.
Note: Each tab is not required to be completed. If applicable, an adjustment made only to the employee’s Retirement Funds can be created.
Settings
Highlight the employee you wish to create a Rebank Pay for.
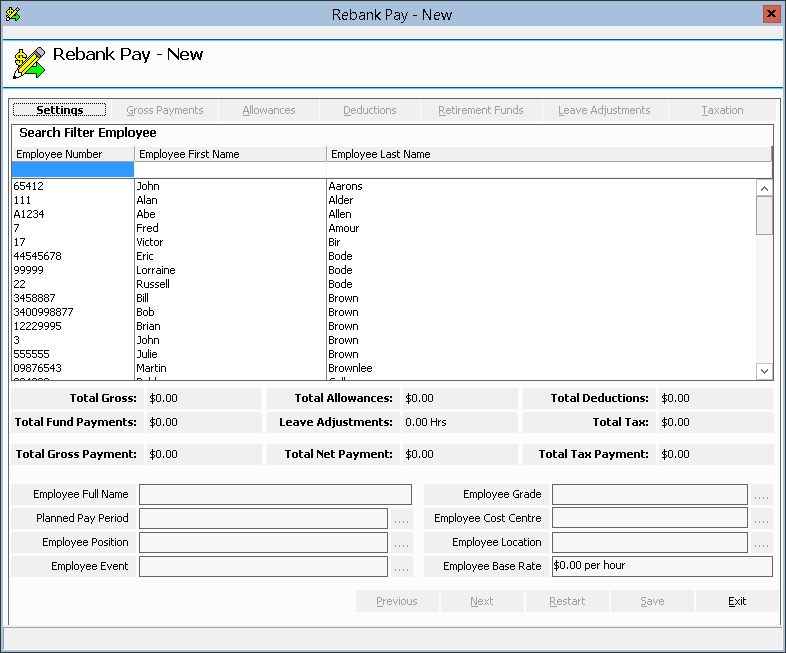
Figure #21: Rebank Pay ‘Settings’ Tab
Note: The search filter has been made available for quicker selection processing. To search simply type in the Employee Number, Employee First Name or Employee Last Name and select the “Tab” button on your keyboard. The list will be filtered accordingly.
When an employee is selected, information will be populated according to the Employee File “Payroll” defaults. A different Position, Event (if applicable), Grade, Cost Centre and Location can be selected using the ellipsis menu. The Employee Base Rate will be populated from the selected Grade.
Note: If the selected employee has an overridden Base Rate within the Employee File, the Grade should not be altered as this will remove the override and pay at the selected Grade’s Base Rate.
Gross Payments
The ‘Gross Payments’ tab handles any corrections to the selected employee’s Gross Wages. All Payments are to be entered as positive amounts – Inzenius will then automatically process this as a negative transaction.
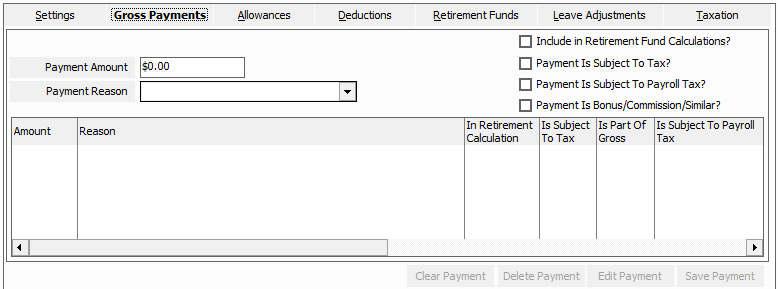
Figure #22: Rebank Pay ‘Gross Payments’ Tab
Once the required fields are input, select the “Save Payment” button to save the payment details. Additional Gross Payments can also be added once each previous payment has been saved.
Note: To clear currently entered, but not saved, Gross Payment data, select the “Clear Payment” button. This function is available throughout all tabs.
Note: To remove a saved Gross Payment, select the “Delete Payment” button. This function is available throughout all tabs.
Note: To edit a saved Gross Payment, select the “Edit Payment” button. This function is available throughout all tabs.
Allowances
In the ‘Allowances’ tab, select the ellipsis (“…”) to retrieve a list of Allowances assigned to the employee. From here, enter the required “Payment Amount” and a “Payment Reason”.
Once the required fields are input, select the “Save Payment” button to save the payment details. Additional Allowances can also be added once each previous payment has been saved.
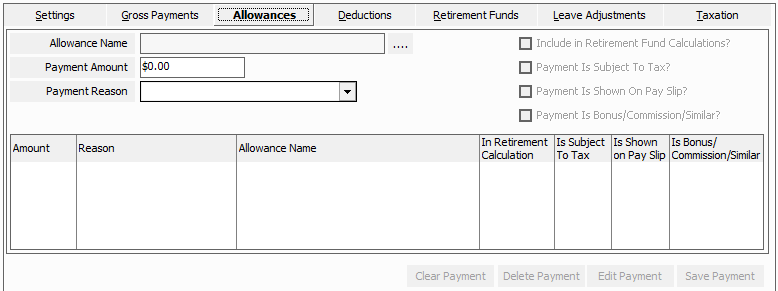
Figure #23: Rebank Pay ‘Allowances’ Tab
Note: Once an Allowance has been selected, the “Include in Retirement Fund Calculations?”, “Payment Is Subject To Tax?” and “Payment Is Shown on Pay Slip?” fields will be flagged according to the Allowance configuration.
Note: You can add as many Allowances transactions as necessary within one Manual Pay.
Deductions
In the ‘Deductions’ tab, select the ellipsis (“…”) to retrieve a list of Deductions assigned to the employee. From here, enter the required “Payment Amount” and a “Payment Reason”.
Once the required fields are input, select the “Save Payment” button to save the payment details. Additional Deductions can also be added once each previous payment has been saved.
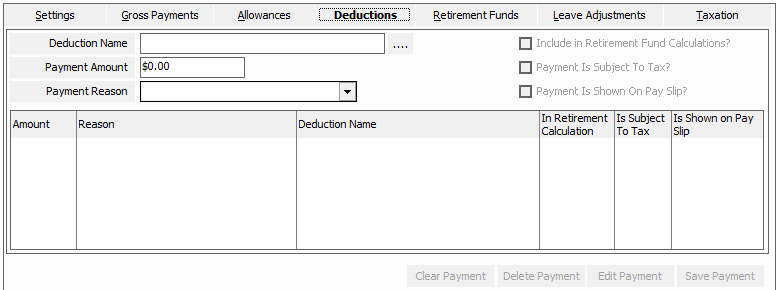
Figure #24: Rebank Pay ‘Deductions’ Tab
Note: Once a Deduction has been selected, the “Include in Retirement Fund Calculations?”, “Payment Is Subject To Tax?” and “Payment Is Shown on Pay Slip?” fields will be flagged according to the Deduction configuration.
Note: You can add as many Deduction transactions as necessary within one Manual Pay.
Retirement Funds
The ‘Retirement Funds’ enables you to make Compulsory, Employer Additional and/or Employee Contribution adjustments.
Once the required fields are input, select the “Save Payment” button to save the payment details. Additional Retirement Payments can also be added once each previous payment has been saved.
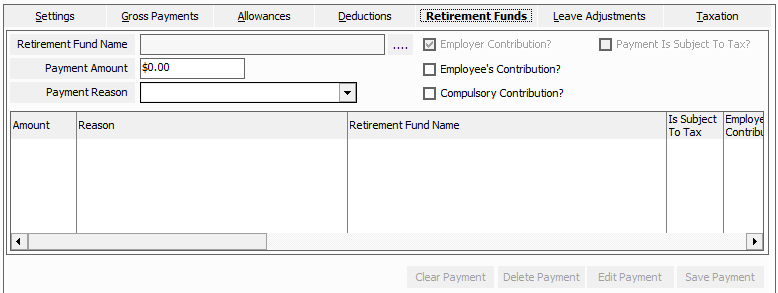
Figure #25: Rebank Pay ‘Retirement Funds’ Tab
Note: Once a Retirement Fund has been selected, the “Employer Contribution?” field will be flagged unless the “Employee’s Contribution” field is flagged.
Leave Adjustments
The ‘Leave Adjustment’ tab allows you to adjust the selected employee’s Leave Balance(s).
Once the required fields are input, select the “Save Payment” button to save the payment details. Additional Leave Adjustments can also be added once each previous adjustment has been saved.
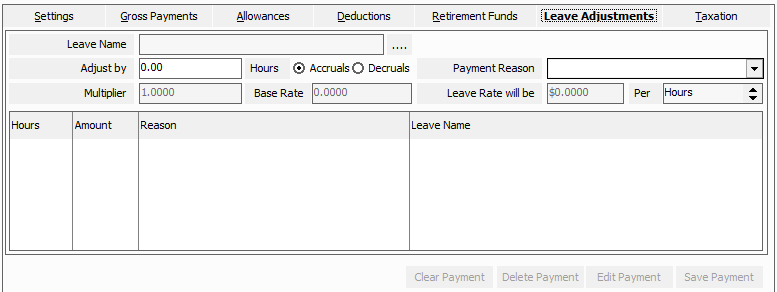
Figure #26: Rebank Pay ‘Leave Adjustments’ Tab
Note: Adjustments made to an employee’s Leave Balance(s) is not associated with any dollar value (i.e., does not constitute as a Leave Payment). These adjustments will simply impact the employee’s balance for the selected Leave(s).
Note: Once a Leave type has been selected, the “Base Rate”, “Leave Rate will be” and “Per” fields will be populated according to the Leave type configuration. If the Multiplier has been altered these rates will be recalculated.
Taxation
Once the required fields are input, select the “Save Payment” button to save the payment details. Additional Tax amounts can also be added once each previous amount has been saved.
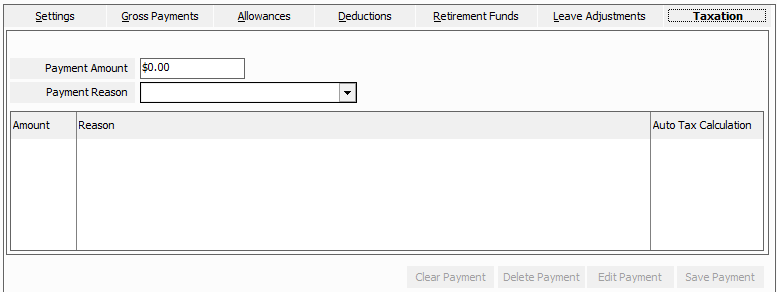
Figure #27: Rebank Pay ‘Taxation’ Tab
A “Save Confirmation” screen will appear confirming your choice to save changes to the Manual Pay when “Save” is selected.

Figure #28: Rebank Pay Save Confirmation
The Rebank Pay will appear within the Pay Run Controller under “Pending Rebank Pays”, where it can be reviewed and committed accordingly.
![]()
Figure #29: Pay Run Controller Pending Rebank Pays
Manual Pay
Manual Pays, set up similar to Pay Adjustments, are payments made outside of the Regular Pay Run that can be committed at any time. Most typically, Manual Pays are utilised where payments have been missed from the Regular Pay Run, or to back pay employees. ![]()
Note: Each tab is not required to be completed. If applicable, an adjustment made only to the employee’s Retirement Funds can be created.
Settings
Highlight the employee you wish to create a Manual Pay for.

Figure #30: Manual Pay ‘Settings’ Tab
Note: The search filter has been made available for quicker selection processing. To search simply type in the Employee Number, Employee First Name or Employee Last Name and select the “Tab” button on your keyboard. The list will be filtered accordingly.
When an employee is selected, information will be populated according to the Employee File “Payroll” defaults. A different Position, Event (if applicable), Grade, Cost Centre and Location can be selected using the ellipsis menu. The Employee Base Rate will be populated from the selected Grade.
Note: If the selected employee has an overridden Base Rate within the Employee File, the Grade should not be altered as this will remove the override and pay at the selected Grade’s Base Rate.
Planned Pay Period Chooser
Once you have selected the applicable employee, a “Planned Pay Period” will need to be selected using the ellipsis menu.
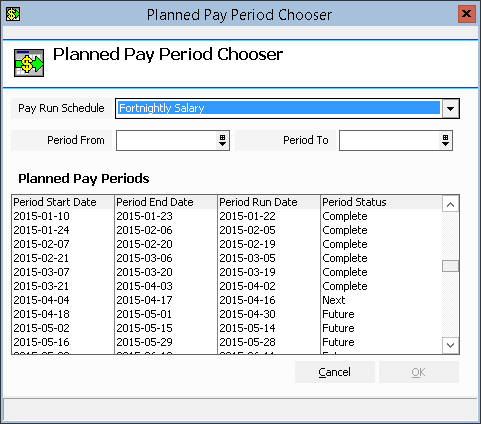
Figure #31: Manual Pay Planned Pay Period Chooser
Note: The Pay Run Schedule selected must coincide with the employee’s Default Grade.
Gross Payments
Once the required fields are input, select the “Save Payment” button to save the payment details. Additional Gross Payments can also be added once each previous payment has been saved.
Figure #32: Manual Pay ‘Gross Payments’ Tab
Note: To clear currently entered, but not saved, Gross Payment data, select the “Clear Payment” button. This function is available throughout all tabs.
Note: To remove a saved Gross Payment, select the “Delete Payment” button. This function is available throughout all tabs.
Note: To edit a saved Gross Payment, select the “Edit Payment” button. This function is available throughout all tabs.
Allowances
In the ‘Allowances’ tab, select the ellipsis (“…”) to retrieve a list of Allowances assigned to the employee. From here, enter the required “Payment Amount” and a “Payment Reason”.
Once the required fields are input, select the “Save Payment” button to save the payment details. Additional Allowances can also be added once each previous payment has been saved.
Figure #33: Manual Pay ‘Allowances’ Tab
Note: Once an Allowance has been selected, the “Include in Retirement Fund Calculations?”, “Payment Is Subject To Tax?” and “Payment Is Shown on Pay Slip?” fields will be flagged according to the Allowance configuration.
Note: You can add as many Allowances transactions as necessary within one Manual Pay.
Deductions
In the ‘Deductions’ tab, select the ellipsis (“…”) to retrieve a list of Deductions assigned to the employee. From here, enter the required “Payment Amount” and a “Payment Reason”.
Once the required fields are input, select the “Save Payment” button to save the payment details. Additional Deductions can also be added once each previous payment has been saved.
Figure #34: Manual Pay ‘Deductions’ Tab
Note: Once a Deduction has been selected, the “Include in Retirement Fund Calculations?”, “Payment Is Subject To Tax?” and “Payment Is Shown on Pay Slip?” fields will be flagged according to the Deduction configuration.
Note: You can add as many Deduction transactions as necessary within one Manual Pay.
Retirement Funds
The ‘Retirement Funds’ enables you to make Compulsory, Employer Additional and/or Employee Contribution adjustments.
Once the required fields are input, select the “Save Payment” button to save the payment details. Additional Retirement Payments can also be added once each previous payment has been saved.
Figure #35: Manual Pay ‘Retirement Funds’ Tab
Note: Once a Retirement Fund has been selected, the “Employer Contribution?” field will be flagged unless the “Employee’s Contribution” field is flagged.
Leave Adjustments
The ‘Leave Adjustment’ tab allows you to adjust the selected employee’s Leave Balance(s).
Once the required fields are input, select the “Save Payment” button to save the payment details. Additional Leave Adjustments can also be added once each previous adjustment has been saved.
Figure #36: Manual Pay ‘Leave Adjustments’ Tab
Note: Adjustments made to an employee’s Leave Balance(s) is not associated with any dollar value (i.e., does not constitute as a Leave Payment). These adjustments will simply impact the employee’s balance for the selected Leave(s).
Note: Once a Leave type has been selected, the “Base Rate”, “Leave Rate will be” and “Per” fields will be populated according to the Leave type configuration. If the Multiplier has been altered these rates will be recalculated.
Taxation
Once the required fields are input, select the “Save Payment” button to save the payment details. Additional Tax amounts can also be added once each previous amount has been saved.
Figure #37: Manual Pay ‘Taxation’ Tab
A “Save Confirmation” screen will appear confirming your choice to save changes to the Manual Pay when “Save” is selected.
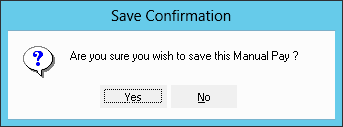
Figure #38: Manual Pay Save Confirmation
The Manual Pay will appear within the Pay Run Controller under “Pending Manual Pays”, where it can be reviewed and committed accordingly.
![]()
Figure #39: Pay Run Controller Pending Manual Pays
Pay Adjustment
The Pay Adjustments function allows for adjustments to be made to an employee’s wages. A Pay Adjustment, once created, will be attached to the applicable Regular Pay Run Schedule Period and processed when the Pay Run is executed. ![]()
Pay Adjustments should be created prior to Regular Pay Run execution.
To create a Pay Adjustment for an employee, highlight the applicable Pay Run pertaining to the employee and select the “New Pay Adjust” button.
Note: Each tab is not required to be completed. If applicable, an adjustment made only to the employee’s Retirement Funds can be created.
Settings
Much like with Rebank Pays and Manual Pays, highlight the employee you wish to create an adjustment for.
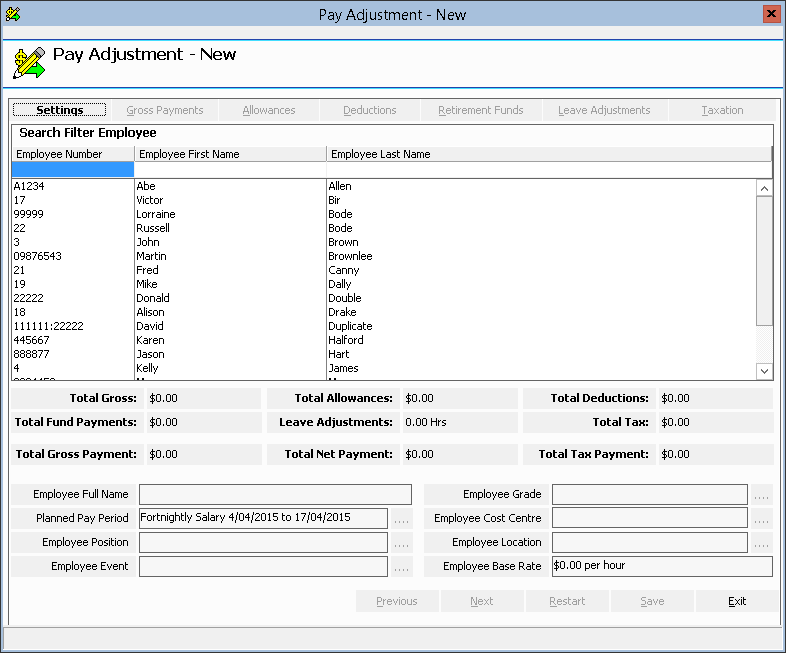
Figure #40: Pay Adjustment ‘Settings’ Tab
Note: The search filter has been made available for quicker selection processing. To search simply type in the Employee Number, Employee First Name or Employee Last Name and select the “Tab” button on your keyboard. The list will be filtered accordingly.
When an employee is selected, information will be populated according to the Employee File “Payroll” defaults. A different Position, Event (if applicable), Grade, Cost Centre and Location can be selected using the ellipsis menu. The Employee Base Rate will be populated from the selected Grade.
Note: If the selected employee has an overridden Base Rate within the Employee File, the Grade should not be altered as this will remove the override and pay at the selected Grade’s Base Rate.
Gross Payments
Once the required fields are input, select the “Save Payment” button to save the payment details. Additional Gross Payments can also be added once each previous payment has been saved.
Figure #41: Pay Adjustment ‘Gross Payments’ Tab
Note: To clear currently entered, but not saved, Gross Payment data, select the “Clear Payment” button. This function is available throughout all tabs.
Note: To remove a saved Gross Payment, select the “Delete Payment” button. This function is available throughout all tabs.
Note: To edit a saved Gross Payment, select the “Edit Payment” button. This function is available throughout all tabs.
Allowances
In the ‘Allowances’ tab, select the ellipsis (“…”) to retrieve a list of Allowances assigned to the employee. From here, enter the required “Payment Amount” and a “Payment Reason”.
Once the required fields are input, select the “Save Payment” button to save the payment details. Additional Allowances can also be added once each previous payment has been saved.
Figure #42: Pay Adjustment ‘Allowances’ Tab
Note: Once an Allowance has been selected, the “Include in Retirement Fund Calculations?”, “Payment Is Subject To Tax?” and “Payment Is Shown on Pay Slip?” fields will be flagged according to the Allowance configuration.
Deductions
In the ‘Deductions’ tab, select the ellipsis (“…”) to retrieve a list of Deductions assigned to the employee. From here, enter the required “Payment Amount” and a “Payment Reason”.
Once the required fields are input, select the “Save Payment” button to save the payment details. Additional Deductions can also be added once each previous payment has been saved.
Figure #43: Pay Adjustment ‘Deductions’ Tab
Note: Once a Deduction has been selected, the “Include in Retirement Fund Calculations?”, “Payment Is Subject To Tax?” and “Payment Is Shown on Pay Slip?” fields will be flagged according to the Deduction configuration.
Retirement Funds
The ‘Retirement Funds’ enables you to make Compulsory, Employer Additional and/or Employee Contribution adjustments.
Once the required fields are input, select the “Save Payment” button to save the payment details. Additional Retirement Payments can also be added once each previous payment has been saved.
Figure #44: Pay Adjustment ‘Retirement Funds’ Tab
Note: Once a Retirement Fund has been selected, the “Employer Contribution?” field will be flagged unless the “Employee’s Contribution” field is flagged.
Leave Adjustments
The ‘Leave Adjustment’ tab allows you to adjust the selected employee’s Leave Balance(s).
Once the required fields are input, select the “Save Payment” button to save the payment details. Additional Leave Adjustments can also be added once each previous adjustment has been saved.
Figure #45: Pay Adjustment ‘Leave Adjustments’ Tab
Note: Once a Leave type has been selected, the “Multiplier”, “Base Rate”, “Leave Rate will be” and “Per” fields will be populated according to the Leave type configuration.
Taxation
Once the required fields are input, select the “Save Payment” button to save the payment details. Additional Tax amount can also be added once each previous amount has been saved.
Figure #46: Pay Adjustment ‘Taxation’ Tab
A “Save Confirmation” screen will appear confirming your choice to save changes to the Pay Adjustment.
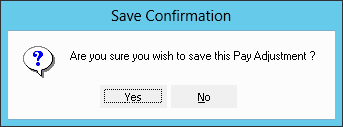
Figure #47: Pay Adjustment Save Confirmation
The Pay Adjustment will appear within the Pay Run Controller under the applicable Pay Run Schedule, where it will be executed and committed with the Pay Run accordingly.

Figure #48: Pay Run Controller Pay Run Adjustment
Regular Pay Run
When all Termination Payments, Final Pays, Rebank Pays, and Pay Adjustments have been created, you are ready to commence executing the Regular Pay Run by selecting the Pay Run and then “Execute Pay Run”. ![]()
After the “Execute Pay Run” button has been selected, the “Pay Run Participants” screen will appear, with the view set to “Grade”. This will display a list of all Grades associated with the Pay Run, and each employee assigned to the Grade.
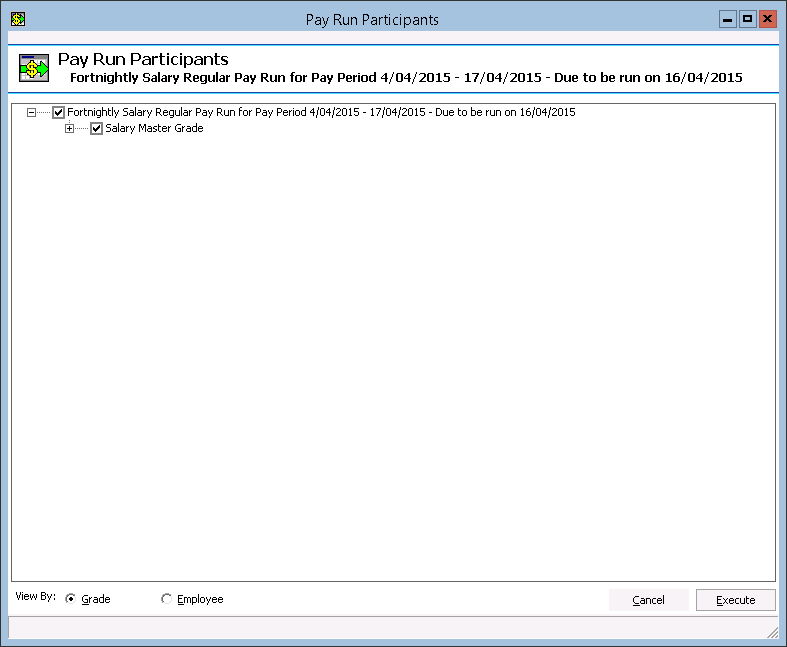
Figure #49: Regular Pay Run Participants
Note: The ability to view by “Employee” is also present. Select the “Employee” button to view a list of all employees in alphabetical order by surname.
All entities are selected by default. If you wish to exclude particular employees or Grades, this can be done by unflagging each respective employee/Grade.
Where Employees have no warnings and can be executed successfully, “No Warnings” will be depicted next to their name. If the Employee does not have any authorised shifts, “Employee does not have any authorised shifts” will be depicted next to their name.
Note: If an error message appears that you require immediate assistance with, or further clarification, please contact Inzenius Support by emailing support@inzenius.com.
Important: During this stage, Users should review the list of Employees (either viewing by “Grade” or “Employee”) to ensure there are no error messages preventing the employee from being executed with the Pay Run.

Figure #50: Regular Pay Run Participants expanded
Once all required employees or Grades have been selected, click the “Execute” button to begin the Pay Run calculations. ![]()
Note: When executing a Pay Run, all Entities linked to the Pay Run will be locked for editing. This includes all Grades attached to the Pay Run, employees attached to Grades, Allowances, Deductions, Leave types, Payroll Rules, as well as assigned Locations, Positions and Cost Centres (to Employee Files).
The Pay Run will automatically display a ‘pause’ symbol next to the Pay Run executed, with a message detailing the “Pay Run is Pending”.
![]()
Figure #51: Pay Run Controller Executed Pay Run
Once the Pay Run is finished processing, you will see that the calculations are complete and ready to be checked and the Pay Run will display a green ‘tick’ symbol.
![]()
Figure #52: Pay Run Controller Pending Pay Run
View Pay Run
When a Pay Run has been executed and is awaiting checking, it is ready to be reviewed. Reports must be reviewed and balanced to ensure no complications arose during Pay Run execution or to ensure all employees have been paid correctly, with the inclusion of any Pay Adjustments made. ![]()
The “Pay Period Transactions” screen will be displayed, with each employee listed under the Grade (Default Grade) and detailing all transactions processed within the Pay Run.
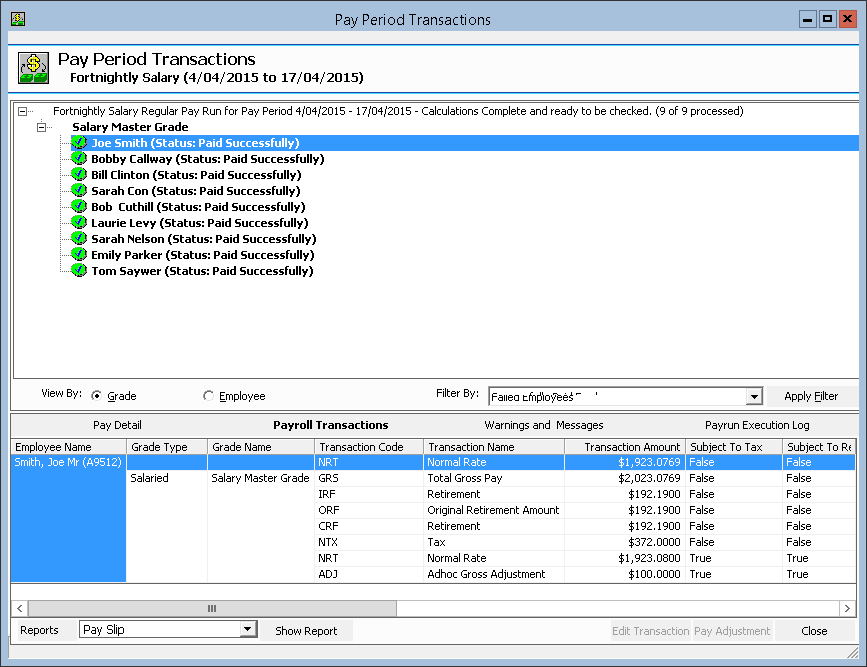
Figure #53: Regular Pay Run Pay Period Transactions
Note: The ability to view by “Employee” is also present. Select the “Employee” button to view a list of all employees in alphabetical order by surname.
Reports from View Pay Run Screen
A number of Reports are able to be generated to aid in the balancing of the Pay Run.
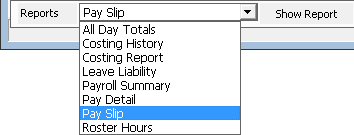
Figure #54: Pay Period Transactions ‘Reports’
| Report Name | Report Description |
| All Day Totals | Displays total wages across all employees on a daily basis within the Pay Period, and any rounding discrepancies |
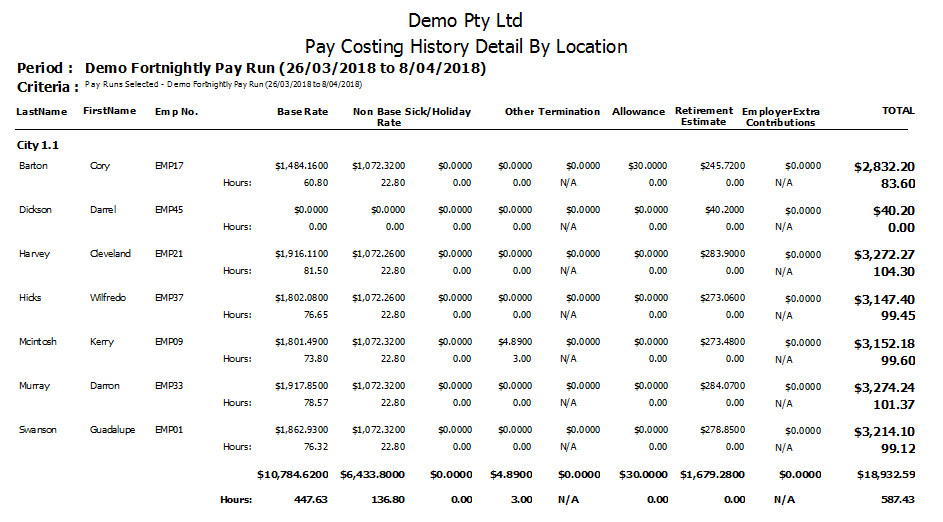
| Costing History | Generated as a detailed or summarised Report by Location or Cost Centre, depicts total wages for each employee categorised by payment type |
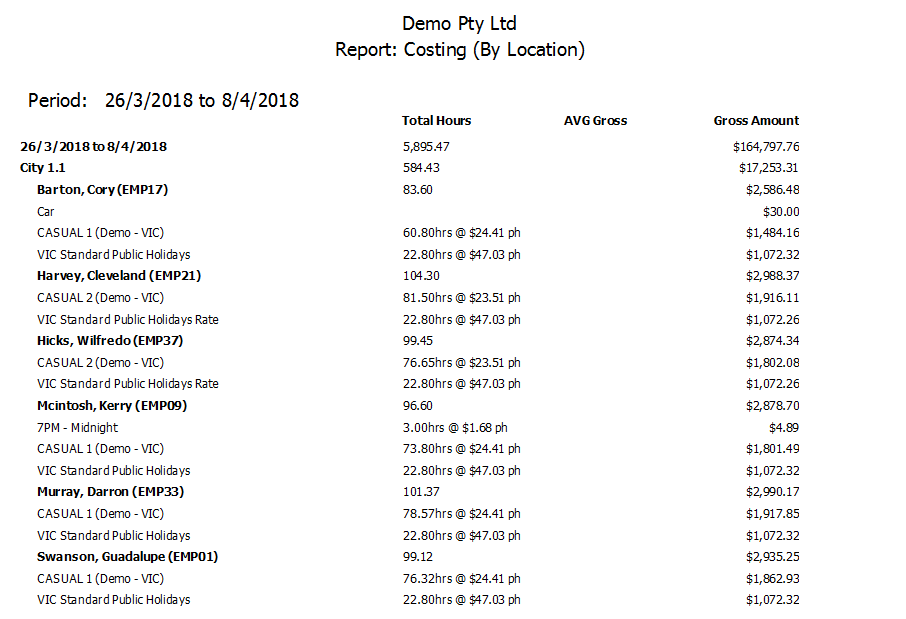
| Costing Report | Similar to the Rostering screen Costing Report, depicts a breakdown of payments made to an employee, generated by Location, Cost Centre, Event, or Event and Location |
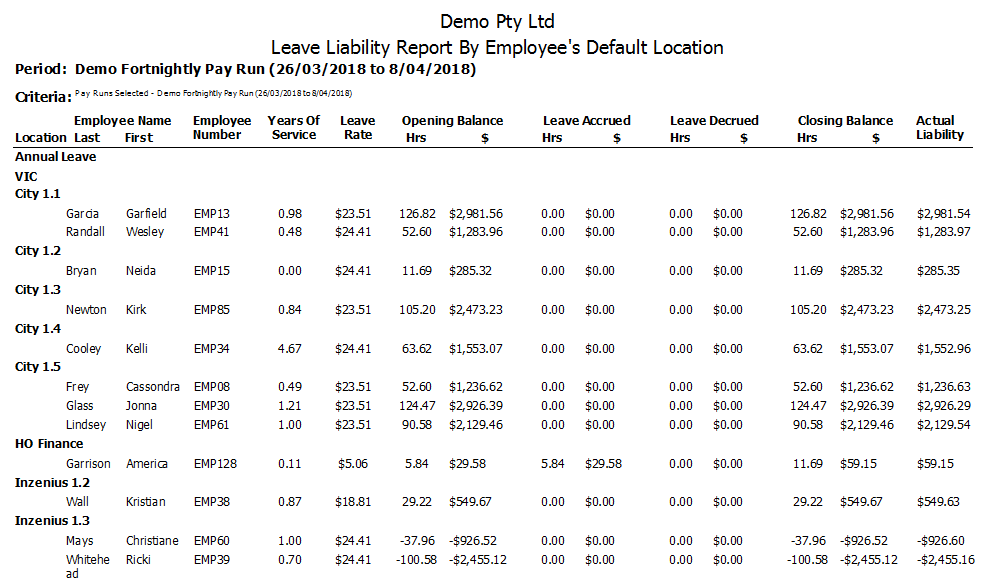
| Leave Liability | Depicts Leave accrued or decrued for each employee within the Pay Period, generated by Default Location, Cost Centre, or Employee |
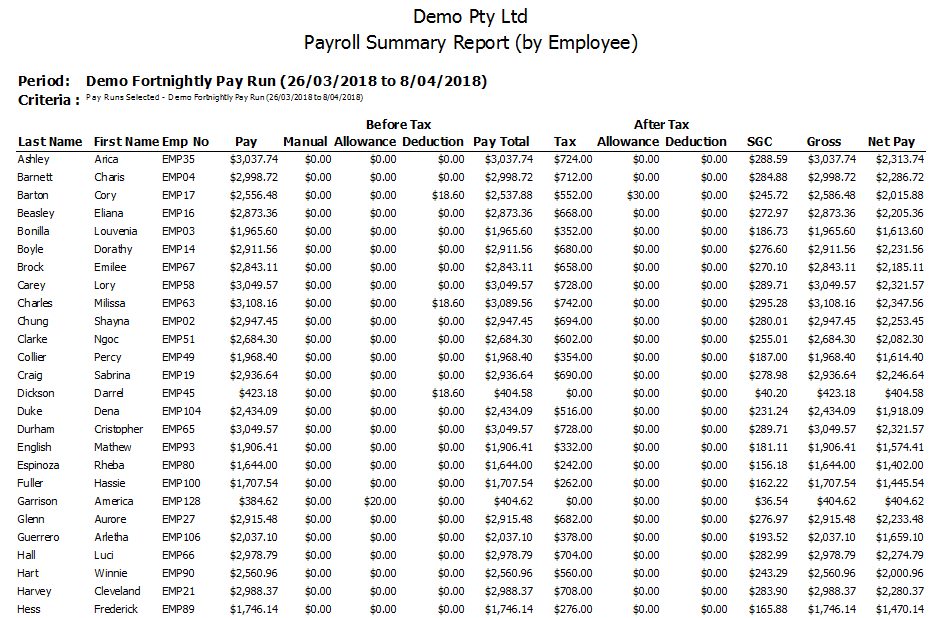
| Payroll Summary | A summary of the payroll processed for each employee, depicting before and after tax amounts paid or deduction, as well as SGC totals |
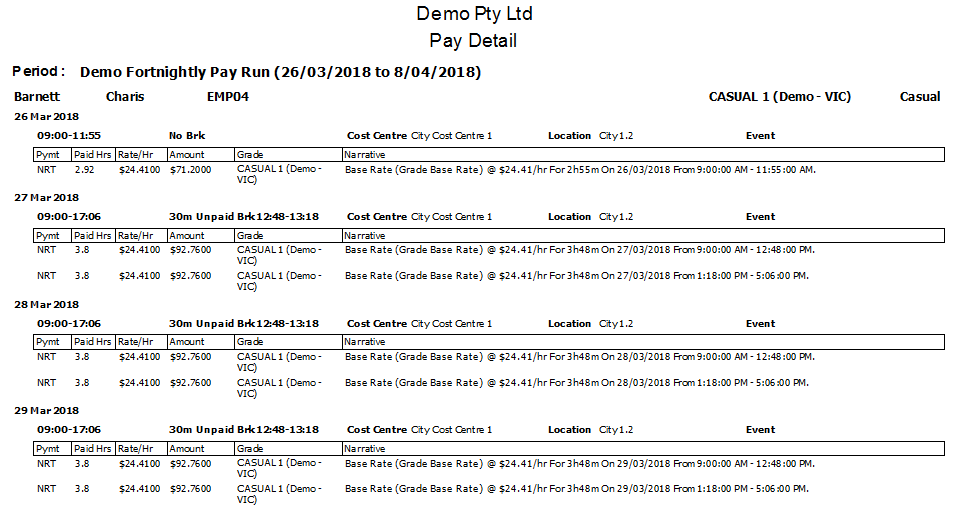
| Pay Detail | Details every transaction for each employee, as displayed in the ‘Pay Detail’ tab |
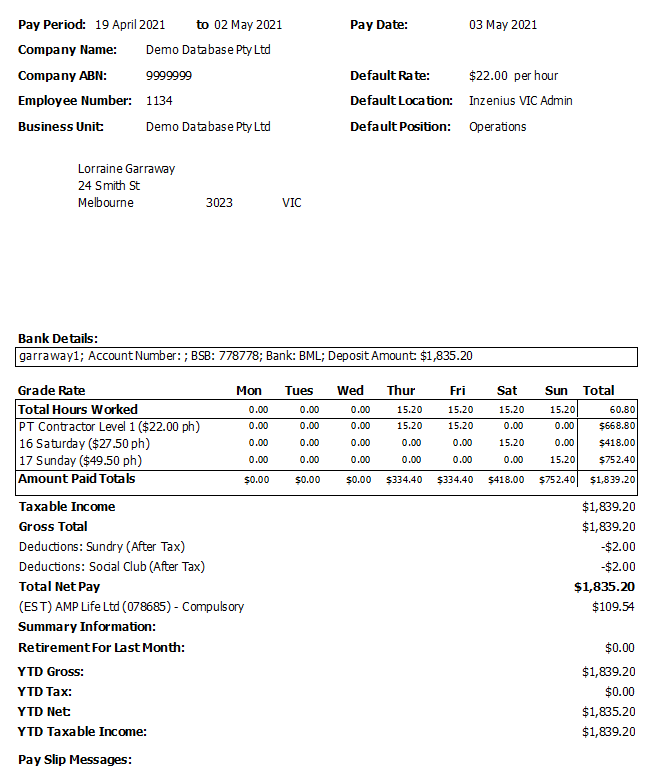
| Pay Slip | Depicts a preview of the Payslip for each successfully paid employee |
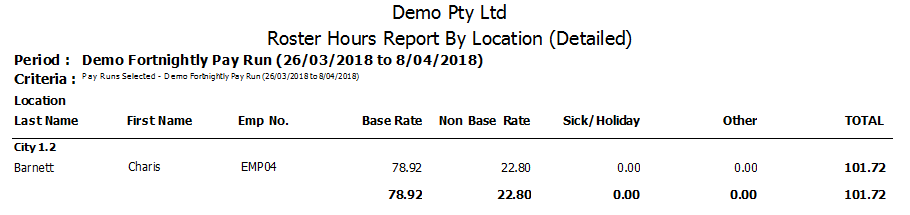
| Roster Hours | Generated as a detailed or summarised Report by Location or Cost Centre, depicts Roster hours for each employee categorised by payment type |
Reports Samples
Note: Reports generated from the “View Pay Run” screen for an executed but not committed Pay Run will be Pending and correct based on the calculations at the time of execution. If the Pay Run is discarded and changes made, the Reports will need to be generated again for accuracy.
Note: These Reports can also be generated from the ‘Pay History’ tab of the Pay Run Controller (once the Pay Run is committed) or Inzenius Standard Reports. Reports generated from these avenues will be based on committed data.
Balancing the Pay Run
To balance the Pay Run, Reports will need to be reviewed and compared so as to balance the Figures and ensure all employees have been paid correctly.
1. Employees Not Successfully Paid:
From the “Filter By” list, review if any employees appear under “Employees With Warnings”, “Failed Employees”, and “Negative Pay Employees”.
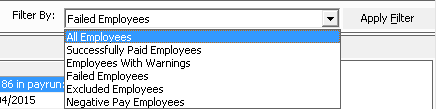
Figure #55: Pay Period Transactions ‘Filter By’
Employees whom appear under these filters should be investigated, by first reviewing the “Warnings and Messages” and also the “Payrun Execution Log”.


Note: Employees under the “Excluded Employees” filter will include any employees who were deselected in the “Pay Run Participants” process.
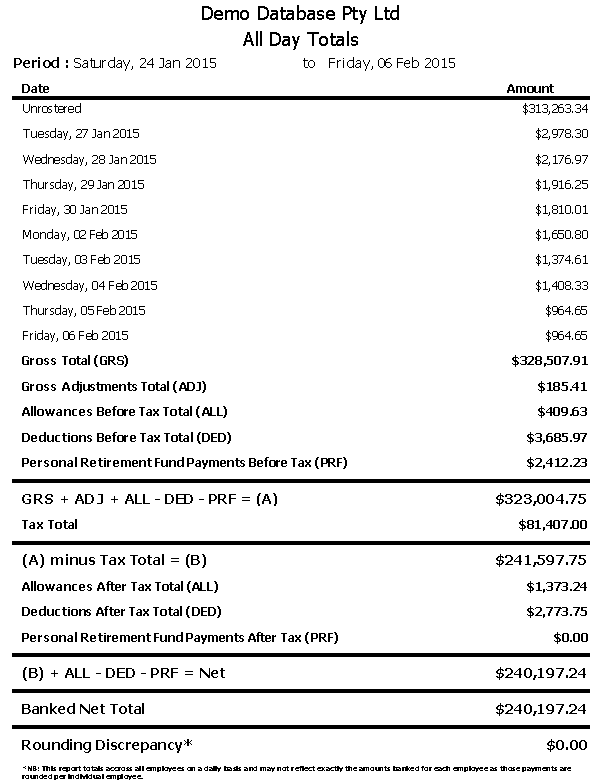
2. Rounding Discrepancies and Net:
Generate the ‘All Day Totals’ Report and review the “Rounding Discrepancy” total. This amount should read $0.00. Any rounding discrepancy will be apparent when reviewing the totals for “(B)+ALL-DED-PRF=Net” and “Banked Net Total”.

Figure #56: Pay Period Transactions All Day Totals Report
Note: If the “Rounding Discrepancy” displays as anything above (+) or below (-) $5.00 (depending on the number of employees included within the Pay Run), this will not be due to rounding and will need to be investigated.
3. Balancing Totals:
Generate the ‘Payroll Summary’ Report and review each column for employees. Cross-check the following balances with the ‘All Day Totals’ Report.
| All Day Totals | Payroll Summary Report |
| Gross Total (GRS) | “Pay” column |
| Gross Adjustments (ADJ) | “Manual” column |
| Allowances Before Tax Totals (ALL) | “Before Tax Allowance” column |
| Deductions Before Tax Totals (DED) | “Before Tax Deduction” column |
| GRS+ADJ+ALL-DED-PRF=(A) | “Pay Total” column |
| Tax Total | “Tax” column |
| Allowances After Tax Total (ALL) | “After Tax Allowance” column |
| Deductions After Tax Total (DED) | “After Tax Deduction” column |
4. Leave Balances:
Generate the ‘Leave Liability’ Report and review accruals and decruals for each employee for the Pay Period. Employees Leave accruals should calculate based on the Leave setup and the hours Rosters (Authorised) for Permanent and Casual employees and based on the Leave setup and Standard Hours con
Figured for Salaried Employees.
Note: Leave will accrue when the employee is Rostered to any type of Location and Authorised, including Unpaid Leave types.
5. Transaction Spot Check:
Spot check employee’s transactions by selecting the employee from the “Successfully Paid Employees” list.

Figure #57: Pay Period Transactions ‘Payroll Transactions’ Tab
All discrepancies should be investigated by the Payroll Manager (or the User executing and reviewing the Pay Run) and attempted to be resolved.
Note: Should any issues arise or the discrepancy unable to be resolved, please email Inzenius Support at support@inzenius.com with as much detail as possible pertaining to the discrepancy found within the Pay Run and mark the email as ‘Urgent’.
Additional Balancing Suggestions
Other Reports generated can be used for verification processes when executing Pay Runs. Below are some combinations Inzenius clients have utilised:
- ‘Actual Labour Report’ (from the Rostering screen) generated for each Cost Centre or Location(s) summed up and balanced against the ‘Payroll Summary’ Report “Pay” column
- ‘Actual Labour Report’ (from the Rostering screen) generated for each Cost Centre or Location(s) summed up for each day and balanced against the ‘All Day Totals’ Report daily
Figures - ‘Costing Report’ (from the Rostering screen) generated for all Cost Centre(s) or Location(s) against the ‘Costing History’ Report to review for additional payments processed at the payroll level, as well as capping
- ‘Allowance Report’ Detailed or Summary (from the Pay Run Controller screen) to review Allowance totals
If any changes are required to be made, the Pay Run will need to be discarded and re-executed.
Bonuses/Commissions/Similar Payments
Occasionally, you may need to process bonuses/commissions/similar payments within Inzenius. These types of payments can be processed within Manual Pays, Pay Adjustments, Final Pays and/or Rebank Pays (where amounts have been clawed back from the employee).
Bonuses/commissions/similar payments can be processed via Gross Adjustments and/or Allowances.
Processing Payments via Gross Adjustments
Select the employee you wish to pay a bonus/commission/similar payment to, and in the ‘Gross Payments’ tab of the selected Pay Type (Manual Pay/Pay Adjustment/Final Pay/Rebank Pay) enter the necessary information.
To ensure that the payment will be treated and taxed accordingly, simply flag the “Payment Is Bonus/Commission/Similar?” checkbox.
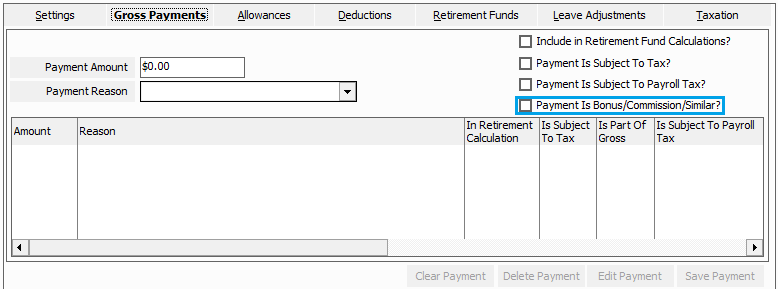
Figure #58: Gross Adjustments; ‘Payment Is Bonus/Commission/Similar?’ checkbox
This checkbox will ensure that the payment will be taxed using the ATO’s Tax Schedule 5 (for more information on Schedule 5, please refer to the ATO’s website: here).
Processing Payments via Allowances
When making this type of payment via Allowances, you will first need to ensure that the applicable Bonus/Commission/Similar Payment Allowance has been (1) created and con
Figured correctly, and (2) assigned to the pertinent employee(s).
Once all has been con
Figured, select the employee you wish to pay a bonus/commission/similar payment to, and in the ‘Allowances’ tab of the selected Pay Type (Manual Pay/Pay Adjustment/Final Pay/Rebank Pay) enter the necessary information.

Figure #59: Allowances; Checkbox configuration inherited from Allowance Setup
The Allowance Setup will dictate how the payment will be flagged in the Manual Pay/Pay Adjustment/Final Pay/Rebank Pay, so you will not need to manually update the checkbox fields.
If “Payment Is Bonus/Commission/Similar?” is not flagged, discard the Pay and amend the Allowance to be flagged accordingly to ensure that the payment will be taxed using the ATO’s Tax Schedule 5 (for more information on Schedule 5, please refer to the ATO’s website: here).
Discarding a Pay Run
Discarding a Pay Run may be necessary in the event that payments are missed, Rosters have not been Authorised, changes are to be made to existing employees pays, or should an issue require resolving before re-execution.
Any Pay Run type (Regular, ETP, Final, Rebank, Manual, and Pay Adjustments) can be discarded. To discard a Pay Run, highlight the pending Pay Run and select the “Discard Pay Run” button. ![]()
The discarded Pay Run will be immediately deleted.
Discarding a Regular Pay Run
When selecting “Discard Pay Run” for a Regular Pay Run, a screen will prompt confirming your choice. On the “Discard Pay Run Dialog” screen, select if you wish to discard the “Complete pay run” or “Selected employees”.
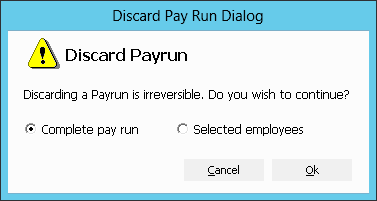
Figure #60: Pay Run Controller Discard Pay Run Dialog
Discard Complete Pay Run
This will ensure that all employees within the Pay Run will have their calculated payments reversed and revert the Pay Run back to the ‘Pay Run is waiting to be started’ status immediately. If you wish to discard the entire Pay Run, select “Complete pay run” and click “Ok”.
Discard Selected Employees
This will ensure that only selected employees within the Pay Run will have their calculated payments reversed. If you wish to discard only a few employees, select “Selected employees” and click “Ok”. This will prompt the “Pay Run Participants” screen where a list of employees is present. Flag the applicable employees you wish to discard and select “Discard”.
Editing a Pay Run
Only Final, ETP, Rebank, Manual, and Pay Adjustments can be edited. Editing these Pay types will re-open the screen where the initial adjustments were made.
To edit an existing Pending Pay, highlight the Pay and select the “Edit [Pay Type]” button.
![]()
![]()
![]()
![]()
![]()
Figure #61: Pay Run Controller Edit Buttons
The Pay Type screen will open where additional adjustments can be made.
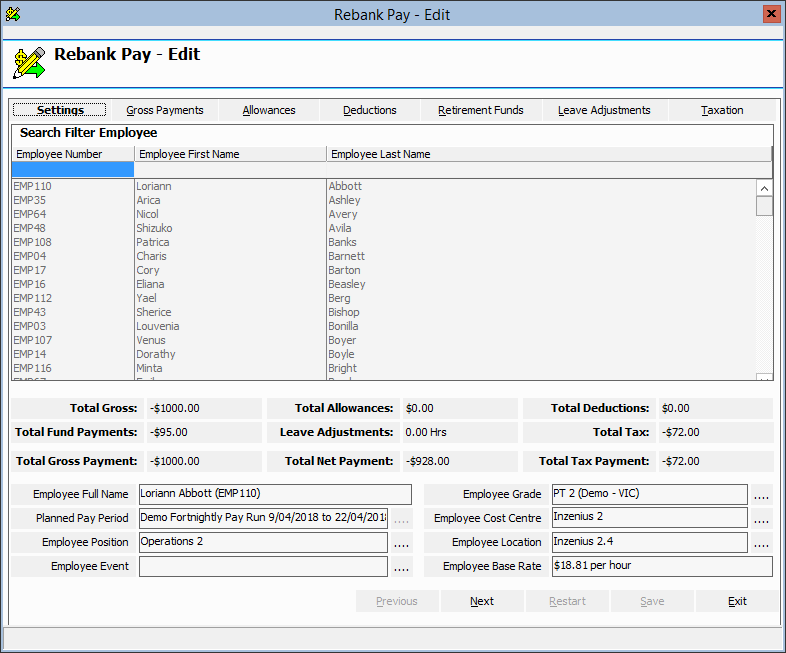
Figure #62: Edit Rebank Pay Screen
Committing a Pay Run
Once a Pay Run has been reviewed (and balanced, if the Regular Pay Run), it is ready to be committed. Committing the Pay Run will complete the process and move all data to the ‘Pay History’. ![]()
A screen will prompt confirming your choice to commit the Pay Run.

Figure #63: Pay Run Controller Commit Pay Run
Once a Pay Run is committed, it is moved to the ‘Pay History’ of the Pay Run Controller.
Committing Multiple Final Pays
If more than one Final Pay has been created, to avoid committing each one separately, you have the option to commit all at the same time by right clicking “Pending Final Pays” and selecting “Commit Pay Runs”. ![]()
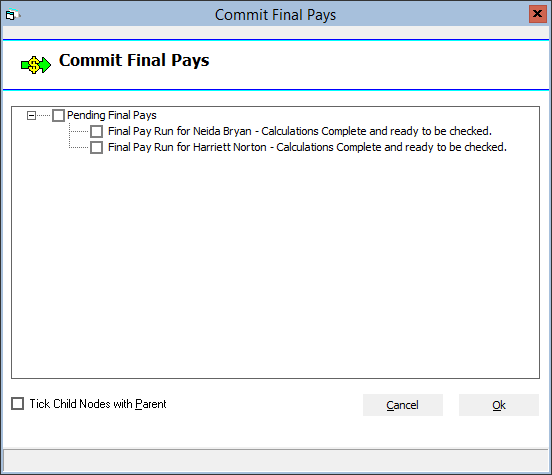
Figure #64: Pay Run Controller Commit Final Pays
A screen will prompt confirming your choice to commit the Pay Runs.
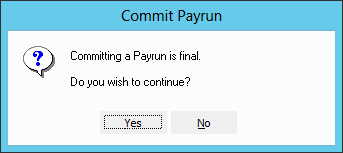
Figure #65: Commit Final Pays Commit Pay Run
Committing Multiple Manual Pays
If more than one Manual Pay has been created, to avoid committing each one separately you have the option to commit all at the same time by right clicking “Pending Manual pays” and selecting “Commit Manual Pays”. ![]()
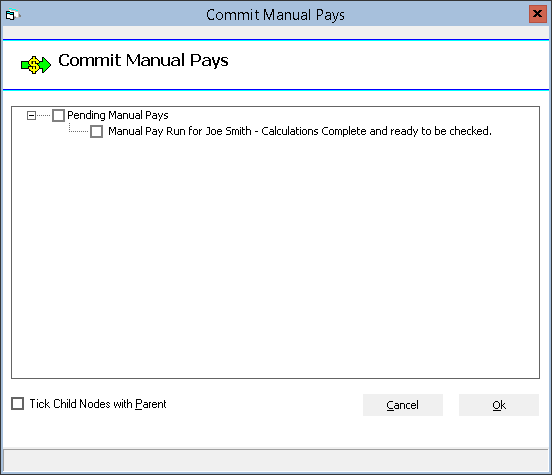
Figure #66: Pay Run Controller Commit Manual Pays
A screen will prompt confirming your choice to commit the Pay Runs.
Figure #67: Commit Manual Pays Commit Pay Run
EFT Processing
Once a Pay Run has been committed, the EFT file is able to be generated for processing.
Within the ‘Pay History’ tab of the Pay Run Controller, right click the Pay Run you wish to generate an EFT file for and select “New Electronic Funds Transfer (EFT)” or select the “New EFT File” button. ![]()
You will be prompted to enter EFT specifications into the “EFT Details” screen.
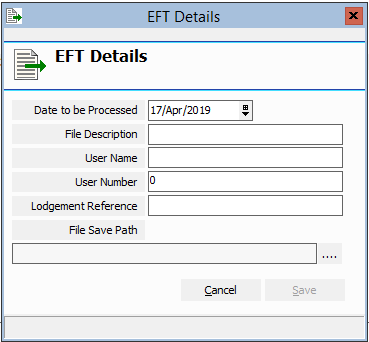
Figure #68: Pay Run Controller EFT Details
Grouping Final Pays into EFT
If more than one Final Pay has been created, they can be grouped together for EFT generation by right clicking “Committed Final Pays” and selecting “Group Final Pays into EFT”. ![]()
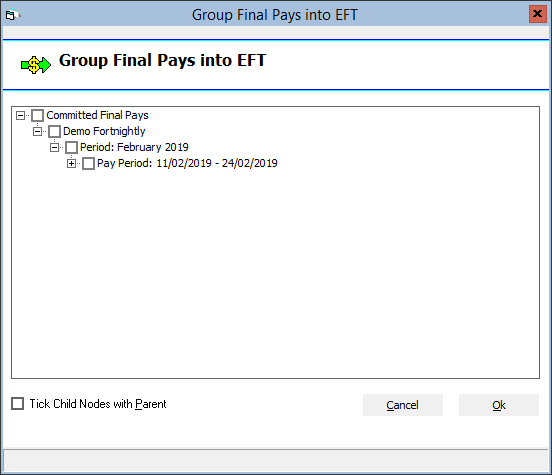
Figure #69: Pay Run Controller Group Final Pays into EFT
Note: Flag “Tick Child Nodes with Parent” to select all entities under the Parent selection.
Grouping Manual Pays for EFT
If more than one Manual Pay has been created, they can be grouped together for EFT generation by right clicking “Committed Manual Pays” and selecting “Group Manual Pays into EFT”. ![]()
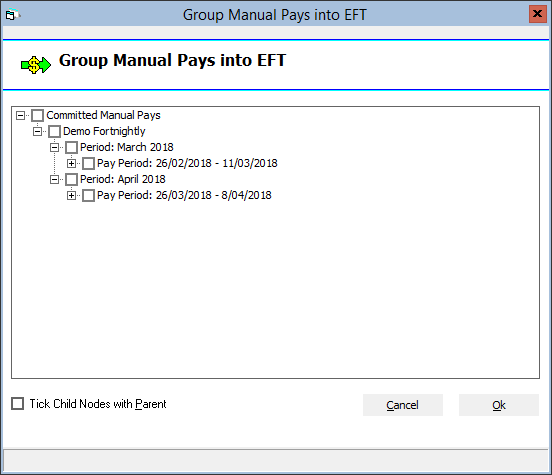
Figure #70: Pay Run Controller Group Manual Pays into EFT
Note: Flag “Tick Child Nodes with Parent” to select all entities under the Parent selection.
Payslip Printing
Once you have committed your Pay Run(s), you have the facility to be able to print your Payslips for the whole Pay Run, or for a selected number of employees by right clicking the committed Pay Run you wish to generate Payslips for, and selecting “Pay Slip Printing”. ![]()
Note: Payslips can be reprinted for past Pay Runs at any time.
Filter
Flag the employees you wish to generate Payslips for by selecting the name individually or flagging the Parent Node to automatically flag all Child Nodes.
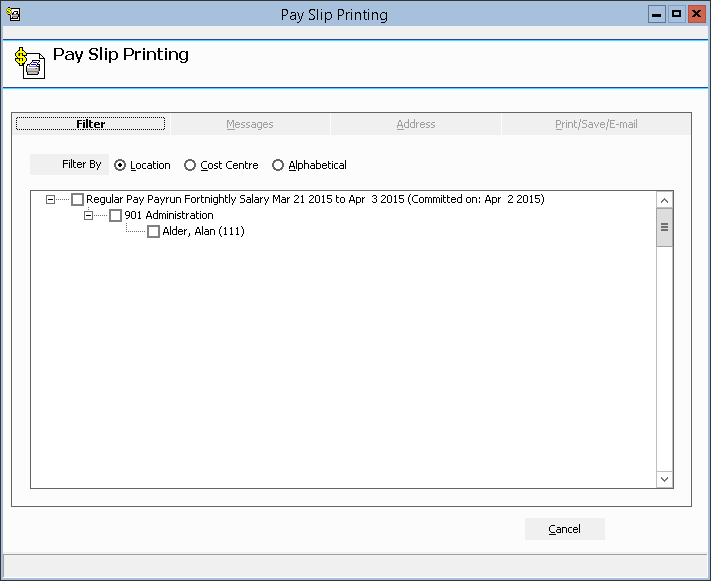
Figure #71: Pay Slip Printing ‘Filter’ Tab
Note: Flagging the Parent Node will flag all Child Nodes as well.
Messages
Payslip messages can be added to all or selected employee Payslips if needed (e.g., at the EOFY, you may wish to remind your employees to provide their current Address and contact Details so that they will be reported to the ATO accordingly).
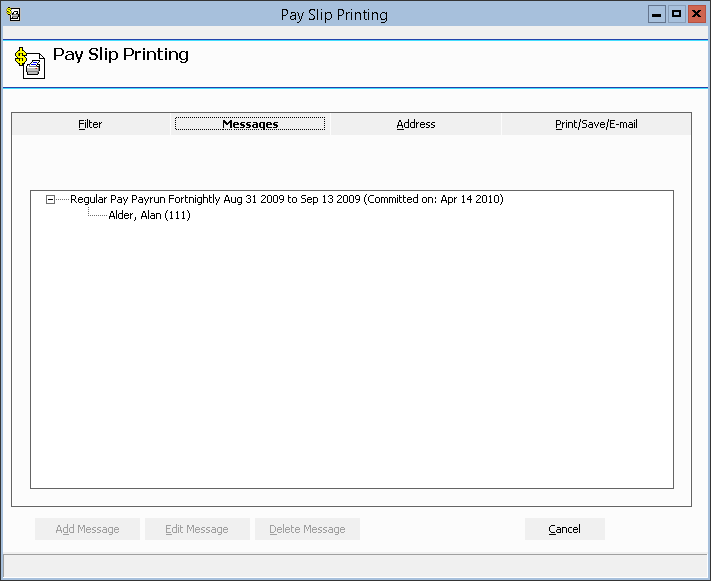
Figure #72: Pay Slip Printing ‘Messages’ Tab
To add a Payslip message for all employee(s) highlight the Regular Pay Run, or for one employee highlight the employee name, and click the “Add Message” button. ![]()
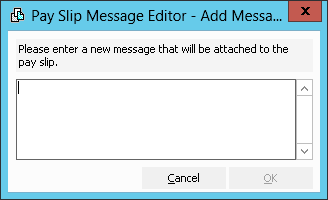
Figure #73: Pay Slip Printing Pay Slip Message Editor
Note: Where a message has been saved but is required to be altered, highlight the Pay Run or employee and select the “Edit Message” button.
Note: Where a message has been saved but is no longer required, highlight the Pay Run or employee and select the “Delete Message” button.
Address
Flag the employees you wish to have Payslips depict the employee’s addresses for by selecting the name individually or flagging the Parent Node to automatically flag all Child Nodes.
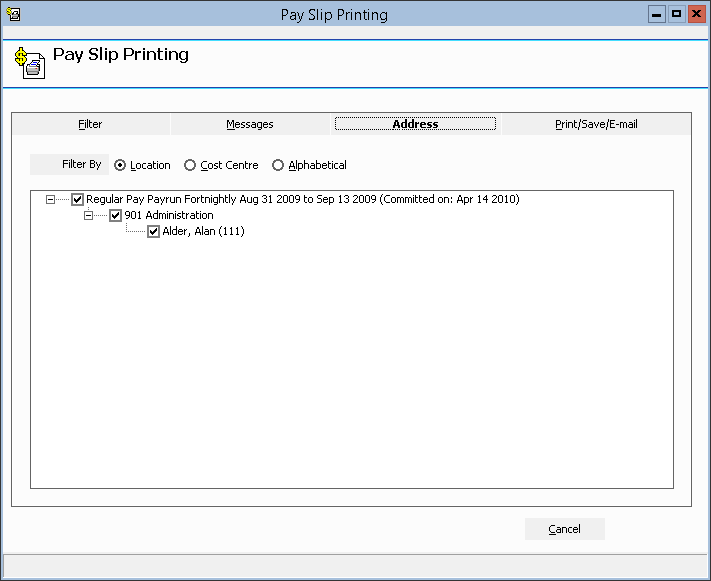
Figure #74: Pay Slip Printing ‘Address’ Tab
Note: Flagging the Parent Node will flag all Child Nodes as well.
Note: The address displayed on the Payslip is the address in the Employee File marked as ‘Default’.
Print/Save/E-mail
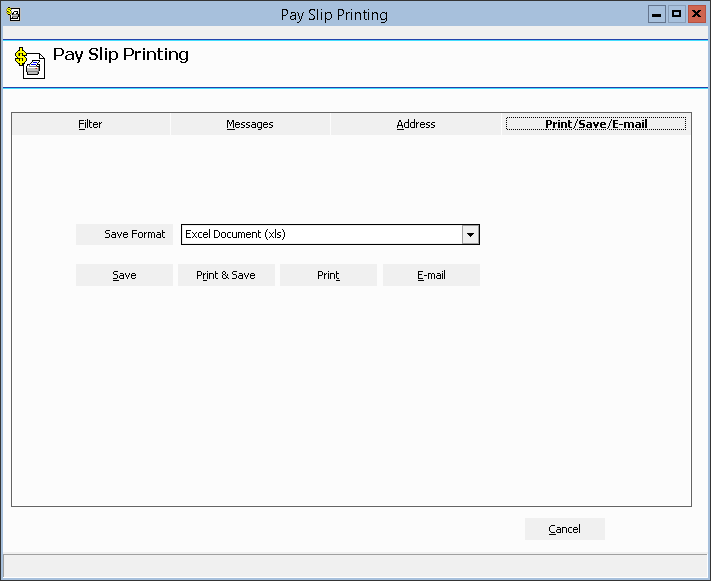
Figure #75: Pay Slip Printing ‘Print/Save/E-mail’ Tab
Once you have selected the applicable file format, click “Save” to save the Payslips, “Print & Save” to print then save the Payslips, “Print” to print the Payslips only, or “E-mail” to e-mail the Payslips.
![]()
Note: The Business Unit ‘Email Setup’ will need to be con
Figured in order for the e-mail Payslips functionality to be available.
Grouping Final Pays for Printing
If more than one Final Pay has been created, they can be grouped together for Payslip printing by right clicking “Committed Final Pays” and selecting “Group Final Pays for Printing”. ![]()
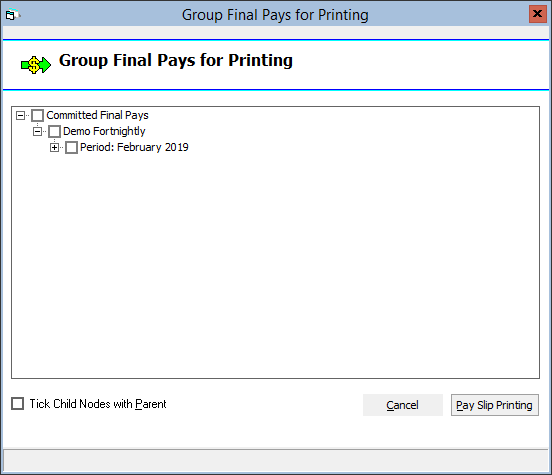
Figure #76: Pay Run Controller Group Final Pays for Printing
Note: Flag “Tick Child Nodes with Parent” to select all entities under the Parent selection.
Grouping Manual Pays for Printing
If more than one Manual Pay has been created, they can be grouped together for Payslip printing by right clicking “Committed Manual Pays” and selecting “Group Manual Pays for Printing”. ![]()
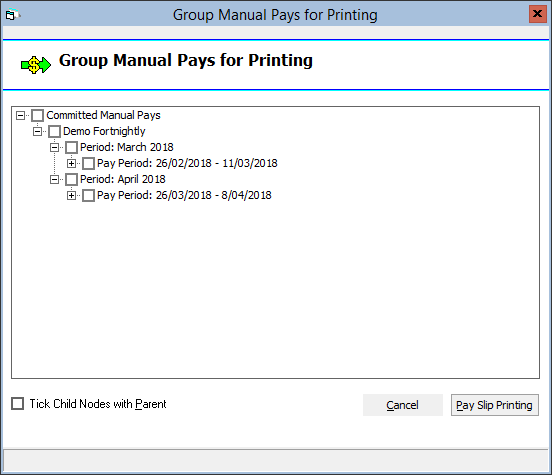
Figure #77: Pay Run Controller Group Manual Pays for Printing
Note: Flag “Tick Child Nodes with Parent” to select all entities under the Parent selection.